
Land Rover Defender: Seat Covers
SEAT COVERS - PART NUMBER: 90: VPLES0561 110: VPLES0560, VPLES0562, VPLES0563, VPLES0564
REMOVAL AND INSTALLATION
WARNING: Accessories which are not correctly installed can be dangerous. Read the instructions carefully prior to installation. Comply with instructions at all times. If in doubt, contact your nearest approved retailer.
CAUTION: Make sure isofix anchor points are accessible after seat cover installation.
NOTES:
- This procedure contains some variation in the illustrations depending on the vehicle specification, but the essential information is always correct.
- This procedure contains illustrations showing certain components removed to provide extra clarity.
- The following instructions are for both sides of the vehicle.
.png)
.png)
.png)
NOTES:
- The illustrated first row seat covers are applicable for vehicles with 110 wheelbase.
- Complete steps 1 to 4 to install the first row seat covers in vehicles with 110 wheelbase.
.png)
NOTES:
- The illustrated second row seat covers are applicable for vehicles with 90 wheelbase.
- Complete steps 5 to 13 to install the second row seat covers in vehicles with 90 wheelbase.
.png)
NOTES:
- The illustrated second row seat covers are applicable for vehicles with 110 wheelbase.
- VPLES0562 is for vehicles with 5 seats. VPLES0563 is for vehicles with 7 seats.
- Complete steps 14 to 28 to install the second row seat covers in vehicles with 110 wheelbase.
.png)
NOTES:
- The illustrated third row seat covers are applicable for vehicles with 110 wheelbase and 7 seats.
- Complete steps 29 to 32 to install the third row seat covers in vehicles with 110 wheelbase and 7 seats.
.png)
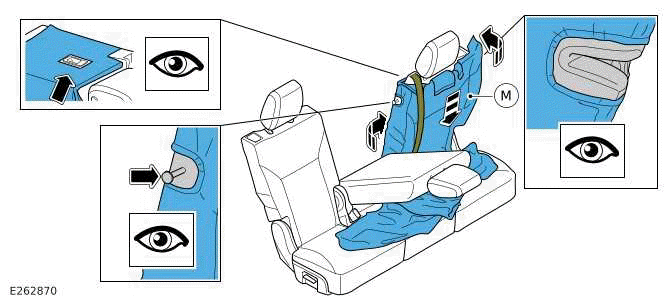
NOTE: Isofix capability for front passenger seat.
.png)
INSTALLATION
1.
WARNING: Make sure the seat cover label is on the outside of the front seat (closest to the vehicle door).
NOTE: Steps 1 to 4 show the install of first row seat covers.
.png)
2.
NOTE: Make sure the retainers are fully inserted between the seat base and the seat back.
.png)
3.
WARNING: Make sure all the seatbelt buckles and isofix anchor points are accessible.
NOTES: Make sure the side tabs are fully inserted between the seat base and the plastic trim.
Make sure the front elasticated hem is correctly positioned to make sure the cover is not loose.
.png)
4.
.png)
Install the head restraint cover (B) for larger head restraints. Install the head restraint cover (C) for smaller head restraints.
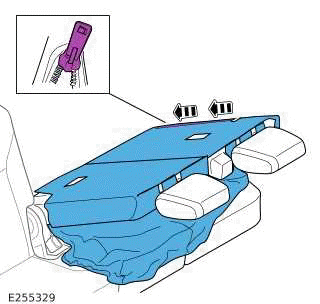
5.
NOTE: Steps 5 to 13 show the install of second row 90 seat covers.
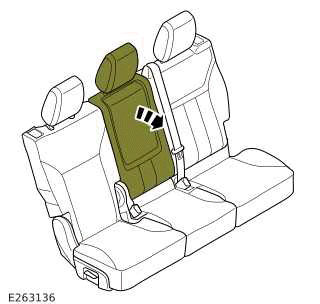
Partially lower the center seat back.
6.
CAUTION: Make sure the cover hole fits over the seat latch as shown.
.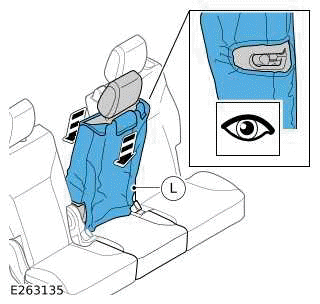
Lower the cover (L) over the central seat back.
7.
Tuck the tabs under the head restraint.
8.
Velcro the tabs to the rear of the seat cover.
9.
Partially lower the seat back and install the cover (M). Make sure the cover is installed under the seatbelt and velcro the tabs at the rear of the cover and under the head restraint.
10.
Zip up the side seat cover zip.
11.
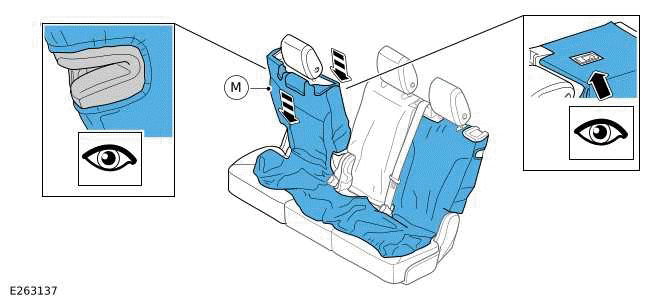
Partially lower the seat back and install the cover (M). Secure the cover with the velco at the side and under the head restraint.
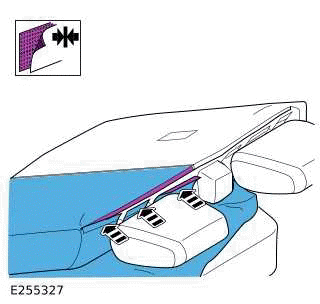
12.
WARNING: Make sure all the seatbelt buckles and isofix anchor points are accessible.
NOTES:
- Make sure the retainers are fully inserted between the seat base and seat back.
- Make sure the side retainers are fully inserted between the seat base and the plastic trim.
- Make sure the front elasticated hem is correctly positioned to make sure the cover is not loose.
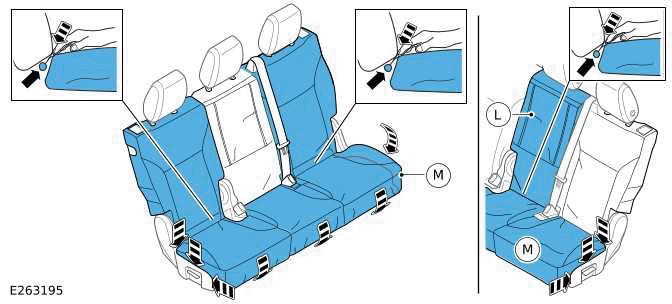
Install the lower part of seat cover (M) over the seat base.
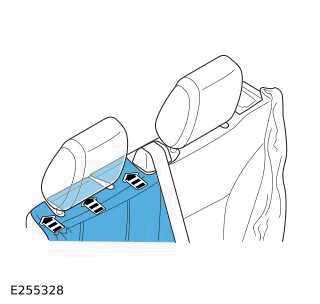
13.
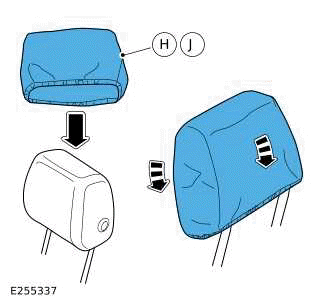
Install the 3 head restraint covers. The smaller cover (J) should fit over the center head restraint.
14.
NOTE: Steps 14 to 28 show the install of second row 110 seat covers.
.png)
Partially lower the center seat back and lower the armrest.
15.
.png)
Lower the cover (D) over the central seat back. When the cover is halfway down the seat, slide the arm rest into the arm rest cover section of the cover.
16.
CAUTION: Make sure the cover hole fits over the seat latch as shown.
.png)
Slide the central seat cover section over the seat back. Slide the integrated armrest cover over the armrest pulling the armrest strap through the hole in the cover.
17.
.png)
Tuck the tabs under the head restraints.
18.
.png)
Velcro the tabs to the rear of the seat cover.
19.
.png)
Partially lower the seat back.
20.
.png)
Slide the cover (E) over the seat back.
21.
WARNING: Make sure all the seatbelt buckles and isofix anchor points are accessible.
.png)
Install the lower section of the seat cover over the seat isofix flap.
22.
.png)
Zip up the side seat cover zip.
23.
WARNING: Make sure all the seatbelt buckles and isofix anchor points are accessible.
NOTES:
- Make sure the side retainers are fully inserted between the seat base and the plastic trim.
- Make sure the front elasticated hem is correctly positioned to make sure the cover is not loose.
.png)
Install the lower part of seat cover (D) over the seat base.
24.
.png)
Partially lower the seat back.
25.
.png)
Slide the cover (D) over the seat back.
26.
.png)
Tuck the tabs under the head restraints and velcro to the rear of the seat cover.
27.
WARNING: Make sure all the seatbelt buckles and isofix anchor points are accessible.
NOTES:
- Make sure the retainers are fully inserted between the seat base and seat back.
- Make sure the side tabs are fully inserted between the seat base and the plastic trim.
- Make sure the front elasticated hem is correctly positioned to make sure the cover is not loose.
.png)
Install seat base cover (G).
28.
.png)
Install the 3 head restraint covers. The smaller cover (J) should fit over the center head restraint.
29.
NOTE: Steps 29 to 32 show the install of third row seat covers.
.png)
Raise the third row seats and head restraints.
30.
WARNING: Make sure the seat cover label and elasticated strap are on the outside of the seat (closest to the vehicle side).
NOTE: Pull the rear seat strap through the seat cover hole.
.png)
Slide the third row cover over the seat. Before fully pulling down, insert the head restraint into the integrated headrest cover.
31.
WARNING: Make sure all the seatbelt buckles and isofix anchor points are accessible.
NOTES: Make sure the side tabs are fully inserted between the seat base and the plastic trim.
Make sure the front elasticated hem is correctly positioned to make sure the cover is not loose.
.png)
Install the seat base part of the cover and secure the head restraint cover with the 3 locators, two on the front and one on the rear.
32.
NOTE: Installing the strap from the rear of the seat may aid ease of installation.
.png)
Hook the elasticated strap and tab over the inside of the seat frame as shown. Detail image shown from rear of seat.
READ NEXT:
 Small Security Box
SMALL SECURITY BOX - PART NUMBER:
VPLVS0183
REMOVAL AND INSTALLATION
WARNING:
Accessories which are not correctly installed can be dangerous. Read the
instructions carefully prior to
installation. Co
Spill Resistant Water Bowl
SPILL RESISTANT WATER BOWL - PART NUMBER:
VPLCS0518
REMOVAL AND INSTALLATION
WARNING:
Accessories which are not properly installed can be dangerous. Read the
instructions carefully prior to
installat
Protective Seat Cover - Second Row
PROTECTIVE SEAT COVER - SECOND ROW - 110,
PART NUMBER: VPLVS0312
REMOVAL AND INSTALLATION
WARNING:
Accessories which are not correctly installed can be dangerous. Read the
instructions carefully prio
SEE MORE:
Rear View Mirrors - Operation
DOOR MIRROR ADJUSTMENT
Door mirror adjustment is enabled:
In Power Mode 6 (ignition ON).
For up to 5 minutes after Power Mode 4 (accessory (vehicle unlocked and
Smart Key present) ).
When the driver door or passenger door mirror switch is pressed, the LED in
the switch illuminates. The door m
Intermediate Pipe
REMOVAL AND INSTALLATION
PART(S)
REMOVAL
WARNING:
Observe due care when working near a hot exhaust system.
CAUTION:
Make sure the exhaust system is supported at all times.
NOTE:
This procedure contains illustrations showing certain components
removed to provide extra clarity.
This procedure c
