
Land Rover Defender: Fuel filler flap

Make sure the relevant safety warnings have been read and understood before refueling the vehicle.
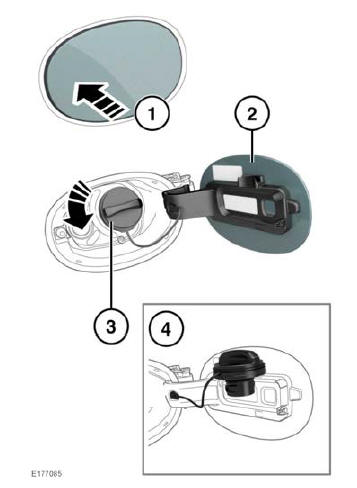
The fuel filler flap is located on the right side of the vehicle, at the rear. To operate, proceed as follows:
- Press and release the rear of the fuel filler flap to unlatch.
- Pull the flap open. The label on the inside of the flap indicates the correct fuel for the vehicle.
- Turn the filler cap counter-clockwise to undo.
- Use the retaining clip to keep the filler cap out of the way while fueling.
When replacing the filler cap, turn it clockwise until the ratchet clicks.
To close the filler flap, push the flap until it is securely latched.
FUEL FILLER FLAP LOCK
Note: Make sure that the vehicle is refueled shortly after the refueling button is pressed. Failure to do so may result in the fuel tank not being filled to the required level. If in doubt, check the fuel level gauge in the instrument panel before continuing the journey, to prevent running out of fuel.
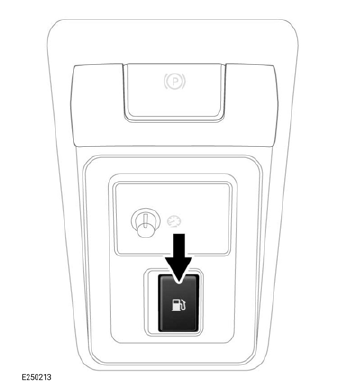
To enable refueling, carry out the following:
- Switch off the vehicle's ignition, apply the Electric Parking Brake (EPB), and make sure that the transmission is engaged in Park (P).
- Press the refueling button located in the lower switch panel at the driver's side of the dashboard. The isolation valve on the fuel tank opens to equalize the fuel tank pressure. The fuel filler flap unlocks. The instrument panel displays a message to confirm that the fuel filler flap is unlocking.
- The instrument panel displays a message to confirm that the fuel filler flap is unlocked and the vehicle can be refueled.
The isolation valve on the fuel tank remains open for approximately 10 minutes, at which point the valve shuts, preventing further refueling. If further refueling is required, repeat the above process from step 2 to open the isolation valve on the fuel tank.
Note: Make sure that the vehicle is stationary. The fuel filler flap does not unlock, and the isolation valve on the fuel tank does not open, if the vehicle is moving. The instrument panel displays a message to confirm that the vehicle's speed is too high.
Note: Make sure that the fuel filler flap is closed after refueling. The instrument panel displays a message to confirm that the fuel filler flap is not fully closed.
If a fault is detected on either the fuel filler flap system, or on the isolation valve system on the fuel tank, the instrument panel displays a message. In this event, consult a retailer/authorized repairer or roadside assistance.
READ NEXT:
 Fuel filler
Make sure the relevant safety warnings
have been read and understood before
refueling the vehicle.
Check the fuel pump information carefully,
to make sure that the correct fuel is used
to refuel the
Breaking-in
The vehicle is built using high-precision
manufacturing methods, but the moving
parts of the engine must still settle in
relative to each other. The breaking-in
process occurs mainly in the first 2 00
SEE MORE:
DAB3 Antenna Amplifier - 110
REMOVAL AND INSTALLATION
REMOVAL
NOTE:
This procedure contains some variation in the illustrations depending
on the vehicle specification, but the
essential information is always correct.
This procedure contains illustrations showing certain components
removed to provide extra clarity.
1. D
Electric Vehicle Safety Rules (Section 5-6)
SECTION 5 - WORKSHOP SAFETY AND PREPARATION
5.1 Segregation of work areas for work on HV systems and components
Where work activities are to be performed on EV Systems which have the
capability of being connected or coupled to
energy sources which could give rise to any risk and/or hazard, a design
