
Land Rover Defender: Lower Timing Chain - Ingenium I4 2.0l Petrol
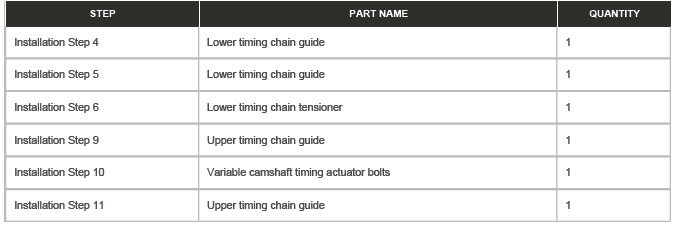
REMOVAL AND INSTALLATION
SPECIAL TOOL(S)
JLR-303-1630
Locking Tool, Crankshaft Pulley
JLR-303-1635
Camshaft Setting Tool
JLR-303-1636
Locking Tool, Variable Camshaft Timing Actuator / Unit
JLR-303-1656
Crank Rotation Tool
PART(S)

REMOVAL
CAUTION: Before disconnecting any components, make sure the area is clean and free from foreign material. When disconnected all openings must be sealed.
NOTE:
- This procedure contains some variation in the illustrations depending on the vehicle specification, but the essential information is always correct.
- This procedure contains illustrations showing certain components removed to provide extra clarity.
1. Raise and support the vehicle on a suitable 2 post lift.
2. Disconnect the startup battery ground cable.
3. Remove the hood.
4. Remove the upper timing cover.
5. Remove the lower timing cover.
6. Remove the charge air cooler.
7.
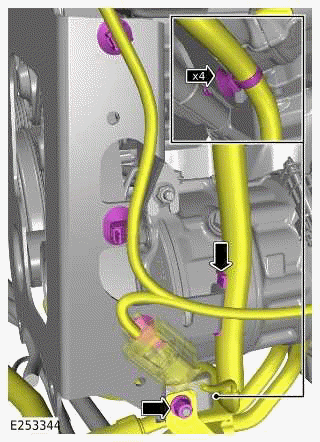
- Release the 4 clips.
- Reposition the wiring harness away form the charge air cooler bracket.
- Remove the nut.
- Repostion the 2 coolant pipes away from the charge air cooler bracket.
8.
- Remove the nut.
- Remove the 2 bolts.
- Remove the charge air cooler bracket.
9.
- Install the special tool.
Special Tool(s): JLR-303-1656
- Use the special tool to rotate the crankshaft clockwise until the timing marks align as illustrated.
10.
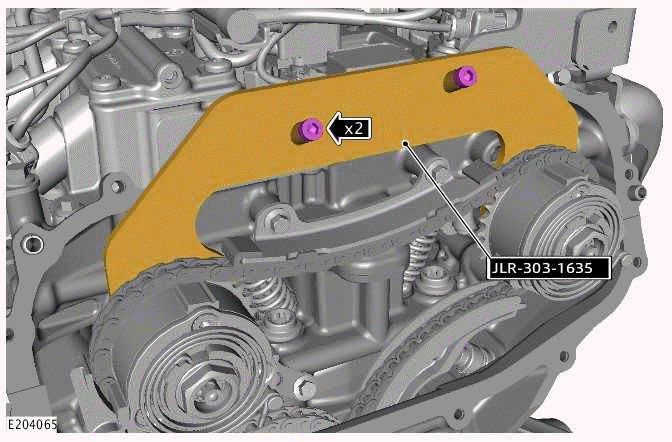
- Install the special tool.
Special Tool(s): JLR-303-1635
- Install and tighten the 2 bolts.
Torque: 13Nm
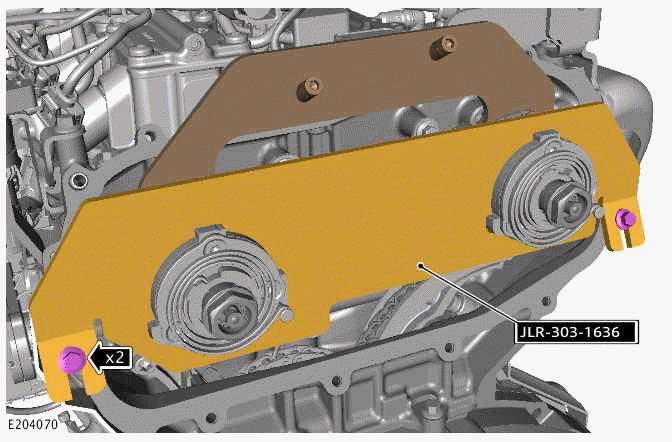
11.
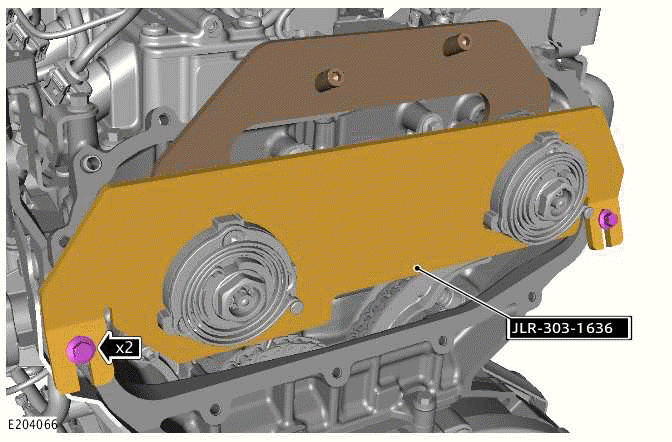
- Install the special tool.
Special Tool(s): JLR-303-1636
- Install and tighten the 2 bolts.
Torque: 13Nm
12.
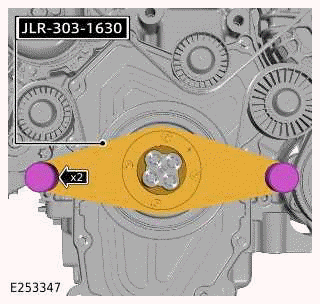
- Install the special tool.
Special Tool(s): JLR-303-1630
- Install and tighten the 2 bolts.
13.
Loosen, but do not fully remove the 2 bolts.
14.
Remove and discard the upper timing chain tensioner.
15.
- Remove the 2 bolts.
- Remove the special tool.
Special Tool(s): JLR-303-1636
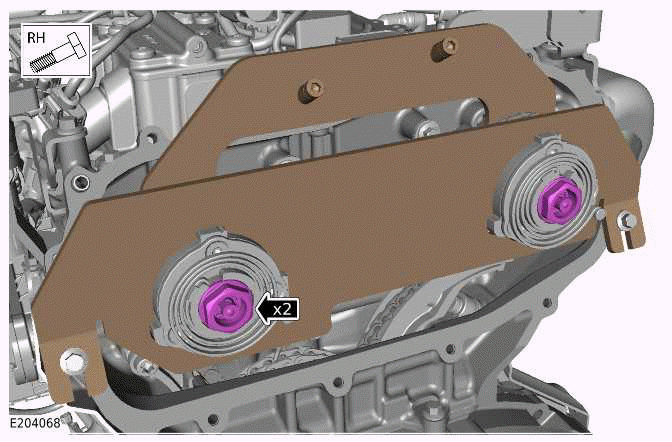
16.
CAUTION: Note the location of the Variable Camshaft Timing (VCT) units prior to removal. Each VCT unit is matched to a specific camshaft.
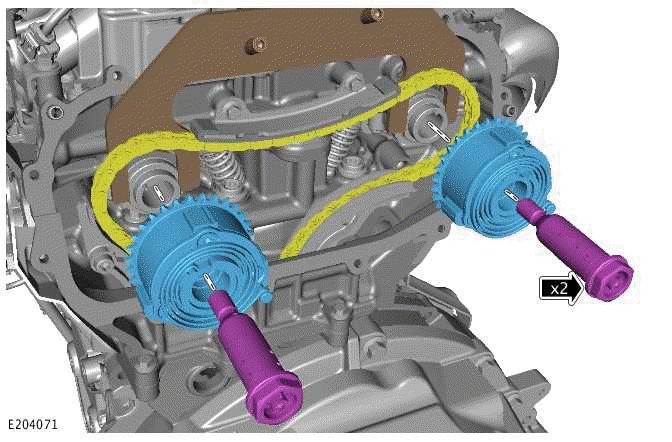
- Remove the 2 bolts.
- Remove and discard the 2 bolts.
- Remove the 2 VCT actuators.
17.
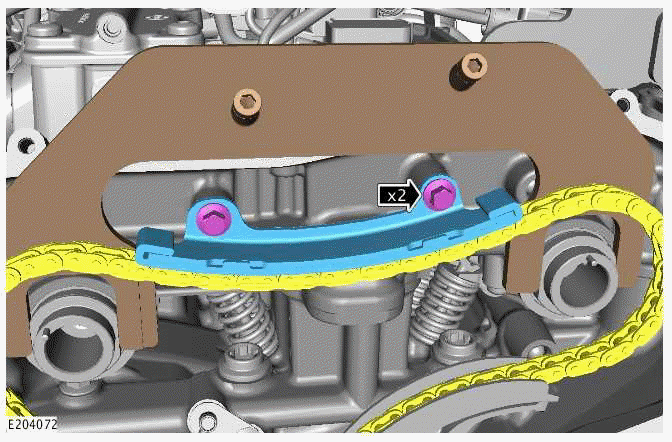
- Remove the 2 bolts.
- Remove and discard the upper timing chain guide.
18.
Remove the upper timing chain.
19.

- Remove the bolt.
- Remove and discard the upper timing chain guide.
20.
Remove and discard the upper timing chain guide.
21.
Remove the bolt.
22.

- Remove the 2 bolts.
- Remove the lower timing chain tensioner.
23.

- Remove the bolt.
- Remove the lower timing chain guide.
24.
- Remove the bolt.
- Remove the lower timing chain guide.
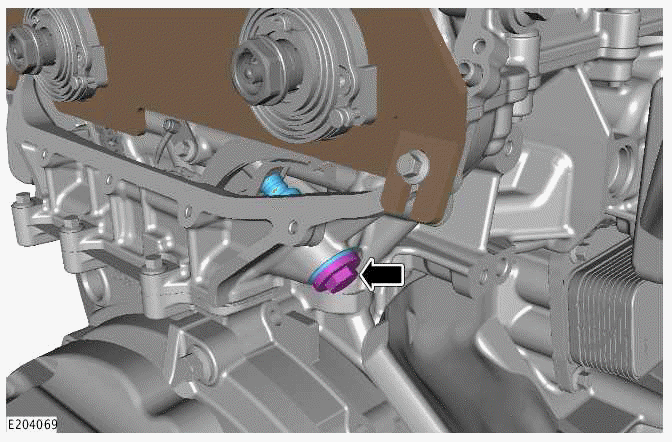
25.
- Remove the bolt.
- Remove the idler sprocket.
26.
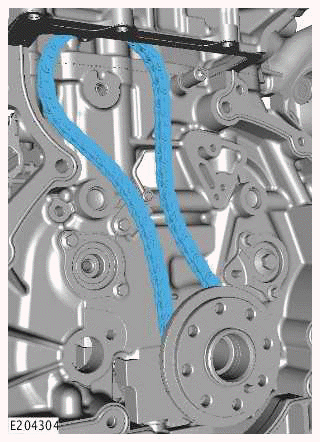
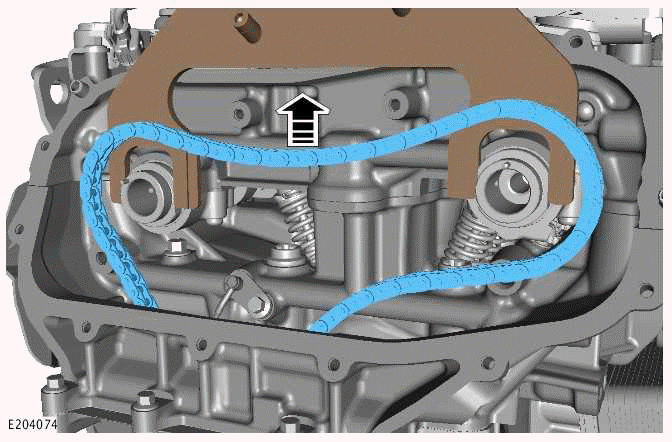
Remove the lower timing chain.
INSTALLATION
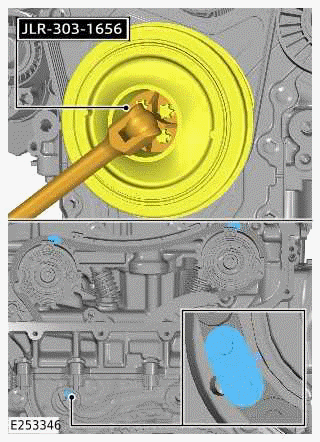
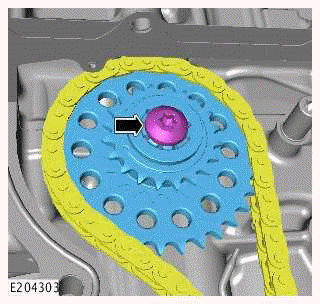
1.
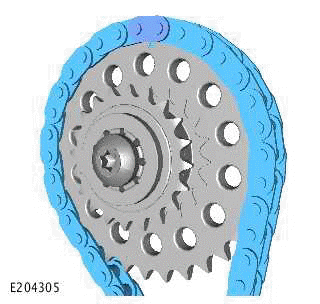
- Install the timing chain to the idler sprocket.
- Make sure the timing mark is aligned with the center of the colored link.
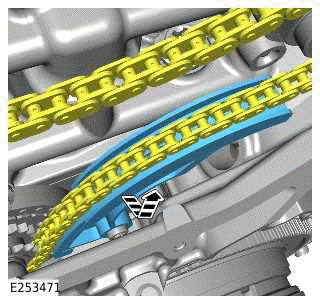
2.
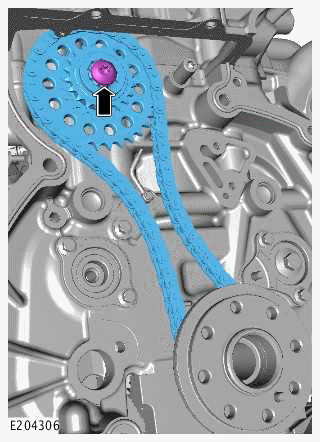
- Install the idler sprocket and timing chain assembly.
- Make sure the timing mark is aligned with the center of the colored link.
- Install and tighten the bolt.
3.
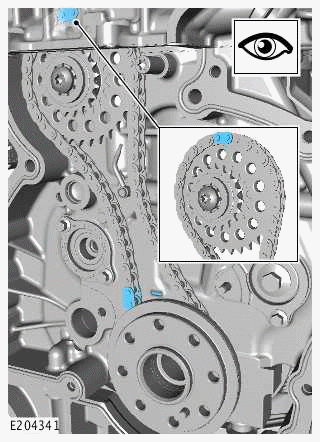
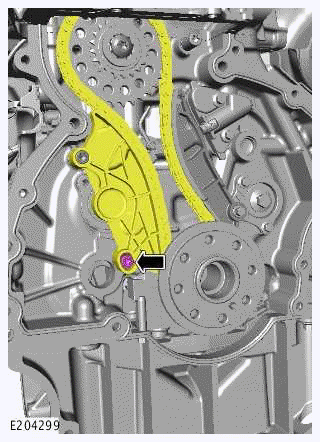
Make sure that the timing marks align as illustrated.
4.
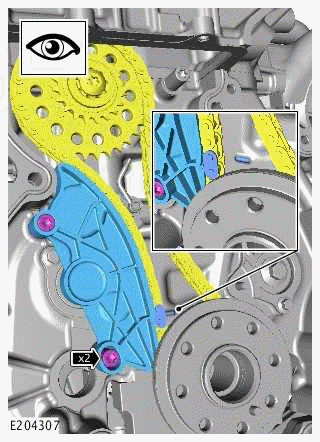
- Install a new lower timing chain guide.
Renew Part: Lower timing chain guide Quantity: 1.
- Make sure that the timing marks align as illustrated.
- Install and tighten the 2 bolts.
Torque: 25Nm
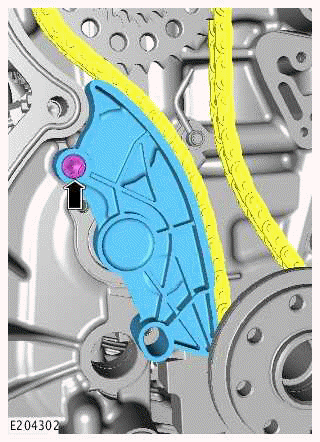
5.
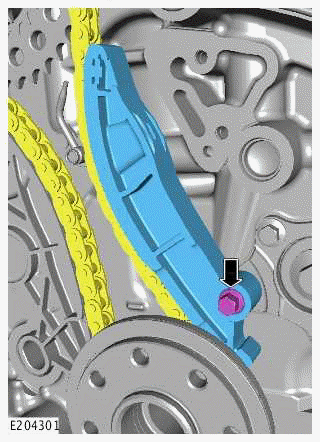
- Install a new lower timing chain guide.
Renew Part: Lower timing chain guide Quantity: 1.
- Install and tighten the bolt.
Torque: 11Nm
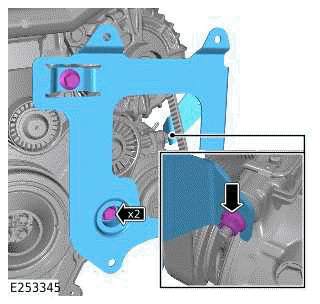
6.
.png)
- Install a new lower timing chain tensioner.
Renew Part: Lower timing chain tensioner Quantity: 1.
- Install and tighten the 2 bolts.
Torque: 11Nm
7.
.png)
Remove and discard the clip.
8.
NOTE: Maintain tension on the chain to prevent the coloured link from disengaging with its sprocket position.
.png)
- Install the upper timing chain.
- Make sure the colored link is aligned with the timing mark on the idler sprocket.
9.
NOTE: Maintain tension on the chain to prevent the coloured link from disengaging with its sprocket position.
.png)
- Install a new upper timing chain guide.
Renew Part: Upper timing chain guide Quantity: 1.
- Install and tighten the bolt.
Torque: 25Nm
10.
CAUTION: Make sure that the upper timing chain does not come off the idler sprocket and stays in the correct position.
.png)
- Install the intake camshaft VCT actuator. Make sure that the correct VCT actuator is installed as noted in the removal steps.
- Make sure the dowel is correctly installed to the VCT actuator as illustrated.
- Install and tighten the new bolt.
Renew Part: Variable camshaft timing actuator bolts Quantity: 1.
Torque
- Stage1: 10Nm
- Stage2: Loosen 90º
- Make sure the timing mark is aligned with the center of the colored link.
11.
NOTE: Maintain tension on the chain to prevent the coloured link from disengaging with its sprocket position.
.png)
Install a new upper timing chain guide.
Renew Part: Upper timing chain guide Quantity: 1.
12.
CAUTION: Make sure that the upper timing chain does not come off the idler sprocket and stays in the correct position.
.png)
- Install the exhaust camshaft VCT actuator. Make sure that the correct VCT actuator is installed as noted in the removal steps.
- Make sure the dowel is correctly installed to the VCT actuator as illustrated.
- Install and tighten the new bolt.
Renew Part: Variable camshaft timing actuator bolts Quantity: 1.
Torque
- Stage1: 10Nm
- Stage2: Loosen 90º
- Make sure the groove on the exhaust VCT actuator is aligned with the center of the colored link.
13.
CAUTION: Make sure that the upper timing chain does not come off the idler sprocket and stays in the correct position.
.png)
- Install a new upper timing chain guide.
Renew Part: Upper timing chain guide Quantity: 1.
- Install and tighten the 2 bolts.
Torque: 11Nm
14.
.png)
- Install the special tool.
Special Tool(s): JLR-303-1636
- Install and tighten the 2 bolts.
Torque: 13Nm
15.
.png)
Install and tighten a new upper timing chain tensioner.
Renew Part: Upper timing chain tensioner Quantity: 1.
Torque: 55Nm
16.
CAUTION: Do not directly touch the timing chain tensioner at this stage.
.png)
- Push and release the upper timing chain guide to release the upper timing chain tensioner.
- Make sure the upper timing chain is correctly released.
17.
.png)
Tighten the 2 bolts.
Torque
- Stage1: 25Nm
- Stage2: 60º
18.
.png)
- Remove the 2 bolts.
- Remove the special tool.
Special Tool(s): JLR-303-1636
19.
.png)
- Remove the 2 bolts.
- Remove the special tool.
Special Tool(s): JLR-303-1635
20. Install the lower timing cover.
21. Install the upper timing cover.
22.
.png)
- Remove the 2 bolts.
- Remove the special tool.
Special Tool(s): JLR-303-1630
23.
.png)
- Install the charge air cooler bracket.
- Install and tighten the 2 bolts.
Torque: 47Nm
- Install and tighten the nut.
Torque: 9Nm
24.
.png)
- Reposition the 2 coolant pipes in the correct location.
- Install and tighten the nut.
Torque: 9Nm
- Install the 4 clips.
25. Install the charge air cooler.
26. Install the hood.
27. Connect the startup battery ground cable.
READ NEXT:
 Oil Filter Housing
REMOVAL AND INSTALLATION
PART(S)
REMOVAL
WARNING:
The spilling of hot engine oil is unavoidable during this procedure, care must
be taken to prevent scalding.
NOTE:
This procedure contains some va
Oil Pump Drive Chain - Ingenium I4 2.0l Petrol
REMOVAL AND INSTALLATION
SPECIAL TOOL(S)
205-053
Retainer, Differential Pinion Flange
PART(S)
REMOVAL
NOTES:
This procedure contains some variation in the illustrations depending
on the vehicle
Continuous Variable Valve Lift
REMOVAL AND INSTALLATION
SPECIAL TOOL(S)
JLR-303-1639
CVVL brake unit reset tool
JLR-303-1647
CVVL Locating Pins
GENERAL EQUIPMENT
PART(S)
REMOVAL
CAUTION:
Before disconnecting any components, mak
SEE MORE:
Auto stop/start
AUTO STOP/START
Always disable the auto stop/start system
before wading. Failure to do so could
cause damage to the vehicle.
The auto stop/start system is designed to
improve fuel efficiency. The system
automatically activates when the vehicle's
ignition is switched on. Unless it is
required to sup
Media safety
Make sure the following warnings and
cautions have been read and fully
understood before using any of the media
controls or features. Failure to use the
media controls or features safely could
result in an accident, leading to serious
injury, death or damage to the vehicle and
its components.
Do no
