
Land Rover Defender: Loadspace Partitions
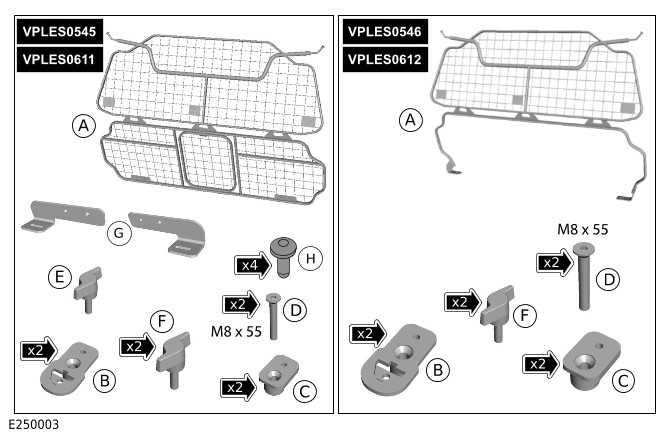
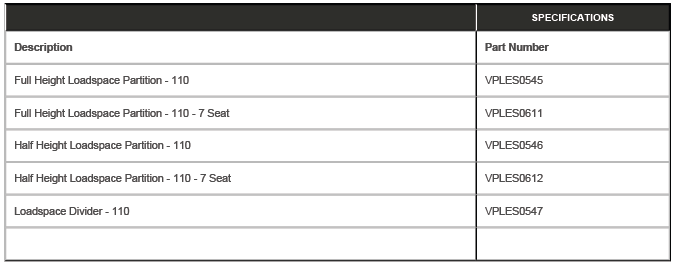
LOADSPACE PARTITIONS - PART NUMBER: 90: VPLES0544, 110: VPLES0545, VPLES0546, VPLES0547, VPLES0611, VPLES0612
REMOVAL AND INSTALLATION
WARNING: Accessories which are not correctly installed can be dangerous. Read the instructions carefully prior to installation. Comply with instructions at all times. If in doubt, contact your nearest approved retailer.
CAUTIONS:
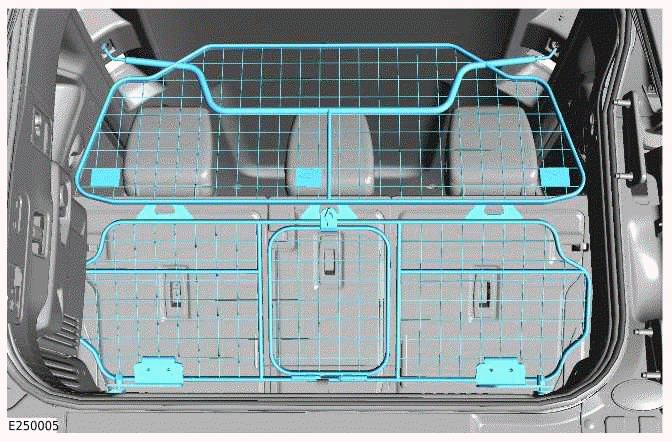
- There are 2 variants of the full height loadspace partition. For vehicles with 5 seats order VPLES0545. For vehicles with 7 seats order VPLES0611.
- There are 2 variants of the half height loadspace partition. For
vehicles with 5 seats order VPLES0546.
For vehicles with 7 seats order VPLES0612.
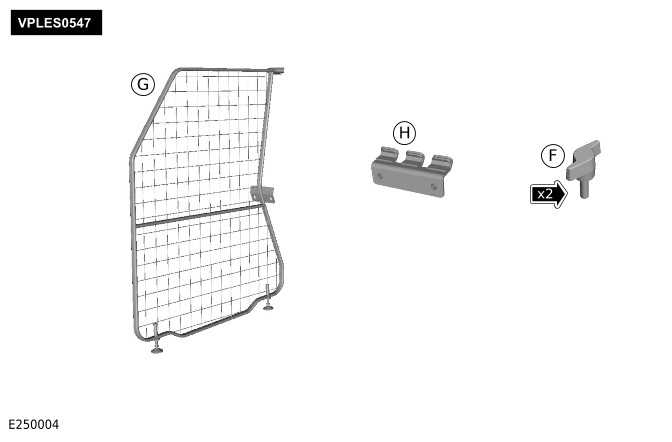
- A full height loadspace partition (VPLES0545) or (VPLES0611) or half height loadspace partition (VPLES0546) or (VPLES0612) must be installed first before the loadspace divider (VPLES0547) can be installed.
- If installing the full height loadspace partition (VPLES0611) or half height loadspace partition (VPLES0612) in vehicles with 7 seats then the third row seats must be in the stowed position.
- If installing the loadspace divider (VPLES0547) in vehicles with 7 seats then the third row seats must be in the stowed position.
- Make sure to protect the vehicle paintwork and trim.
NOTES:
- Instructions show the installation of the full height loadspace partition and the loadspace divider. The install process is the same for the half height loadspace partition.
- The full height or half height loadspace partition can be installed at the same time as the loadspace rubber mat. The loadspace rubber mat must be installed first and then install the loadspace partition afterwards.
- The loadspace divider cannot be installed onto the loadspace rubber mat.
- This procedure contains some variation in the illustrations depending on the vehicle specification, but the essential information is always correct.
- This procedure contains illustrations showing certain components removed to provide extra clarity.
REMOVAL
NOTE: If the full height, or half height, loadspace partition is already installed in the vehicle, then proceed to install step 17 for installation of the loadspace divider only.
1.

Open the tailgate.
2.
NOTES:
- This step only applies to vehicles equipped with fixed D-loop anchor points.
- Repeat this step for the other side of the vehicle.
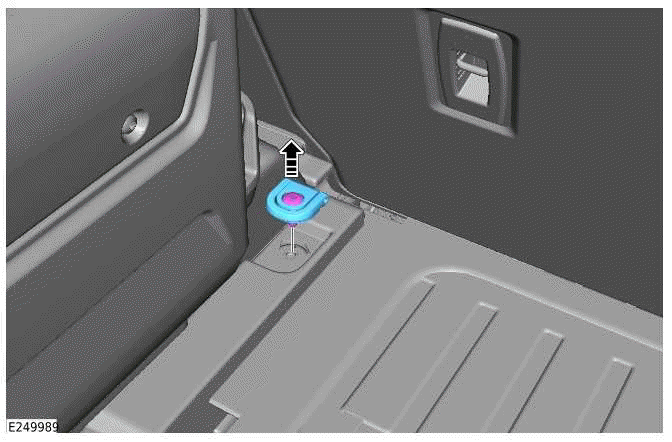
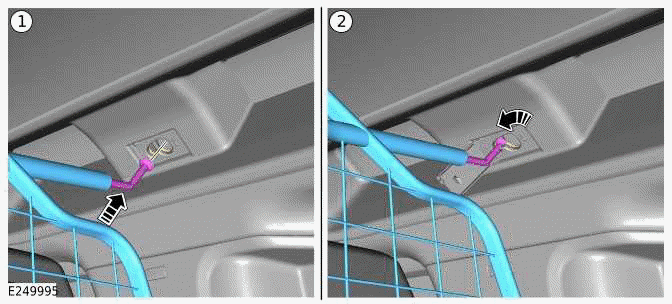
Remove the D-loop anchor point.
3.
NOTES:
- This step only applies to vehicles equipped with fixed D-loop anchor points.
- Repeat this step for the other side of the vehicle.

Install the bracket (B) using the retaining bolt (D).
- Torque: 24 Nm
4.
NOTES:
- This step only applies to vehicles equipped with sliding D-loop anchor points.
- Repeat this step for the other side of the vehicle.
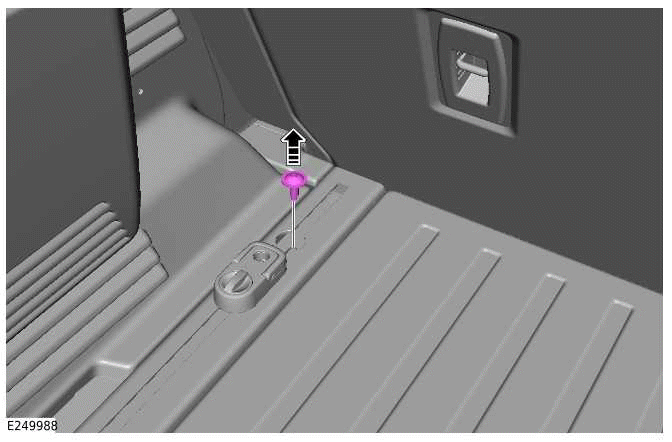
Remove and discard the loadspace rail retaining bolt.
5.
NOTES:
- This step only applies to vehicles equipped with sliding D-loop anchor points.
- Repeat this step for the other side of the vehicle.
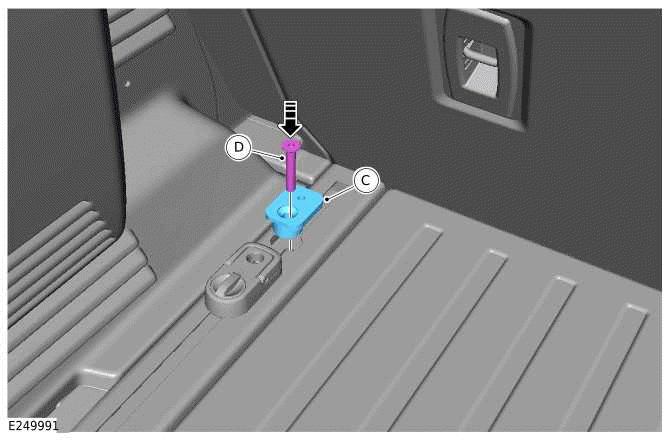
Install the bracket (C) using the retaining bolt (D).
- Torque: 24 Nm
6.
NOTE: Not all seat variants will be able to move forward as illustrated.
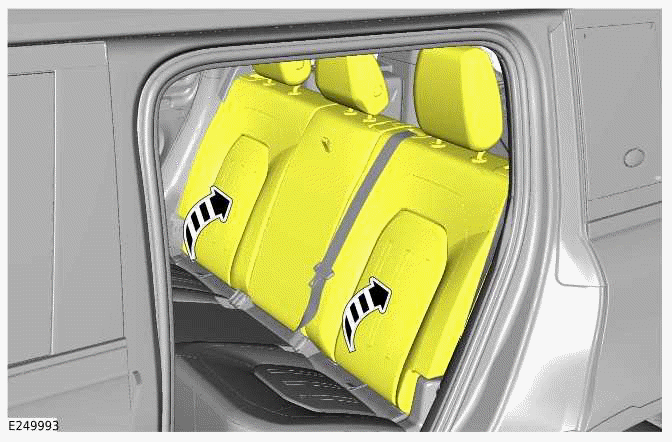
Adjust the second row seats to the lowest and most forward position.
INSTALLATION
1.
WARNING: Make sure to wear suitable personal protective equipment.
CAUTION: The loadspace rubber mat must only be cut, as illustrated, if the loadspace rubber mat will be used with the full height or half height loadspace partition.
NOTE: Only complete step if the loadspace rubber mat will be installed with the full height or half height loadspace partition.
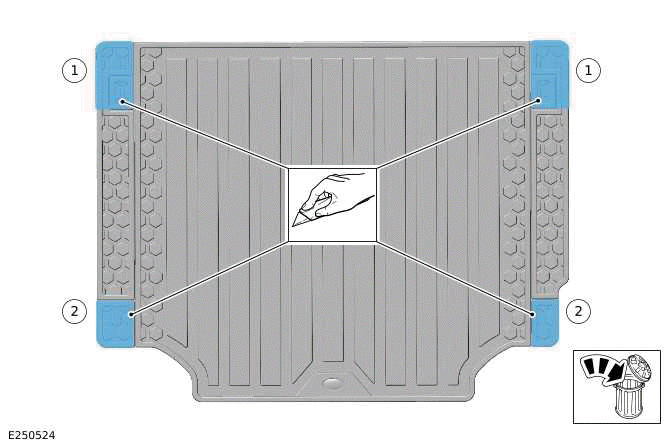
If the loadspace rubber mat will be installed with the full height or half height loadspace partition then trim the cutouts from the loadspace rubber mat as illustrated.
- Trim the 2 cutouts.
- Trim the 2 cutouts if access to the D-loop anchor points nearest the tailgate is also required.
2.
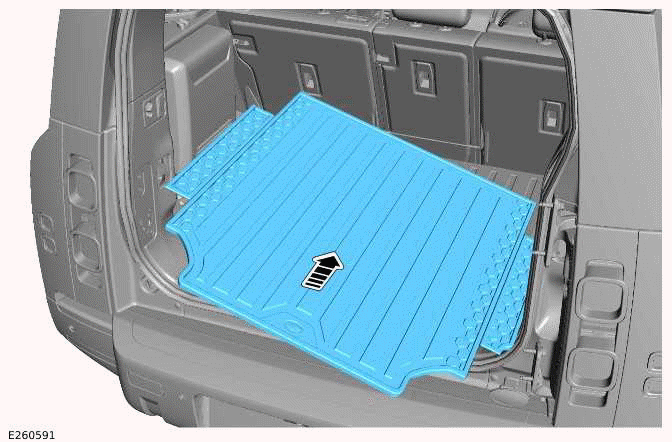
Install the loadspace rubber mat into the vehicle loadspace.
3.
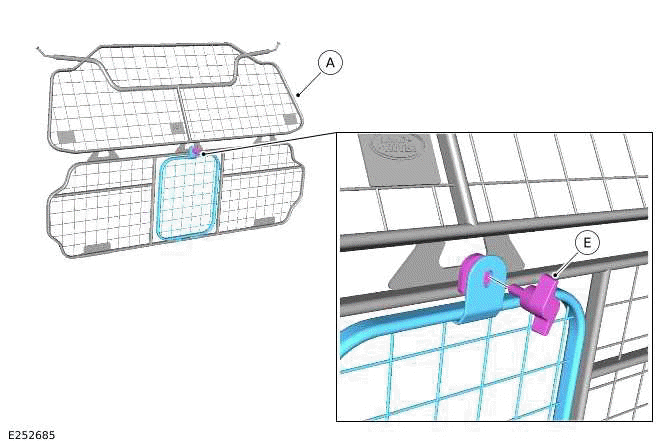
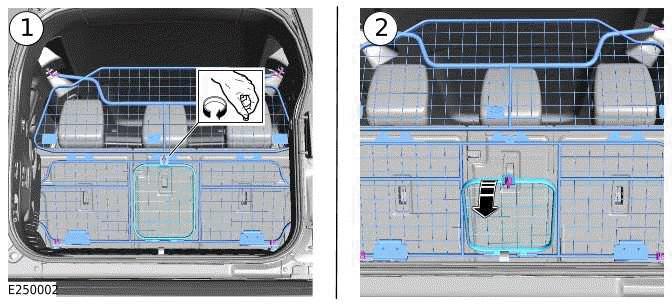
Install the thumbscrew (E) to the loadspace partition access door.
4.
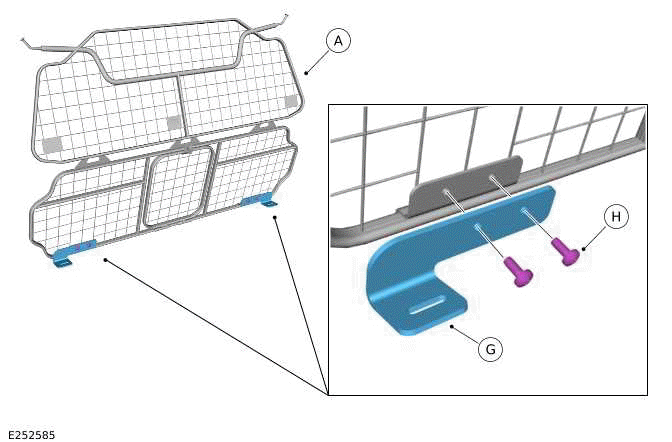
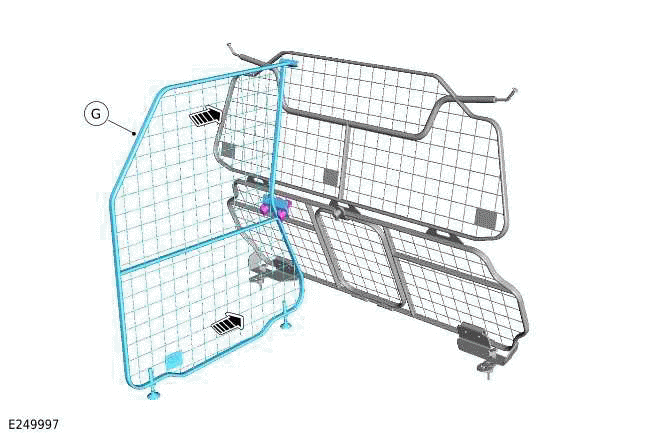
Install the 2 brackets (G) to the main body of the loadspace partition, using the fixings (H).
- Torque: 15 Nm
5.
CAUTION: Make sure the mounting slot covers are not damaged when installing the loadspace partitions through the second row door.
Use a suitable trim tool to open the loadspace partition mounting slot cover on both sides of the vehicle.
- Insert the trim tool into the cutout.
- Open the loadspace partition mounting slot cover.
6.
NOTE: The route for installing the loadspace partition into the vehicle depends if the second row seats can move forward.
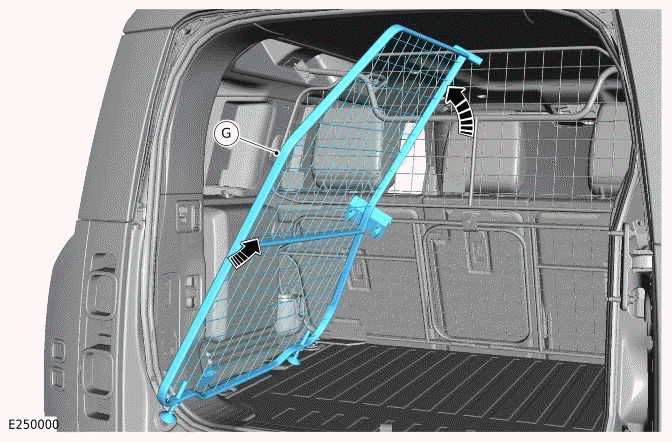
Install the loadspace partition (A) into the vehicle.
- If the vehicle has second row seats that will slide forward, then complete steps 7 and 8.
- If the vehicle has second row seats that do not slide forward, then complete steps 9 and 10.
7.
CAUTION: Make sure to protect the vehicle paintwork and trim.

Carefully install the loadspace partition (A) into the vehicle as illustrated.
- Protect the loadspace partition pins to make sure they do not damage the vehicle paintwork and trim.
8.
NOTE: The loadspace partition pins may require side to side adjustment to locate correctly.
Install the loadspace partition pins to the loadspace partition mounting slots on both sides of the vehicle.
- Carefully raise the 2 loadspace partition pins into the larger circular slots.
- Move the loadspace partition pins over the tab that is part of the loadspace partition mounting slot bracket. Move the loadspace partition pins into the smaller circular slots.
- Continue at step 11.
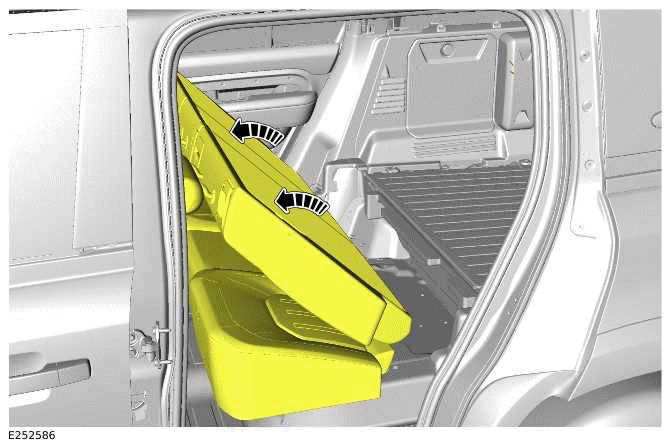
9.
CAUTIONS:
- Make sure to protect the vehicle paintwork and trim.
- Make sure to avoid damage to the trim around the alpine glass.
Carefully install the loadspace partition (A) into the vehicle loadspace through the tailgate.
- Protect the loadspace partition pins to make sure they do not damage the vehicle paintwork and trim.
10.
CAUTIONS:
- Make sure to protect the vehicle paintwork and trim.
- Make sure to avoid damage to the trim around the alpine glass.
NOTE: Only complete this step if the loadspace partition has been installed through the vehicle tailgate.

Install the loadspace partition to one side of the vehicle only. Swing the loadspace partition into the correct position and then install the loadspace partition to the other side of the vehicle.
- Carefully raise the loadspace partition pin into the larger circular slot on one side of the vehicle.
- Move the loadspace partition pin over the tab that is part of the
loadspace partition mounting slot bracket.
Move the loadspace partition pin into the smaller circular slot.
- Swing the loadspace partition into the correct position.
- Install the loadspace partition pin into the mounting slot on the other side of the vehicle.
11.
NOTE: Repeat this step for the other side of the vehicle.

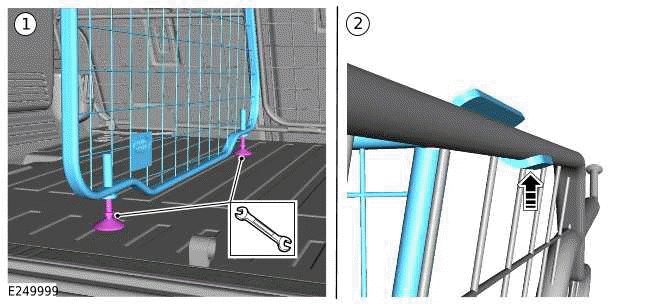
Secure the base of the loadspace partition to the floor bracket (B) or (C) using the thumbscrew (F).
- Tightening the thumbscrew (F) puts the loadspace partition under tension and closes the gap between theloadspace rail and the floor bracket. Make sure there is no gap between the loadspace rail and the floorbracket.
12.
Return the second row seats to the upright position.
13.
Make sure that the loadspace partition is correctly installed.
14.
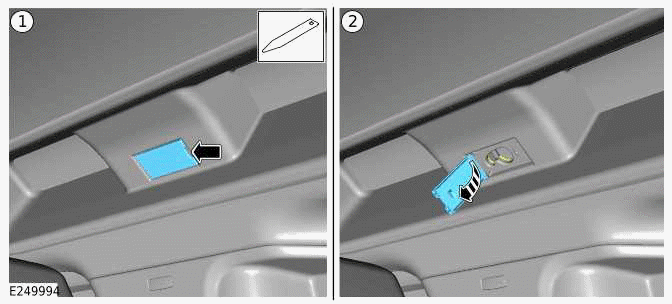
Opening the full height loadspace partition access door.
- Release the thumbscrew.
- Lower the access door.
15. After covering the indicated distances, check that all the thumbscrews remain appropriately tightened.
- 500 km or 300 miles.
- 1000 km or 600 miles.
16.
CAUTION: Make sure to protect the vehicle paintwork and trim.
NOTE: The loadspace partition pins may require side to side adjustment to allow removal.
To remove the loadspace partition follow the steps.
- Release the thumbscrews (F) that secure the base of the loadspace partition to the floor brackets (B) or (C).
- Move the loadspace partition pins out of the loadspace partition mounting slots on both sides of the vehicle.
- Protect the loadspace partition pins to make sure they do not damage the vehicle paintwork and trim.
- Remove the loadspace partition from the vehicle through the second row door or the tailgate as appropriate.
- Close the loadspace partition mounting slot cover on both sides of the vehicle.
17. Steps 18 to 27 show the install of the loadspace divider (VPLES0547).
18.

Prepare the loadspace divider (VPLES0547). Install the center clamp bracket (H) to the loadspace divider (G) using the 2 thumbscrews (F).
- Make sure the loadspace divider center clamp bracket thumbscrews are not tightened.
- Make sure the feet are screwed in.
19.
CAUTION: Make sure to protect the vehicle paintwork and trim.
Carefully place the loadspace divider (G) into the loadspace.
20.
Position the loadspace divider (G) against the loadspace partition as illustrated.
21.
CAUTION: Do not fasten the thumbscrews on the center clamp at this stage.

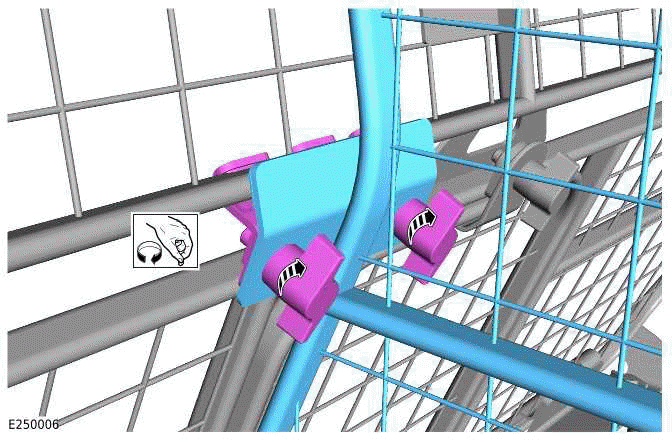
Make sure the top bracket and the central clamp are positioned correctly in relation to the crossbars on the loadspace partition.
- Position the top bracket as illustrated.
- Install the center clamp to the loadspace partition as illustrated but do not tighten at this stage.
22.
CAUTION: Excessive force may damage the loadspace floor.
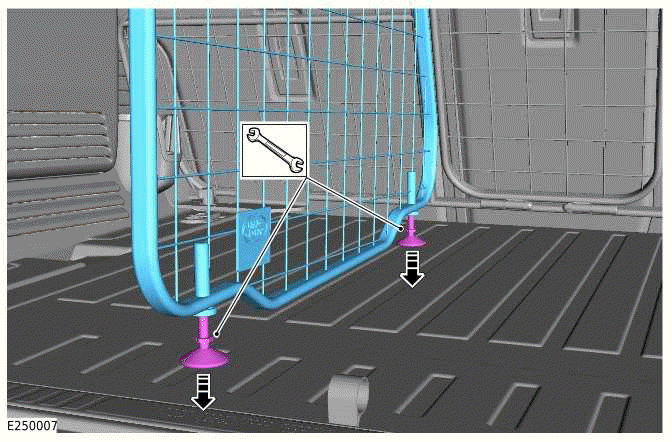
Use a spanner to adjust the feet so the loadspace divider is supported.
- Extend the feet located at the base of the loadspace divider.
- Make sure that the top bracket is correctly engaged.
23.
Tighten the 2 thumbscrews on the center clamp to secure the loadspace divider to the loadspace partition.
24.
CAUTION: Excessive force may damage the loadspace floor.
Excessive movement of the loadspace divider can be removed by adjusting the feet as required using a spanner.
25. Close the tailgate.
26. After covering the indicated distances, check that all the thumbscrews remain appropriately tightened.
- 500 km or 300 miles.
- 1000 km or 600 miles.
27. To remove the loadspace divider follow the steps.
- Loosen the 2 thumbscrews on the loadspace divider center clamp.
- Use a spanner to adjust the loadspace divider feet so the top bracket on the loadspace divider is released from the loadspace partition.
- Release the loadspace divider center clamp and top bracket from the loadspace partition. Remove the loadspace divider from the vehicle.
READ NEXT:
 Loadspace Retention Kit - 110
LOADSPACE RETENTION KIT - 110, PART NUMBER:
VPLGS0171
REMOVAL AND INSTALLATION
WARNING:
Accessories which are not correctly installed can be dangerous. Read the
instructions carefully prior to
instal
Floor Mats
FLOOR MATS - PART NUMBER: 90: VPLES0548,
VPLES0549, VPLES0554, VPLES0555 110:
VPLES0550, VPLES0552, VPLES0551, VPLES0553,
VPLES0556, VPLES0557, VPLES0558, VPLES0559
REMOVAL AND INSTALLATION
WARNING:
A
Seat Backpack
SEAT BACKPACK - PART NUMBER: VPLES0573
REMOVAL AND INSTALLATION
WARNING:
Accessories which are not correctly installed can be dangerous. Read the
instructions carefully prior to
installation. Comply
SEE MORE:
Seats - [+] 5 Seat Configuration - Description
FRONT ROW SEAT - MANUAL EASY ENTRY ADJUSTMENT (VEHICLE WITH 3 DOORS ONLY)
NOTE:
Right installation is shown, left installation is similar.
Head restraint - Manual
Seat backrest recline motor
Seat forward/rearward lever
Front seat switchpack
Seat height adjustment lever
Easy entry switch
The
Hill Descent Control (HDC)
HILL DESCENT CONTROL (HDC)
Hill Descent Control (HDC) restricts the
vehicle's speed to a set limit when
traveling downhill.
Do not attempt a steep descent if HDC
is inoperative or warning messages are
displayed. Doing so could lead to loss
of vehicle control, resulting in vehicle
damage, personal i
