
Land Rover Defender: Loadspace Partition Net
LOADSPACE PARTITION NET - PART NUMBER: LR133503
REMOVAL AND INSTALLATION
WARNING: Accessories which are not correctly installed can be dangerous. Read the instructions carefully prior to installation. Comply with instructions at all times. If in doubt, contact your nearest approved retailer.
CAUTION: Make sure to protect the vehicle paintwork and trim.
NOTES:
- This procedure contains some variation in the illustrations depending on the vehicle specification, but the essential information is always correct.
- This procedure contains illustrations showing certain components removed to provide extra clarity.
.png)
INSTALLATION
1.
.png)
Open the tailgate.
2.
.png)
Use a suitable trim tool to open the loadspace partition mounting slot cover on both sides of the vehicle.
- Insert the trim tool into the cutout.
- Open the loadspace partition mounting slot cover.
3.
.png)
Check the operation of the spring loaded fastener on both sides of the loadspace partition net.
4.
NOTE: Make sure the logo on the loadspace partition net will be visible when standing at the rear of the vehicle and looking into the loadspace.
.png)
Install the loadspace partition net (A) into the loadspace as illustrated.
5.
.png)
Install the loadspace partition net spring loaded fasteners into the loadspace partition mounting slots on both sides of the vehicle.
- Move the loadspace partition net so the spring loaded fastener is aligned with the larger circular slot as illustrated.
- Carefully raise the loadspace partition net spring loaded fastener into the larger circular slot. The top part of the spring loaded fastener will engage into the smaller circular slot.
6.
NOTES:
- The loadspace partition net can be installed when the loadspace is configured with the sliding Dloop anchor points or the fixed D-loop anchor points.
- If the vehicle has sliding D-loop anchor points then move 1 anchor point on each side of the vehicle to the rail position nearest to the second row seats and then lock the 2 anchor points.
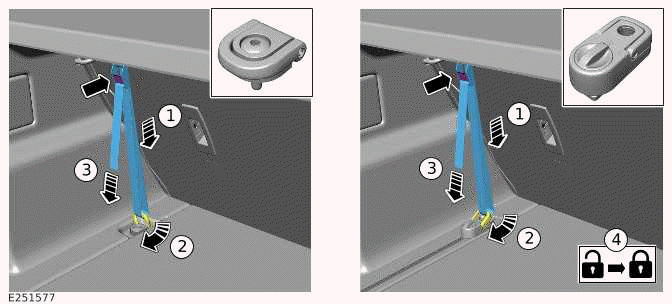
Secure the loadspace partition net straps to the fixed or sliding D-loop anchor points as illustrated on both sides of the vehicle.
7. Roll up the spare length of the loadspace partition net strap and then insert the rolled strap into the buckle. This will keep the vehicle loadspace tidy.
8.
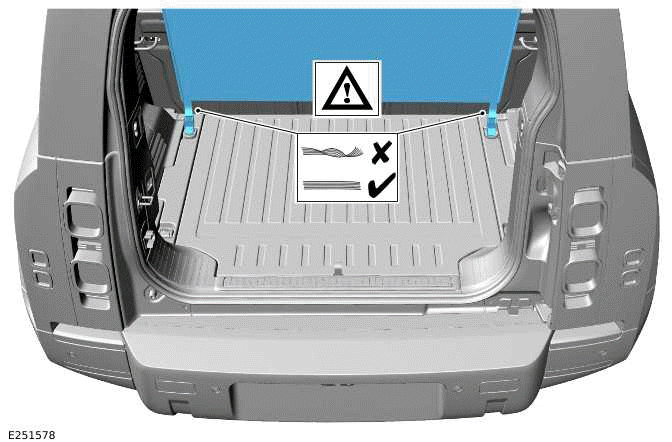
Make sure the loadspace partition net and all fasteners have a safe and correct installation. The straps should be tight and straight.
9. Close the tailgate.
REMOVAL
1. Release the loadspace partition net straps from the fixed or sliding D-loop anchor points on both sides of the vehicle.
2. Remove the loadspace partition net spring loaded fasteners from the loadspace partition mounting slots on both sides of the vehicle.
3. Carefully remove the loadspace partition net (A) from the loadspace.
4. When the loadspace partition net is not being used it should be stored in the supplied bag.
READ NEXT:
 Loadspace Partitions
LOADSPACE PARTITIONS - PART NUMBER: 90:
VPLES0544, 110: VPLES0545, VPLES0546,
VPLES0547, VPLES0611, VPLES0612
REMOVAL AND INSTALLATION
WARNING:
Accessories which are not correctly installed can be dan
Loadspace Retention Kit - 110
LOADSPACE RETENTION KIT - 110, PART NUMBER:
VPLGS0171
REMOVAL AND INSTALLATION
WARNING:
Accessories which are not correctly installed can be dangerous. Read the
instructions carefully prior to
instal
Floor Mats
FLOOR MATS - PART NUMBER: 90: VPLES0548,
VPLES0549, VPLES0554, VPLES0555 110:
VPLES0550, VPLES0552, VPLES0551, VPLES0553,
VPLES0556, VPLES0557, VPLES0558, VPLES0559
REMOVAL AND INSTALLATION
WARNING:
A
SEE MORE:
DAB3 Antenna Amplifier - 90
REMOVAL AND INSTALLATION
REMOVAL
NOTE:
This procedure contains some variation in the illustrations depending
on the vehicle specification, but the
essential information is always correct.
This procedure contains illustrations showing certain components
removed to provide extra clarity.
This
Near Field Sensing Module
REMOVAL AND INSTALLATION
GENERAL EQUIPMENT
REMOVAL
NOTES:
This procedure contains some variation in the illustrations depending
on the vehicle specification, but the
essential information is always correct.
This procedure contains illustrations showing certain components
removed to provide
