
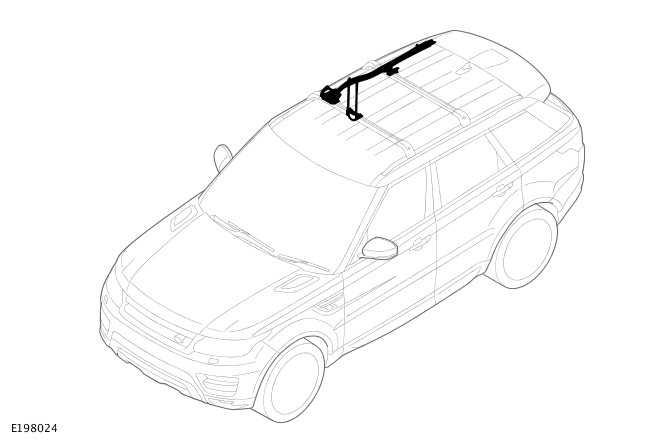
Land Rover Defender: Fork Mounted Cycle Carrier
FORK MOUNTED CYCLE CARRIER - PART NUMBER: VPLWR0101
REMOVAL AND INSTALLATION
WARNING: Accessories which are not properly fitted can be dangerous. Read the instructions carefully prior to fitting.
Whilst fitting, comply with instructions at all times. If in doubt, contact your nearest approved retailer.
NOTE: Right side illustrations shown, left side is similar.
INSTALLATION
1.
.png)
Determine if the cycle carrier will be mounted on the left side or right side of the vehicle.
- If the cycle carrier will be mounted on the left side of the vehicle, start at step 2 then continue to end.
- If the cycle carrier will be mounted on the right side of the vehicle, start at step 5 then continue to end.
2.
NOTE: Left side mounting.
.png)
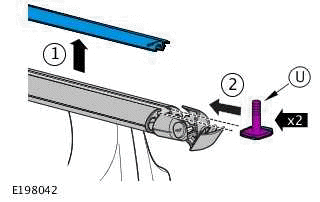
- Remove the three parts as illustrated.
- Rotate each part 180º.
- Replace each part onto the cycle carrier as illustrated.
3.
.png)
Locate part X onto the bracket for the rear roof cross bar.
4.
.png)
- Loosen the front fork locking handle bolts.
- Remove the front fork locking handle from the mount.
- Insert the front fork locking handle into the opposite side of the mount.
- Tighten the front fork locking handle bolts.
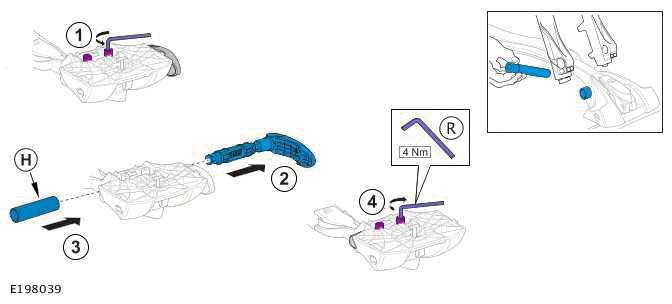
5.
.png)
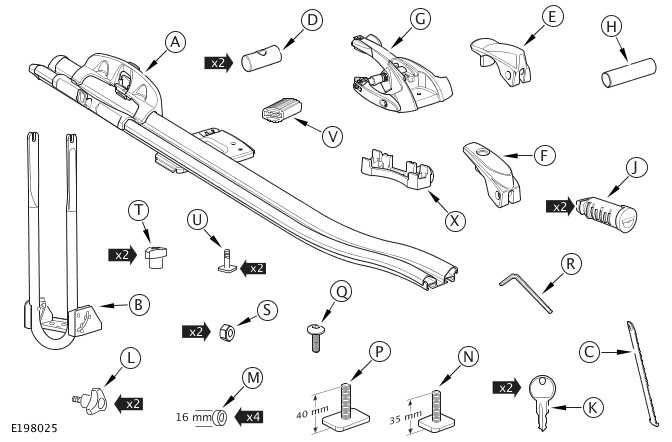
- Attach the front fork mount (G) to the cycle carrier (A).
- Using the key, unlock the front fork locking handle.
6.
.png)
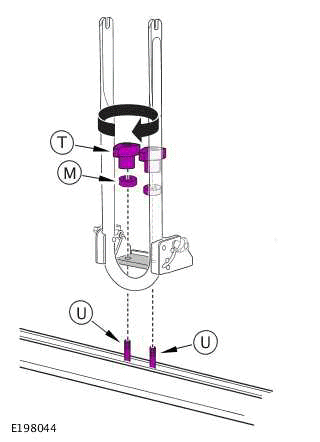
Assemble the roof cross bar locking handles (E and F).
7.
.png)
Assemble the roof cross bar locking handles (E and F) to the cycle carrier.
- Tighten each roof cross bar locking handle two to three turns.
- Attach the rear wheel strap to the cycle carrier making sure the orientation is correct and the strap buttonis not locked.
8.
.png)
Remove the roof cross bar cover.
9.
WARNING: Be aware of the vehicle height and seek assistance if required.
.png)
Lift the cycle carrier and align with the ends of the roof cross bars.
10.
NOTE: Make sure the locking handles are in the upright position.
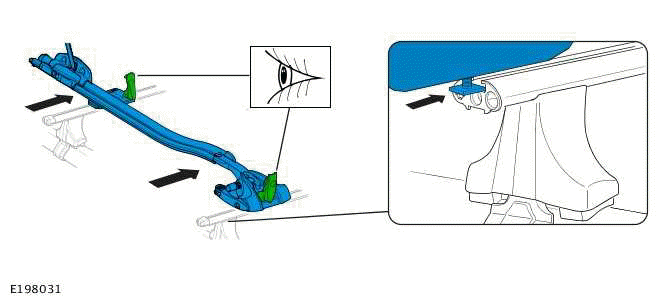
- Make sure the roof cross bar locking handles are released.
- Insert the bolts into the roof cross bars.
- Slide the cycle carrier along the roof cross bars to the required position.
11.
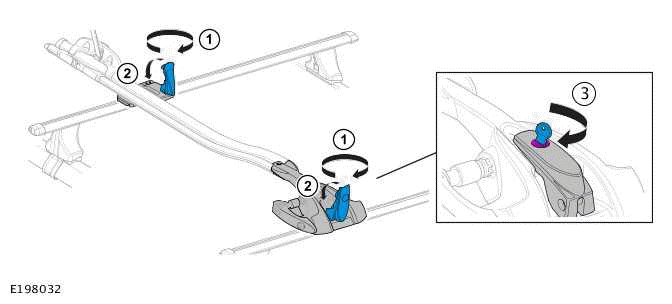
Secure the cycle carrier to the roof cross bars.
- Rotate the roof cross bar locking handles to tighten.
- Push down the handles to secure the cycle carrier to the roof cross bars.
- Using the key, lock the front roof cross bar locking handle.
12.

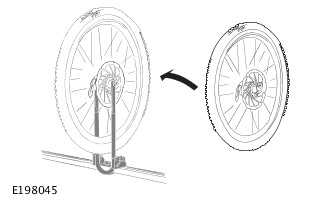
Mounting the cycle onto the cycle carrier.
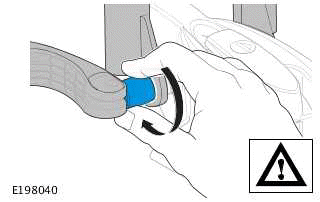
- Using the key, unlock the front fork locking handle.
- Release the front fork locking handle.
- Lift the cycle onto the cycle carrier, locate the front forks onto the mount and tighten the clamping sleeve.
- Engage the front fork locking handle.
- Using the key, lock the front fork locking handle.
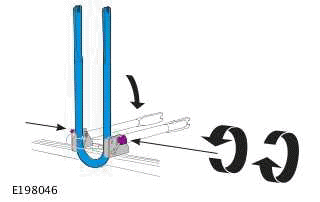
13.
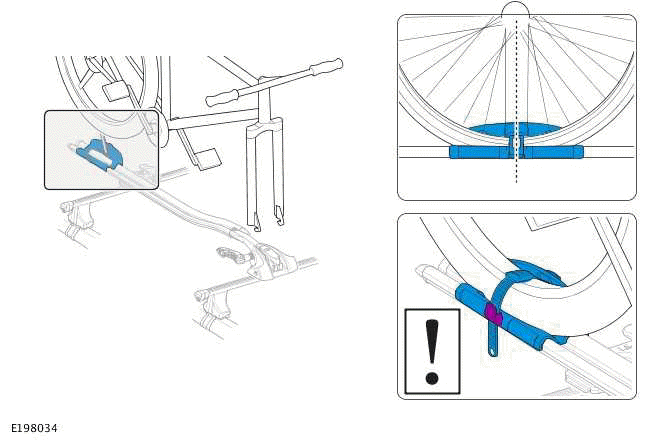
Make sure the rear wheel is placed in the centre of the mount. Tighten the rear wheel strap and then press down the locking button.
14.
WARNING: Make sure the cycle is securely mounted onto the cycle carrier at both the front and the back.

15.
The adapter (H) should be used where the axle diameter is 20 mm.
- Loosen the bolts to release the front fork locking handle.
- Remove the front fork locking handle from the mount.
- Insert the adapter into the mount.
- Tighten the bolts to secure the adapter within the mount.
16.
CAUTION: When a cycle is not attached to the cycle carrier, the clamping sleeve can loose its clamping force.
Tightening of the clamping sleeve must always be carried out when a cycle is attached.
17.
NOTE: Make sure the fork can be folded up and down.
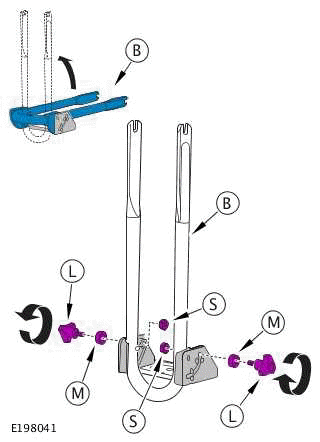
Assemble the front wheel mounting fork.
18.
- Remove the roof cross bar cover.
- Locate the two bolts into the front roof cross bar then slide along to the position where the front wheel mounting fork will be located.
19.
- Locate the front wheel mounting fork onto the bolts.
- Attach the fasteners onto the bolts.
20.
CAUTION: Make sure the wheel is secure to the fork mount.
Attach the wheel to the fork.
21.
When the cycle carrier is not being used, fold down the front wheel mounting fork.
22.
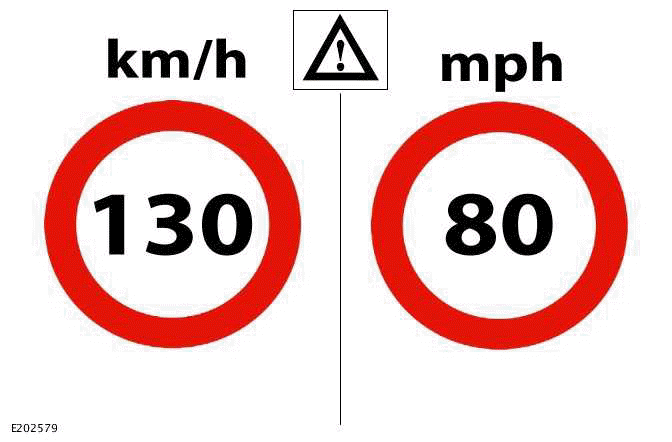
WARNING: Do not exceed 130 km/h or 80 mph.
23.
WARNINGS:
- Be aware of the extra vehicle height.
- Make sure the load is secure before starting a journey.
- Adapt your driving technique to suit changes in vehicle handling.
- Weight of fully assembled cycle carrier is 2.5 kg.
- Maximum cycle weight without front wheel is 20 kg.
- Seek assistance if fitting a heavy load.
24.
NOTE: Make a note of the key number for future reference.
READ NEXT:
 Chequered Body Protection Kit
CHEQUERED BODY PROTECTION KIT - PART
NUMBER: VPLEP0419, 90: VPLEP0383, 110:
VPLEP0384
REMOVAL AND INSTALLATION
WARNING:
Accessories which are not correctly installed can be dangerous. Read the
instru
Matte Bonnet Decal
MATTE BONNET DECAL - PART NUMBER:
VPLEB0438
REMOVAL AND INSTALLATION
WARNING:
Accessories which are not correctly installed can be dangerous. Read the
instructions carefully prior to
installation. Co
Front Mudflaps
FRONT MUDFLAPS - PART NUMBER: VPLEP0387,
VPLEP0389
REMOVAL AND INSTALLATION
WARNING:
Accessories which are not correctly installed can be dangerous. Read the
instructions carefully prior to
installat
SEE MORE:
Using the navigation system
Make sure the relevant safety warnings
have been read and understood before
operating the navigation system.
To access the navigation system, touch
the navigation icon via the navigation tile
on the home screen.
Alternatively, touch the navigation icon
via the driver side bar.
Note: The navigation
Front Wheel Bearing
Front Wheel Bearing - Vehicles With: 380mm Brake Disc
REMOVAL AND INSTALLATION
SPECIAL TOOL(S)
204-250
Wheel bearing install and removal tool
204-305
Remover, Wheel Bearing
204-726
Remover/Installer, Wheel Bearing
JLR-204-807
Installer, Front Wheel Bearing
JLR-204-808
Installer, Front Wheel Bea
