
Land Rover Defender: Using the navigation system

Make sure the relevant safety warnings have been read and understood before operating the navigation system.
To access the navigation system, touch the navigation icon via the navigation tile on the home screen.
Alternatively, touch the navigation icon via the driver side bar.
Note: The navigation tile displays various shortcuts depending if a route has been set or not.
Note: A first time user should set up personal preferences in the navigation settings menu. Personal preferences may include settings for managing which selected routing mode and route preferences are applied.
Touch the navigation icon to display a map view of the current vehicle position and search card.
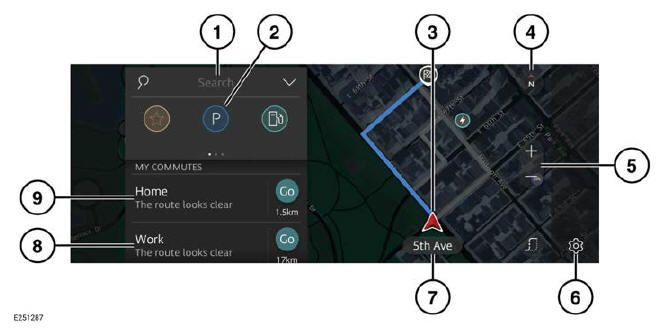
- Search card: Touch to search for an address or a place name.
- Category list: Touch to search for Points of Interest (POIs) or a saved favorite from the category list displayed. Swipe left or right for further options.
- The current vehicle position and direction.
- View options toggle: Touch to select 2D, 3D, north facing, or route overview map views.
- Zoom icons: Touch to zoom in or out.
Note: The map zoom setting can be altered by using a pinch or push motion. The map view can be panned using a swipe motion.
- Settings icon: Touch to display the navigation settings menu.
- Current road name.
- Work shortcut: When a work destination is saved as a favorite, the user can select the work shortcut from the search card to begin navigation guidance.
- Home shortcut: When a home destination is saved as a favorite, the user can select the home shortcut from the search card to begin navigation guidance.
SETTING A DESTINATION

Make sure the relevant safety warnings have been read and understood before operating the navigation system.
To set a destination:
1. Touch the search icon¹ located within the navigation tile on the touchscreen's home menu.
2. Alternatively, touch the search icon¹ located within the search card on the navigation map screen.
3. Using the keyboard:
- Input the required destination.
4. Select the required entry.
5. The navigation system calculates the route. The touchscreen displays a map with the entered location, destination address, and the most appropriate route. The touchscreen may also display alternative routes.
6. Select the required route from the available options.
7. Touch Go to begin navigation.
To search for Points of Interest (POIs) from the category list:
1. Select a category from the following list:
- EAT & DRINK.
- FUEL STATIONS.
- PARKING.
- CAR DEALER/REPAIRER.
- SHOPPING.
- SIGHTS & MUSEUM.
- LEISURE & OUTDOORS.
- GOING OUT.
- ACCOMMODATION.
- POLICE/EMERGENCY.
- HOSPITAL or HEALTHCARE FACILITY.
Note: More options may be available.
2. From the sub-category list, select the required destination.
3. The navigation system calculates the route. The touchscreen displays a map with the entered location, destination address, and the most appropriate route. The touchscreen may also display alternative routes based on route preferences setup.
4. Select the required route from the available options.
5. Touch Go to begin navigation.
To edit the route:
1. Touch the Routes soft key.
2. Select the route preferences icon².
3. Select the required route preferences, e.g., avoiding toll roads or avoiding tunnels.
4. Touch Start to begin navigation.
Note: Touch the drop-down icon³, suggestions icon⁴, or the OK soft key, to view the search results. Touch the text box to continue typing.
Note: The navigation system calculates all routes, based on the selected routing mode and route preferences.
Note: An address, place name, or category can be added as a waypoint after a destination has been selected.
 Search icon.¹
 Route preferences icon.²
 Drop-down icon.³
 Suggestions icon.⁴
READ NEXT:
 Map split screen
Make sure the relevant safety warnings
have been read and understood before
operating the navigation system.
When a route has been selected,
depending on the navigation settings, the
touchscreen disp
Navigation settings
Make sure the relevant safety warnings
have been read and understood before
operating the navigation system.
To view the navigation settings menu:
1. Select the settings icon from the
navigation map
Map auto zoom
Make sure the relevant safety warnings
have been read and understood before
operating the navigation system.
When auto-zoom is enabled, the map
automatically zooms in when the vehicle
is traveling at
SEE MORE:
Battery
DIAGNOSIS AND TESTING
PRINCIPLES OF OPERATION
For a detailed description of the battery system and operation, refer to the
relevant Description and Operation section
of the workshop manual REFER to: Battery, Mounting and Cables - [+] Non-Electric
Vehicles.
INSPECTION AND VERIFICATION
CAUTION:
Diag
Overview
The following warning and information
lamps may illuminate in the instrument
panel:
BATTERY CHARGE
(RED).
USA: BRAKE (RED).
Canada: BRAKE (RED).
CRITICAL WARNING
MESSAGE (RED).
ELECTRIC PARKING
BRAKE (EPB) (RED).
ENGINE
TEMPERATURE (RED).
LANE DEPARTURE
WARNING (RED).
LOW OIL PRESSURE
(RED).
