
Land Rover Defender: Wheel Mounted Cycle Carrier
WHEEL MOUNTED CYCLE CARRIER - PART NUMBER: VPLFR0091
REMOVAL AND INSTALLATION
WARNING: Accessories which are not properly fitted can be dangerous. Read the instructions carefully prior to fitting.
Whilst fitting, comply with instructions at all times. If in doubt, contact your nearest approved retailer.
NOTE: Right side illustrations shown, left side is similar.
.png)
.png)
INSTALLATION
1.
.png)
Determine if the cycle carrier will be mounted on the left or right side of the vehicle. If the carrier is to be mounted on the left side then follow substeps 1 to 4 below then continue at step 2. If the cycle carrier will be mounted on the right side of the vehicle, start at step 2.
- Remove the five parts as illustrated.
- Loosen the bolts to release the claw and control handle. Rotate this part by 180º.
- Tighten the bolts to attach the claw and control handle back onto the carrier and then rotate the claw to face the rear of the vehicle.
- Replace each part onto the cycle carrier as illustrated.
2.
.png)
If the cycle carrier will be mounted on a square roof cross bar, start at step 4.
3.
.png)
If the cycle carrier will be mounted on a T-track roof cross bar, start at step 13.
4.
.png)
Assemble the roof cross bar locking handles (E and F x 2).
5.
.png)
Assemble the roof cross bar locking handle (F) to the rear cycle carrier bracket.
6.
.png)
Assemble the roof cross bar locking handles (E and F) to the front cycle carrier bracket.
7.
.png)
Insert part H of the rear roof cross bar locking handle through the gap in the rear cycle carrier bracket.
8.
.png)
Insert part H of the two roof cross bar locking handles through the gaps in the front cycle carrier bracket.
9.
.png)
Attach the wheel straps to both ends of the cycle carrier.
- Make sure the strap orientation is correct.
- Make sure the strap button is not locked.
10.
WARNING: Be aware of the vehicle height and seek assistance if required.
.png)
Lift the cycle carrier and place onto the roof cross bars.
11.
.png)
Follow substeps 1 to 5 below to attach the cycle carrier to the roof cross bars.
- Guide part H beneath the roof cross bar.
- Attach part H to the stem of the locking handle.
- Raise up the locking handles as illustrated.
- Rotate the roof cross bar locking handles to tighten.
- Push down the handles to secure the cycle carrier to the roof cross bars.
12.
.png)
Using the key, lock the front roof cross bar locking handle. Continue at step 21.
13.
.png)
Assemble the roof cross bar locking handles (E and F).
14.
.png)
Assemble the roof cross bar locking handle (F) to the rear cycle carrier bracket.
15.
.png)
Assemble the roof cross bar locking handles (E and F) to the front cycle carrier bracket.
16.
.png)
Attach the wheel straps to both ends of the cycle carrier.
- Make sure the strap orientation is correct.
- Make sure the strap button is not locked.
17.
WARNING: Be aware of the vehicle height and seek assistance if required.
.png)
Lift the cycle carrier and slide onto the roof cross bars.
18.
.png)
Slide the cycle carrier to the required position. Rotate the roof cross bar locking handles to tighten and then push down the handles to secure the cycle carrier to the roof cross bars.
- Slide the cycle carrier to the required position.
- Rotate the roof cross bar locking handles to tighten
- Push down the roof cross bar locking handles to secure the cycle carrier to the roof cross bars.
19.
.png)
Using the key, lock the front roof cross bar locking handle.
20.
.png)
For both roof cross bar variants, continue at step 21.
21.
.png)
Raise the claw.
22.
WARNING: Lifting the cycle onto the cycle carrier will require two people.
.png)
Lift the cycle onto the cycle carrier. The cycle frame should engage into the claw.
23.
.png)
Turn clockwise the button on the claw control handle until the clicking sound stops.
24.
.png)
Using the key, lock the claw control handle.
25.
.png)
- Tighten both the front and rear wheel straps, making sure the strap is an equal length on either side of the wheel.
- Press down the locking button on each strap.
26.
.png)
For removal of a cycle, release both the wheel straps.
27.
.png)
Using the key, unlock the claw control handle.
28.
.png)
Press the button on the claw control handle to loosen the claw. Make sure the cycle is being supported as the claw is released. Lift the cycle clear of the cycle carrier.
29.
.png)
The cycle carrier can be removed from the vehicle as a single item. Release the locking handles at the front of the cycle carrier.
- Using the key, unlock the roof cross bar locking handle. Lift the locking handles and rotate to loosen.
- Detach part H and rotate away from the stem of the locking handle.
30.
.png)
Release the locking handle at the rear of the cycle carrier.
31.
.png)
Lift or slide the cycle carrier from the vehicle.
32.
WARNINGS:
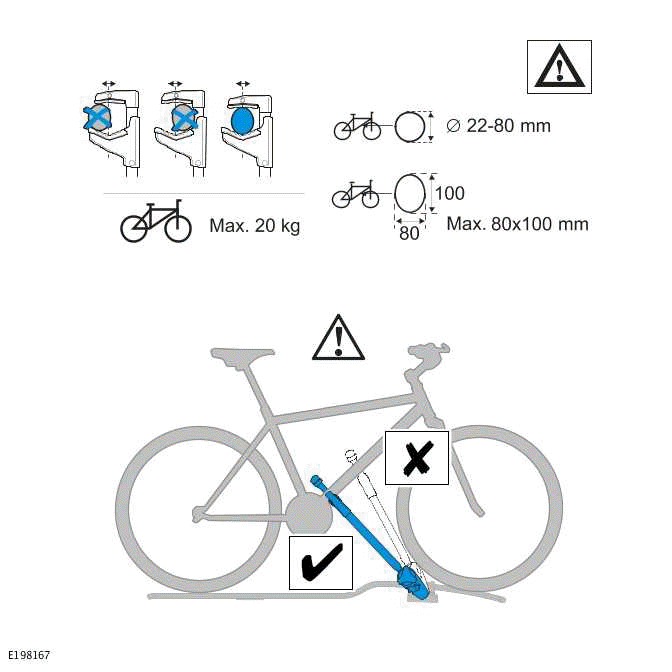
- Comply with maximum frame tube sizes.
- Make sure the claw is engaged correctly about the cycle frame.
- Maximum cycle weight is 20 kg.
33.
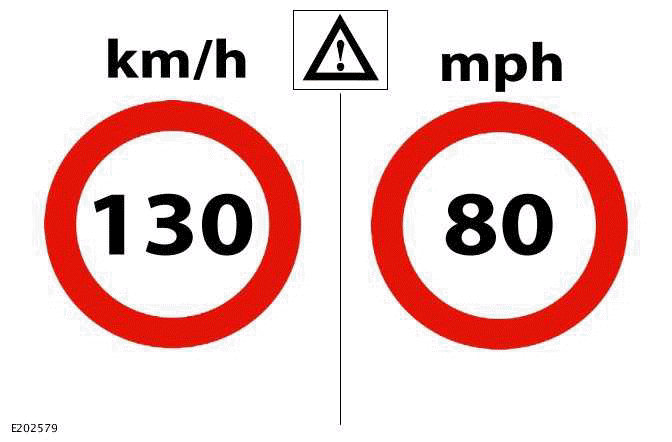
WARNING: Do not exceed 130 km/h or 80 mph.
34.
WARNINGS:
- Be aware of the extra vehicle height.
- Make sure the load is secure before starting a journey.
- Adapt your driving technique to suit changes in vehicle handling.
- Weight of fully assembled cycle carrier is 4.2 kg.
- Remove roof cross bars, cycle carrier and cycle when using an automatic car wash.
NOTE: Make a note of the key number for future reference.
READ NEXT:
 Fork Mounted Cycle Carrier
FORK MOUNTED CYCLE CARRIER - PART NUMBER:
VPLWR0101
REMOVAL AND INSTALLATION
WARNING:
Accessories which are not properly fitted can be dangerous. Read the
instructions carefully prior to fitting.
Wh
Chequered Body Protection Kit
CHEQUERED BODY PROTECTION KIT - PART
NUMBER: VPLEP0419, 90: VPLEP0383, 110:
VPLEP0384
REMOVAL AND INSTALLATION
WARNING:
Accessories which are not correctly installed can be dangerous. Read the
instru
Matte Bonnet Decal
MATTE BONNET DECAL - PART NUMBER:
VPLEB0438
REMOVAL AND INSTALLATION
WARNING:
Accessories which are not correctly installed can be dangerous. Read the
instructions carefully prior to
installation. Co
SEE MORE:
Engine Cover - Ingenium I6 3.0l Petrol
REMOVAL AND INSTALLATION
REMOVAL
NOTES:
This procedure contains some variation in the illustrations depending
on the vehicle specification, but the
essential information is always correct.
This procedure contains illustrations showing certain components
removed to provide extra clarity.
1.
Front Door Impact Pressure Sensor
REMOVAL AND INSTALLATION
REMOVAL
WARNINGS:
To prevent accidental deployment, you must power down the Restraints
Control Module (RCM). Wait at
least 1 minute after you disconnect the startup battery ground cable before
you do any work on the
Supplementary Restraint System (SRS). If you do not
