
Land Rover Defender: Smart key operation

The smart key system uses Radio Frequency (RF) transmissions that could interfere with implanted medical devices. To avoid any possibility of interference between the system and the device, make sure that the device is kept at a safe distance. The distance should be at least 8 in (22 cm) away from any transmitter. In rare circumstances, interference may cause an implanted medical device to malfunction. Malfunction of implanted medical devices may cause injury or death.
Note: For more information on the locations of the security system transmitters.

Never leave children or animals unattended in the vehicle. The vehicle can be operated when the smart key is inside the vehicle. Doing so may potentially result in accident or unauthorized operation.
Note: The operational range of the smart key varies considerably, depending on atmospheric conditions and interference from other transmitting devices.
Note: If any door, or the taildoor, is unlocked ten times within a short period, the locking latch disables for approximately 1 minute.
Note: A replacement smart key can be obtained only from a retailer/authorized repairer. The retailer/authorized repairer will require proof of identification and ownership. Notify a retailer/authorized repairer immediately if a smart key is lost or stolen.
The vehicle is supplied with two smart keys. The smart keys act as remote controls for the locking and alarm system.
The smart keys allow the vehicle to be locked, unlocked, and driven without the use of a conventional key. Each smart key also has an emergency key inserted in the smart key's body.
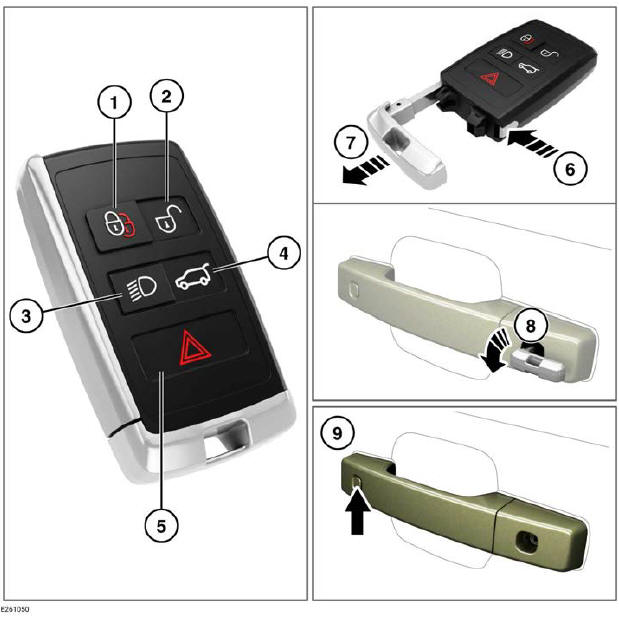
Use of the smart key to operate the vehicle locks:
1. Lock: Press to secure the vehicle. The vehicle locks. If power-fold mirrors are enabled, the mirrors fold in.
2. Unlock: Press briefly to unlock the vehicle and disarm the alarm. The hazard warning lights flash twice to indicate that the vehicle is unlocked and the alarm is disarmed. The interior lights illuminate to assist entry to the vehicle. If power-fold mirrors are enabled, the mirrors unfold.
3. Headlights: When approaching the vehicle during darkness, press to switch on the headlights to provide approach illumination. Press again to switch approach illumination off. The approach illumination preset delay period is 30 seconds. The delay period can be configured to provide illumination lasting between 0 and 240 seconds.
Note: Make sure the smart key is not left inside the vehicle before closing the taildoor. The smart key may not be detected if kept inside a metal container, or shielded by a device with a back-lit LCD screen. For example, a smartphone, laptop, including when inside a bag, or a games console. Also, if the vehicle is in an area of localized Radio Frequency (RF) interference, the smart key may not be detected. If the smart key is not detected inside the vehicle, the vehicle can still be locked.
However, the vehicle does not automatically unlock. The vehicle unlocks only with another valid smart key.
4. Taildoor: Press briefly to unlock the taildoor. If the vehicle is locked and armed, all of the other doors remain closed and the exterior alarm remains armed while the taildoor is open. Press the lock button (1) to lock the taildoor when closed.
5. Panic alarm: Press and hold for 3 seconds, or press three times within 3 seconds, to activate the horn and the hazard warning lights. Once active for more than 5 seconds, the alarm can be canceled. Press the button and hold for 3 seconds, or press three times within 3 seconds. The panic alarm also cancels if a valid smart key is present when the START/STOP button is pressed.
6. Emergency key blade: Push the release button.
7. Emergency key blade: Pull to withdraw the key blade.
8. Emergency unlock: Insert key blade into key barrel and rotate counterclockwise to unlock door.
9. Keyless unlock: Press button on front of door handle to lock the vehicle.
2-STAGE UNLOCKING
To unlock the vehicle and disarm the alarm system, press the smart key's unlock button.
The vehicle unlocks in one of two ways:
1. 2-stage unlocking on: Unlocks the driver's door only. A second press is required to unlock the remaining doors and the taildoor.
2. 2-stage unlocking off: Unlocks all of the doors and the taildoor on the first press.
To change the vehicle's 2-stage unlocking status, press the smart key's lock and unlock buttons simultaneously for 3 seconds. The hazard warning lights flash twice to confirm the change.
2-stage unlocking can also be set via the Vehicle menu in the touchscreen.
Note: If an audible warning sounds when the vehicle is unlocked, there may be a fault with the alarm sensors. Consult a retailer/authorized repairer as soon as possible.
READ NEXT:
 Keyless entry
The smart key system uses Radio
Frequency (RF) transmissions that could
interfere with implanted medical
devices. Make sure that the device is
kept at a safe distance of at least 9 in
(22 cm) away fr
Activity key
The activity key is a touchscreen with wrist
strap designed to support situations where
the smart key might be obtrusive or
difficult to keep secure. The activity key is
waterproof to a depth of 131 f
Opening and closing the taildoor
While the taildoor is open, the locking
latch is exposed. Do not attempt to
manually close the latch, as it may also
automatically soft-close and trap items
or body parts.
Do not drive with an open
SEE MORE:
Differential
REMOVAL AND INSTALLATION
GENERAL EQUIPMENT
PART(S)
REMOVAL
CAUTION:
Before disconnecting any components, make sure the area is clean and free from
foreign material. When
disconnected all openings must be sealed.
NOTE:
This procedure contains illustrations showing certain components
removed to
Supplementary Restraint System
SPECIFICATIONS
Torque Specifications
COMPONENT TORQUE LOCATION
