
Land Rover Defender: Opening and closing the taildoor

While the taildoor is open, the locking latch is exposed. Do not attempt to manually close the latch, as it may also automatically soft-close and trap items or body parts.

Do not drive with an open taildoor at any time. Driving with an open taildoor obscures the rear lights. Also, driving with an open taildoor may result in persons or luggage falling from the vehicle. In either case, death or serious injury may occur.

An open taildoor obscures the rear lights. If available, place a warning triangle at a suitable distance behind the vehicle, facing toward oncoming traffic.

Make sure there is sufficient space behind and at the side of the vehicle before operating the taildoor. Insufficient opening space may result in damage to the vehicle.

Do not operate the taildoor if a cycle rack is fitted to the vehicle. Remove any cycles and/or racks before operating the taildoor.
Improper use of cycle racks may cause damage to the vehicle.

Make sure the taildoor is fully closed before the vehicle is driven, to prevent damage to the vehicle.
For further information regarding proper use of the taildoor, refer to the taildoor label.
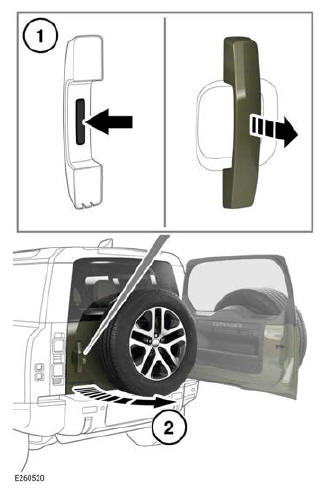
Opening the taildoor:
- Press the button on the rear of the handle to release the latch.
- Pull to open the taildoor.
Note: The taildoor handle releases if all of the doors are unlocked and the gear selector is in the Park (P) position. With the gear selector in the Neutral (N) position, the taildoor releases only if all of the doors are unlocked. Also, the ignition must be in convenience mode or switched off. The taildoor handle does not operate the taildoor if the gear selector is in any other position.
To close the taildoor, move it to the closed position. The taildoor automatically soft-closes to the fully closed position.

Do not slam the taildoor as damage to the soft-close mechanism may result.
The taildoor can also be released using the following methods:
- The taildoor button on the smart key.
- The taildoor command on the activity key.
Note: The taildoor does not release if the vehicle is traveling at, or above, approximately 3 mph (5 km/h).
Note: If the smart key remains inside the loadspace when the vehicle is locked and the alarm is set, a warning is given. The warning indicates a mislock and the taildoor unlatches after approximately 3 seconds.
Note: If the taildoor is pushed to a closed position, the vehicle searches for a valid smart key at the rear of the vehicle. If a valid smart key is not detected within 1.5 m of the rear of the vehicle, the taildoor re-opens and an audible mislock warning sounds. Additionally the taildoor re-opens with an audible mislock warning sound if any smart key remains inside the vehicle when the taildoor is closed.
Note: The smart key may not be detected if it is shielded by metal and/or devices with LCD screens. For example, a smartphone, a laptop or a games console.
Note: Make sure the taildoor is fully closed before leaving the vehicle unattended. Visible and audible warnings indicate if the vehicle is locked and the alarm armed. If there are no visible or audible warnings upon closing the taildoor, the vehicle may be unprotected.
DRIVE-AWAY LOCKING
Drive-away locking automatically locks all of the doors when the vehicle reaches a set speed. The drive-away locking set speed can be adjusted via Vehicle in the touchscreen menu.
Note: After drive-away locking has taken place, press the unlock or lock button to override the feature for the current journey. The unlock and lock buttons are located on the inside of the front doors.
READ NEXT:
 Smart key battery replacement
When the battery needs replacing, there
is a significant decrease in the effective
range and the instrument panel displays
a warning message.
To replace the battery:
Push the button on the smart k
Single locking
Before exiting the vehicle, always select
Park (P), switch off the ignition, apply
the Electric Parking Brake (EPB), and
remove any smart keys. Missing these
steps may lead to serious injury or
death
SEE MORE:
Driver Airbag
REMOVAL AND INSTALLATION
REMOVAL
WARNING:
Always wear safety glasses when repairing an airbag Supplementary
Restraint System (SRS) vehicle
and when handling an airbag module.
Never probe the connectors on the airbag module. Doing so may result
in airbag deployment. Failure to
follow this in
Door Mirror Motor Assembly
REMOVAL AND INSTALLATION
REMOVAL
NOTE:
This procedure contains some variation in the illustrations depending
on the vehicle specification, but the
essential information is always correct.
This procedure contains illustrations showing certain components
removed to provide extra clarity.
This
