
Land Rover Defender: Removing the spare wheel
Make sure to read and fully understand the following warnings. Failure to comply with the safety instructions may result in an accident, leading to serious injury or death.

Make sure the relevant safety warnings have been read and understood before removing the spare wheel.

An open taildoor obscures the rear lights. If available, place a warning triangle at a suitable distance behind the vehicle, facing toward oncoming traffic.

Do not store the wheel while the vehicle is raised on the jack.

Always secure the spare wheel, or the removed wheel, in the correct position, using the three lug nuts.
Note: If in any doubt regarding the ability to remove or secure the spare wheel, seek assistance.
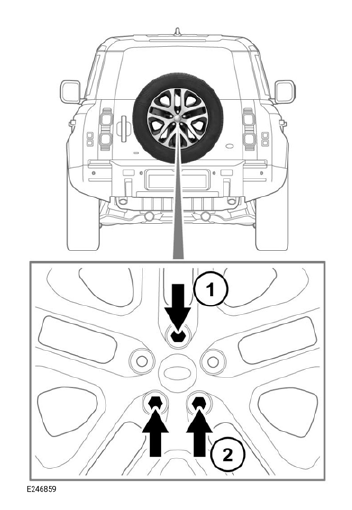
The spare wheel is located on the taildoor.
The spare wheel is secured to the vehicle with three lug nuts.
The location of the locking lug nuts depends on the specification of the vehicle:
- Steel wheels: One locking lug nut in the upper position, as shown.
- Alloy wheels: Two locking lug nuts in the lower positions, as shown.
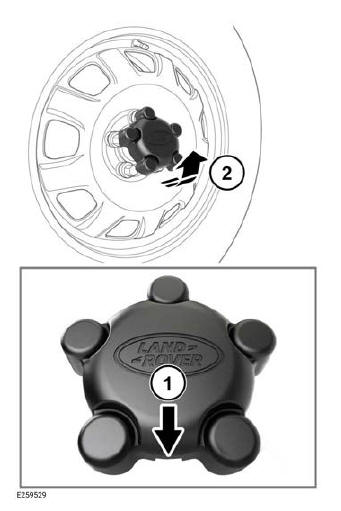
Vehicles with steel wheels have a hubcap.
To remove the hubcap:
- Insert a suitable tool into the slot on the hub cap.
- Carefully lever the hub cap off the lug nuts.
To remove the spare wheel:
- Carefully remove the spare wheel's cover or hub cap.
- Use the locking lug nut adapter and the lug wrench to remove the locking lug nuts.
- Remove the standard lug nuts.

Make sure that the spare wheel is supported when removing the final lug nut. Failure to do so may result in serious injury or death.
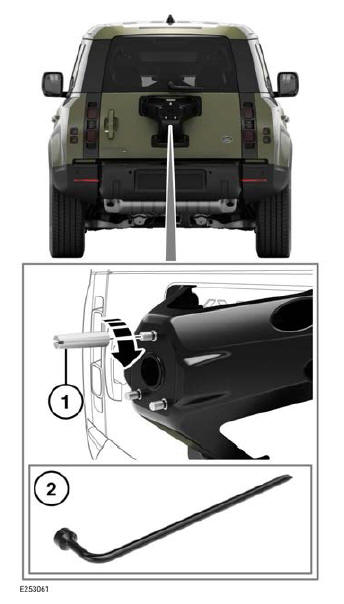
Vehicles with alloy wheels: A spare wheel alignment tool is supplied in the vehicle's tool kit. Install the spare wheel alignment tool as shown before storing the spare wheel on the vehicle:
- Fit the spare wheel alignment tool to the spare wheel carrier.
- Tighten the spare wheel alignment tool using the end of the lug wrench.

Make sure that the locking lug nuts are fitted in the correct location.
Reverse the procedure to store the changed wheel. Tighten the spare wheel lug nuts to 103 lb.ft. (140 Nm).
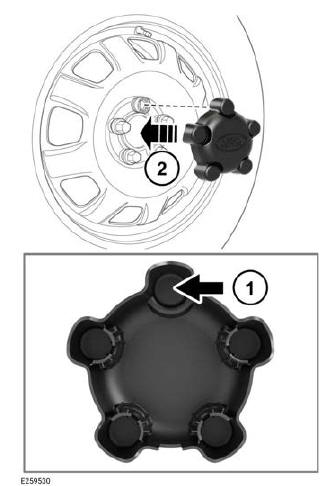

Make sure that the hubcap is correctly aligned to the locking lug nut.
To install the hubcap:
- Align the hubcap to the locking lug nut.
- Press the hubcap firmly into place.
USING WHEEL CHOCKS

Make sure the relevant safety warnings have been read and understood before using wheel chocks. Failure to comply with the safety instructions could result in an accident, leading to serious injury or death.
A wheel chock is stored in the vehicle's spare wheel tool kit.
Note: Not all vehicles have wheel chocks supplied as part of the tool kit. Wheel chocks are a useful addition to a vehicle's tool kit.
READ NEXT:
 Locking lug nuts
Note: Not all vehicles have locking lug
nuts as standard parts.
The locking lug nut adapter must be
correctly aligned and fully fitted to the
locking lug nut before usage. Incorrect
fitment can resul
Wheel changing
Make sure to read and fully understand
the following warnings. Failure to comply
with the safety instructions could result in
an accident, leading to serious injury or
death.
Make sure the relevant s
SEE MORE:
Folding fabric roof reset
Make sure that the conditions listed below
are met before carrying out the folding
fabric sunroof reset procedure:
The ambient air temperature is
between 41ºF to 149ºF (5ºC to 65ºC).
The vehicle is at a standstill.
The vehicle's battery is sufficiently
charged and the electrical connection
Camshafts - Engine Set
REMOVAL AND INSTALLATION
REMOVAL
NOTE:
This procedure contains some variation in the illustrations depending
on the vehicle specification, but the
essential information is always correct.
This procedure contains illustrations showing certain components
removed to provide extra clarity.
1. R
