
Land Rover Defender: Engine and Ancillaries - Installation
ENGINE AND ANCILLARIES - INGENIUM I4 2.0L PETROL
INSTALLATION
SPECIAL TOOL(S)
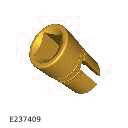
303-680
Socket, Cylinder Head Temperature Sensor
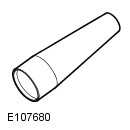
310-198
Installer, Teflon Seal
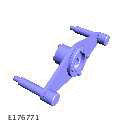
JLR-303-1630
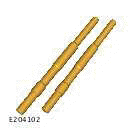
Locking Tool, Crankshaft Pulley
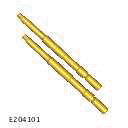
JLR-310-255
Guide pins threaded
JLR-310-256
Guide pins unthreaded

JLR-310-257
Teflon Seal Resize Tool
PART(S)
WARNING:
- Be prepared to collect escaping fuel.
- Be prepared to collect escaping coolant.
- Be prepared to collect escaping oil.
CAUTION: Before disconnecting any components, make sure the area is clean and free from foreign material. When disconnected all openings must be sealed.
NOTE:
- This procedure contains illustrations showing certain components removed to provide extra clarity.
- This procedure contains some variation in the illustrations depending on the vehicle specification, but the essential information is always correct.
1.
- Install the Noise, Vibration and Harshness (NVH) material.
- Install and tighten the bolt.
Torque: 11.5Nm
2.
- Install the NVH material.
- Install the clip.
3.

- Install the NVH material.
- Install the 4 clips.
4.

- Inspect the O-ring seal. Install a new O-ring seal if damaged or worn.
- Lubricate the O-ring seal with clean engine oil.
- Install the crankshaft pulley.
- Install the special tool.
Special Tool(s): JLR-303-1630
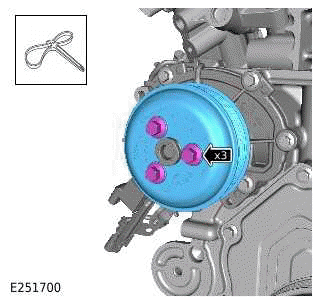
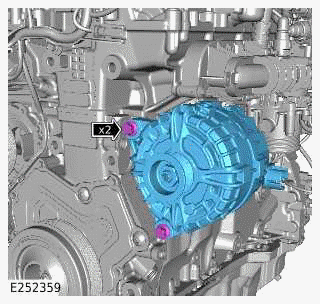
5.
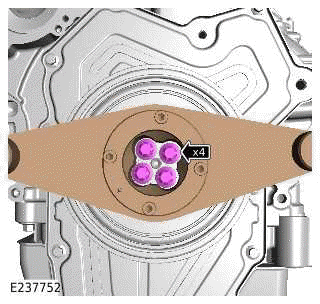
Install and tighten the 4 bolts.
Torque
- Stage1: 37Nm
- Stage2: 90º
6.
NOTE: Do not insert the bottoming tap more than the depth of the threaded holes (16mm). Apply tape to the bottoming tap 16mm from the end as a visual guide.

- Use a suitable M10 x 1.0 mm tap to clean out the threads illustrated.
- Use a suitable cleaning solution to remove any foreign material from the threads.
7.
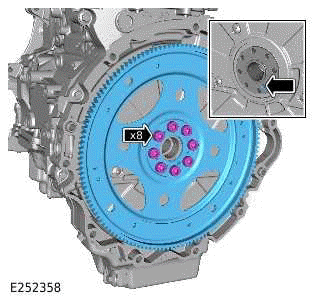
- Install the drive plate.
- Install, but do not fully tighten the 8 new bolts.
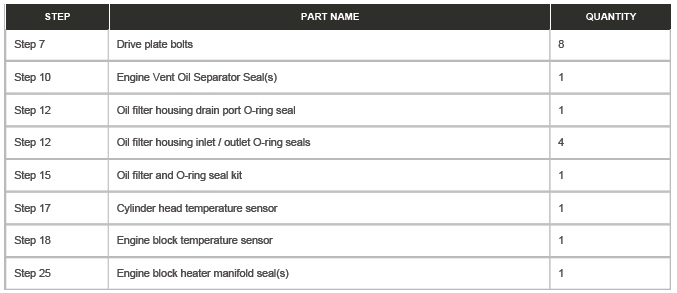
Renew Part: Drive plate bolts Quantity: 8.
8.
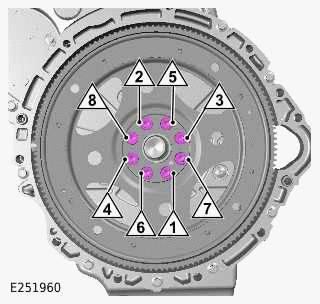
Tighten the 8 bolts in the illustrated sequence.
Torque
- Stage1: 30Nm
- Stage2: 120º
9. Remove the special tools.
Special Tool(s): JLR-303-1630
10.
- Install a new gasket.
Renew Part: Engine Vent Oil Separator Seal(s) Quantity: 1.
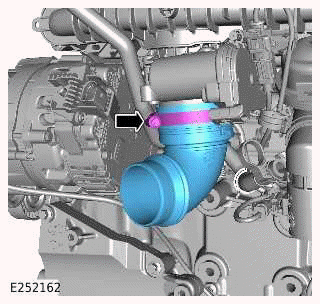
- Install the engine vent oil separator.
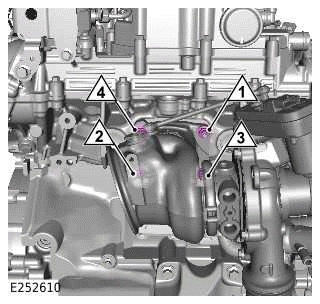
- Install, but do not fully tighten the 7 bolts.
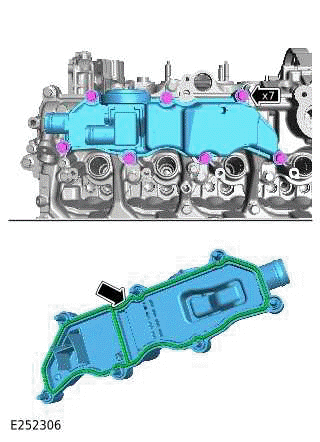
11.
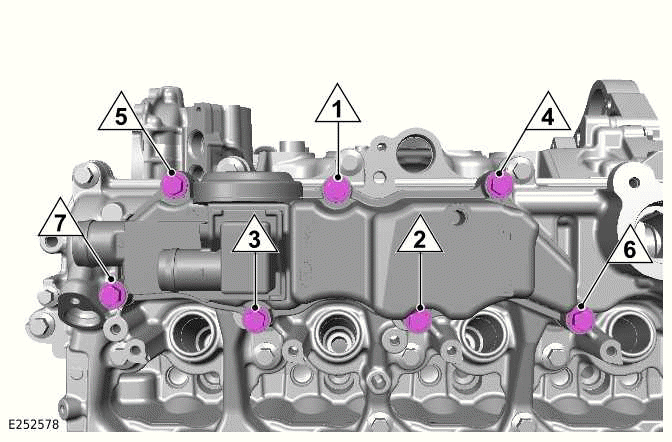
Tighten the 7 bolts in the illustrated sequence.
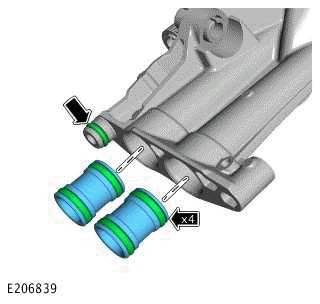
Torque: 11.5Nm
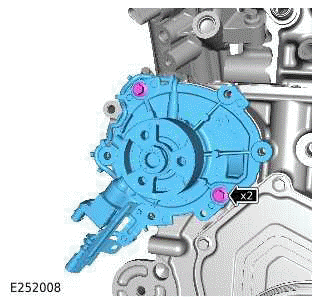
12.
- Lubricate the O-ring seals with clean engine oil.
- Install 5 new O-ring seals.
Renew Part: Oil filter housing drain port O-ring seal Quantity: 1.
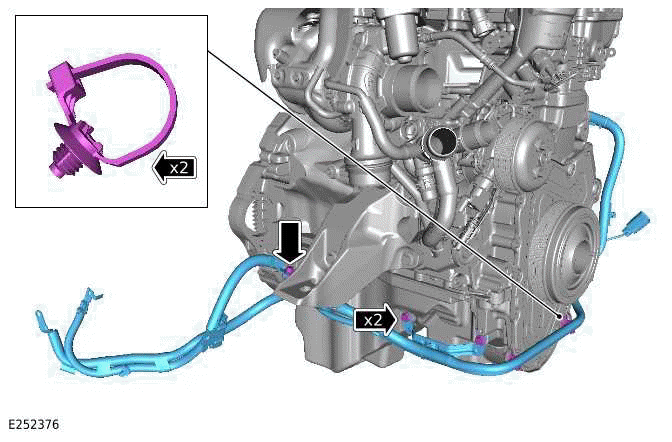
Renew Part: Oil filter housing inlet / outlet O-ring seals Quantity: 4.
13.
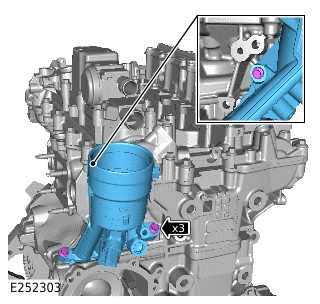
- Install the oil filter housing assembly.
- Install and tighten the 3 bolts.
Torque: 11.5Nm
14.
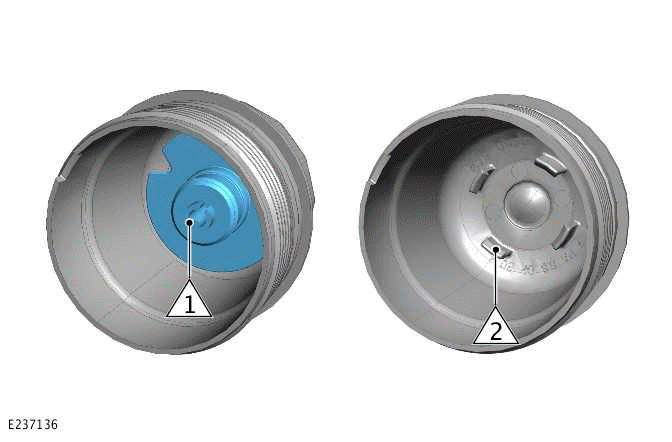
Before installing the oil filter cap, check the by-pass valve (1) is installed and correctly secured on the locating tabs (2).
15.
- Install a new O-ring seal.
Renew Part: Oil filter and O-ring seal kit Quantity: 1.
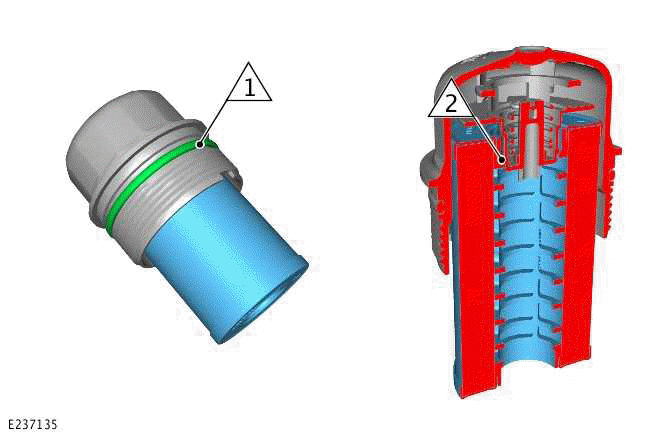
- Install a new oil filter element.
- Lubricate the oil filter O-ring seal (1) with clean engine oil and install the oil filter element into the cap.
- Make sure the oil filter element is pushed correctly onto the bypass valve inside the oil filter cap (2).
16.
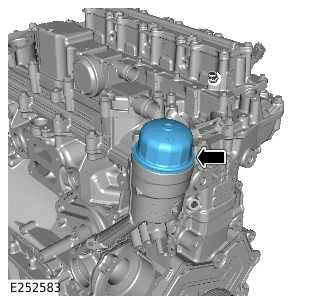
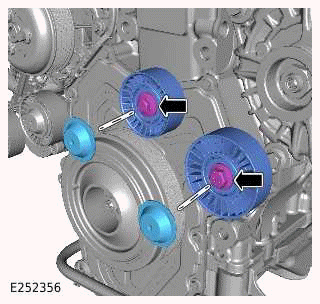
Install and tighten the oil filter assembly.
Torque: 28Nm
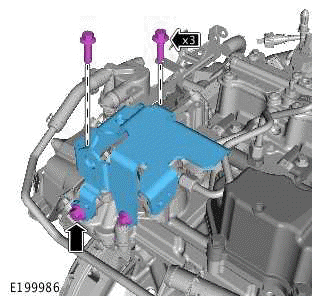
17.
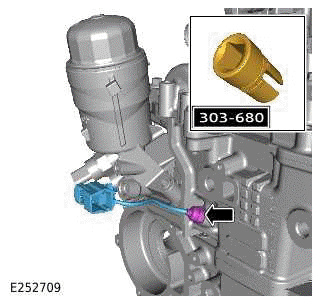
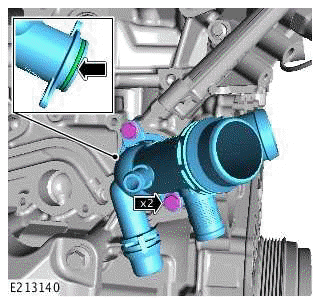
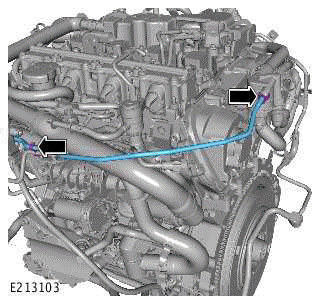
Use the special tool to install and tighten the new cylinder head temperature sensor.
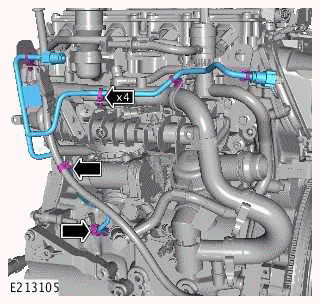
Special Tool(s): 303-680
Renew Part: Cylinder head temperature sensor Quantity: 1.
Torque: 10.5Nm
18.
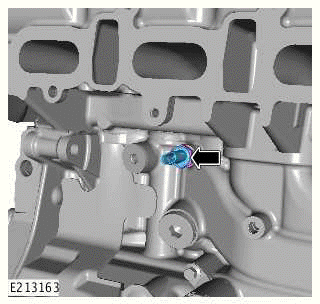
Install and tighten a new cylinder block temperature sensor.
Renew Part: Engine block temperature sensor Quantity: 1.
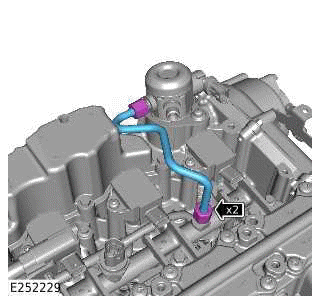
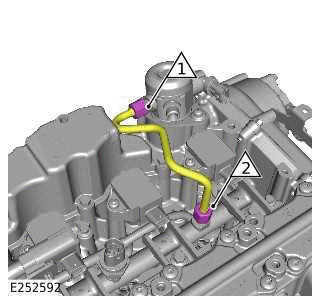
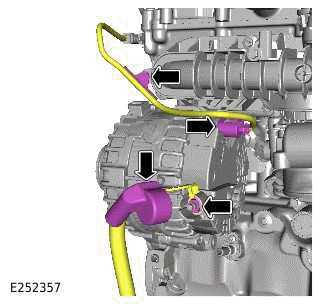
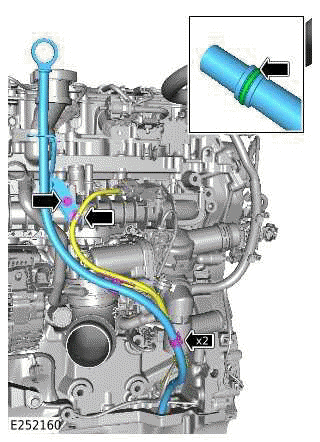
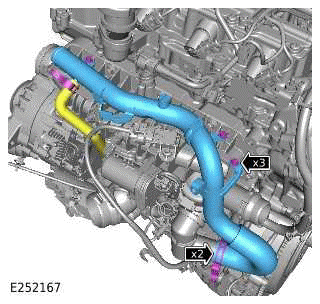
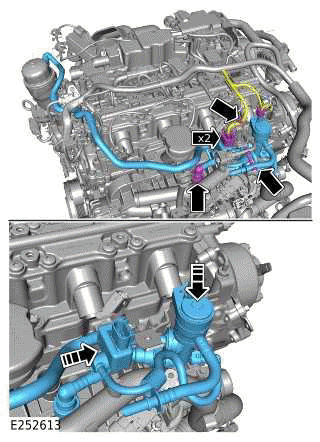
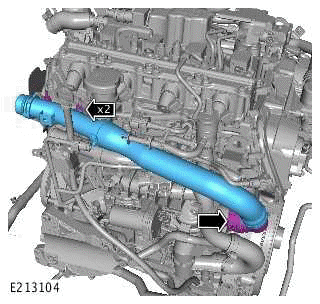
Torque: 10.5Nm
19.
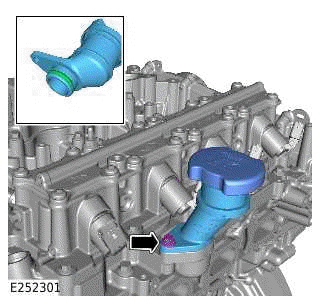
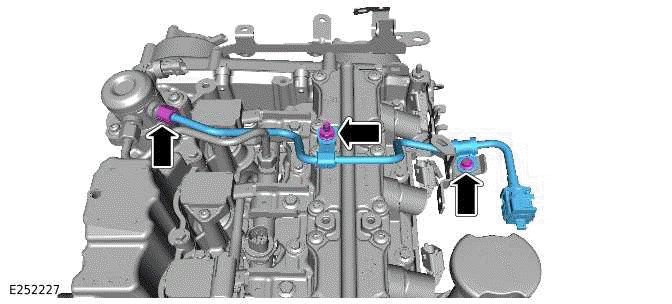
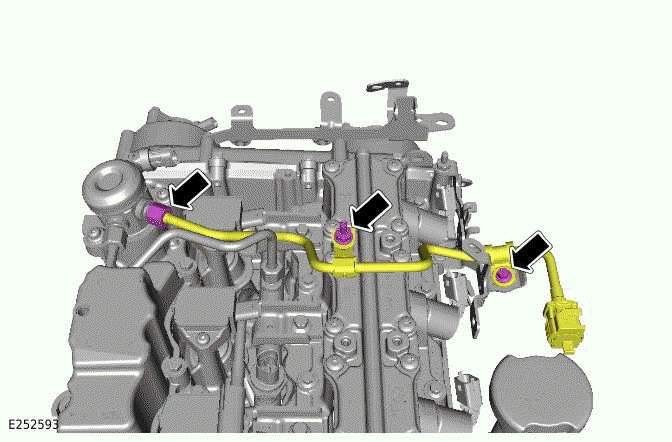
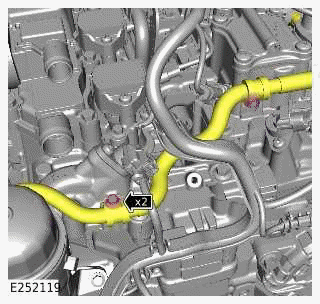
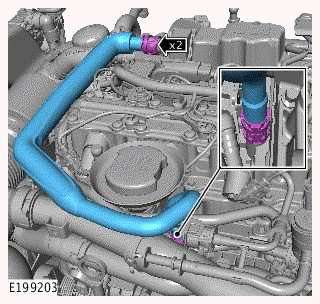
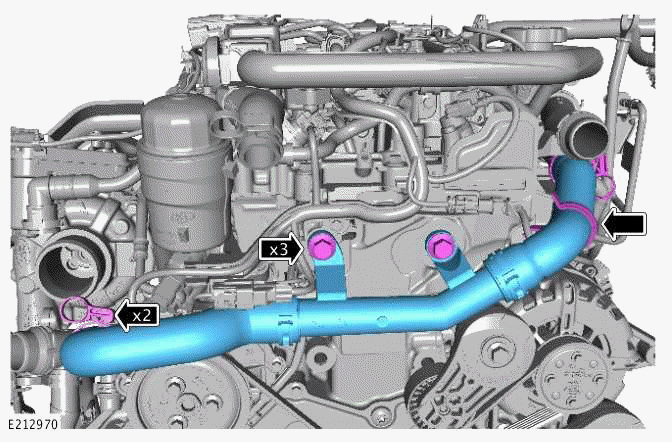
- Inspect the O-ring seal. Remove and discard the O-ring seal if damaged or worn.
- Lubricate the O-ring seal with clean engine oil.
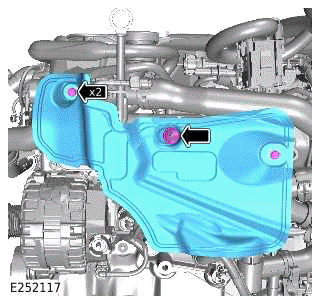
- Install the oil filler.
- Install and tighten the bolt.
Torque: 11.5Nm
20.
- Install the bracket.
- Install and tighten the bolt.
Torque: 11.5Nm
21.
- Install the bracket.
- Install and tighten the 2 bolts.
Torque: 11.5Nm
22.
- Inspect the O-ring seal. Install a new O-ring seal if damaged or worn.
- Lubricate the O-ring seal with clean engine oil.
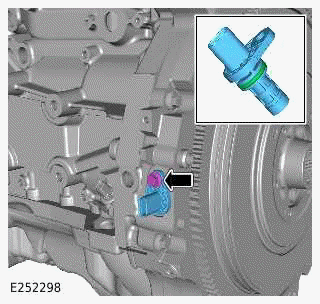
- Install the Crankshaft Position Sensor (CKP) sensor.
- Install and tighten the bolt.
Torque: 8Nm
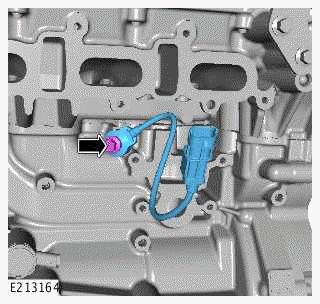
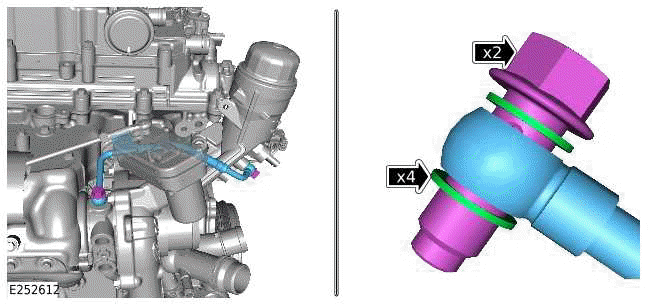
23.
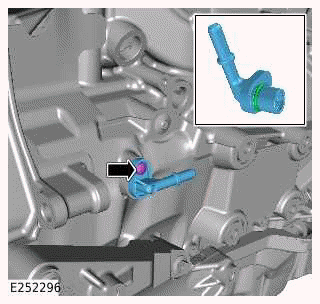
- Inspect the O-ring seal. Install a new O-ring seal if damaged or worn.
- Lubricate the O-ring seal with clean engine oil.
- Install the vacuum pipe connector.
- Install and tighten the bolt.
Torque: 5Nm
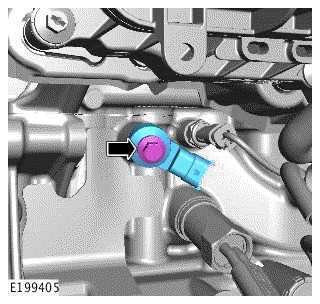
24.
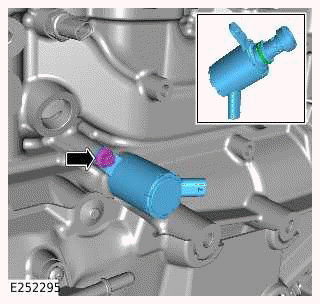
- Inspect the O-ring seal. Install a new O-ring seal if damaged or worn.
- Lubricate the O-ring seal with clean engine oil.
- Install the piston cooling oil jet solenoid.
- Install and tighten the bolt.
Torque: 11.5Nm
25.
NOTE: If equipped.
- Install a new gasket.
Renew Part: Engine block heater manifold seal(s) Quantity: 1.
- Install and tighten the cylinder block heater.
Torque: 55Nm
26.
CAUTION: Make sure that the mating faces are clean and free of foreign material.
- Install the knock sensor to the position noted in the removal step.
- Install and tighten the bolt.
Torque: 20Nm
27.
CAUTION: Make sure that the mating faces are clean and free of foreign material.
- Install the knock sensor to the position noted in the removal step.
- Install and tighten the bolt.
Torque: 20Nm
28.
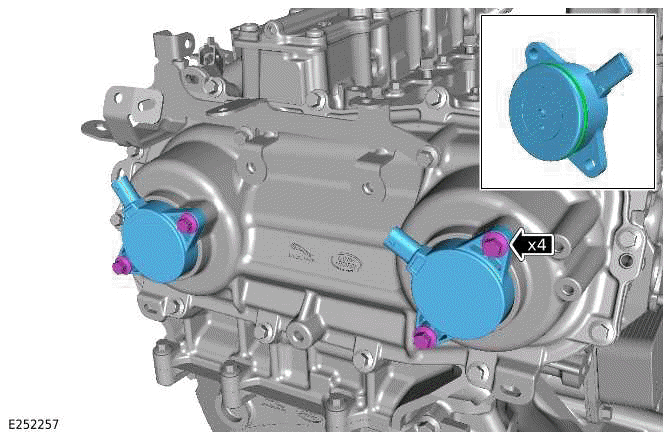
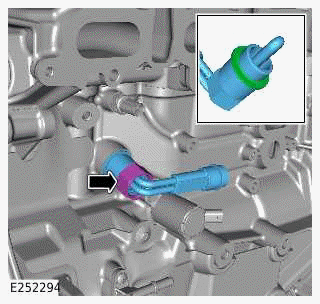
- Inspect the O-ring seal. Install a new O-ring seal if damaged or worn.
- Lubricate the 2 O-ring seals with clean engine oil.
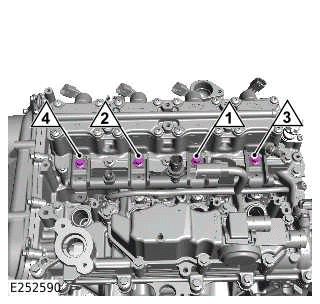
- Install the 2 variable valve timing (VVT) solenoids.
- Install and tighten the 2 bolts.
Torque: 9Nm
29.
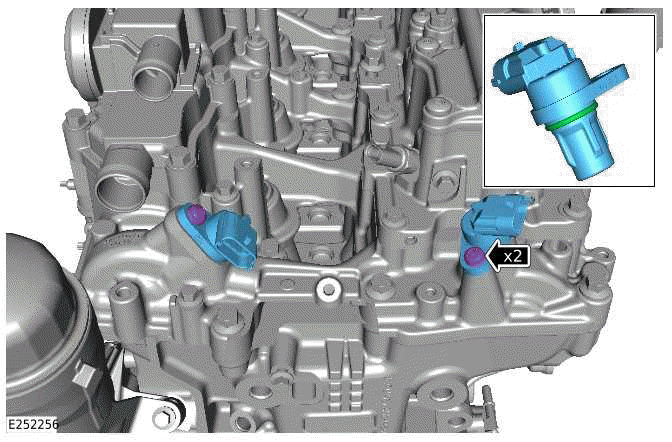
- Inspect the 2 O-ring seals. Install a new O-ring seal if damaged or worn.
- Lubricate the 2 O-ring seals with clean engine oil.
- Install the 2 Camshaft Position Sensor (CMP) sensors.
- Install and tighten the 2 bolts.
Torque: 8Nm
30.
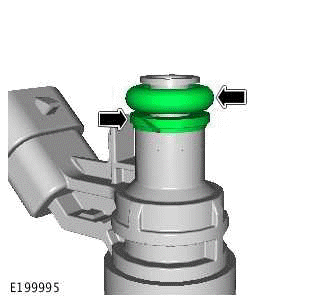
- Install a new fuel injector O-ring seal and washer.
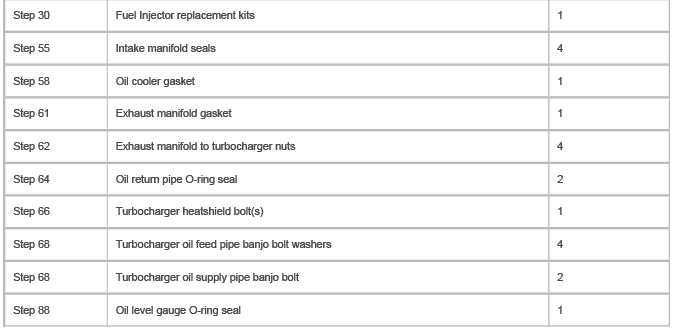
Renew Part: Fuel Injector replacement kits Quantity: 1.
- Lubricate the O-ring seal with clean engine oil.
31.
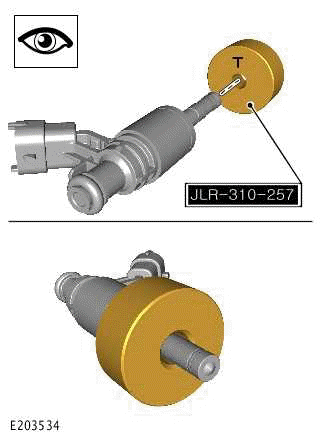
Install the special tool to the fuel injector with the 'T' symbol towards the top of the fuel injector as illustrated.
Special Tool(s): JLR-310-257
32.
CAUTION: Make sure that the fuel injector Teflon seal groove is clean and free of foreign material.
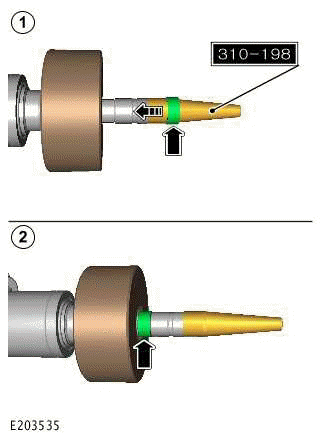
Use the special tool 310-198 to install the Teflon seal to the fuel injector.
Special Tool(s): 310-198
33. Wait 2 minutes to allow the Teflon seal to recover its shape.
34.
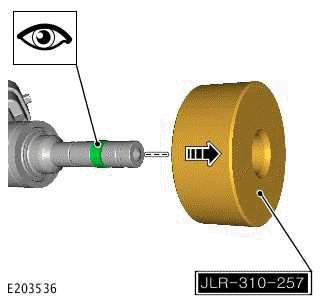
- Make sure the Teflon seal is correctly installed.
- As illustrated, remove the special tool JLR-310-257 from the fuel injector to create the final shape of the Teflon seal.
35.
Install a new fuel injector spring clamp.
36. Repeat steps 30 to 35 for the 3 remaining fuel injectors.
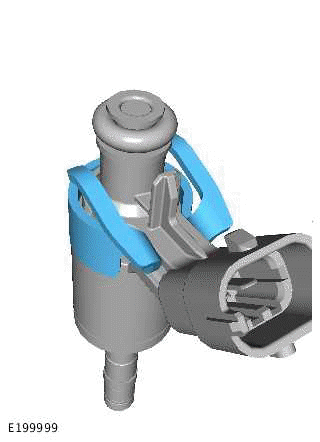
37.
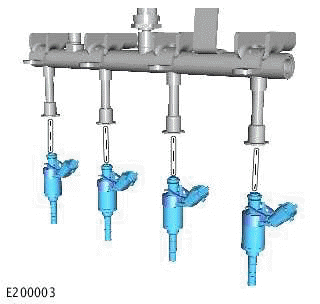
Install the 4 fuel injectors to the fuel rail.
38.
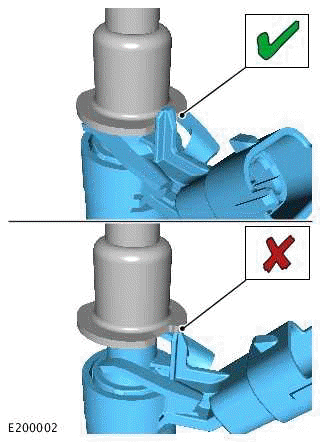
Make sure the fuel injectors are correctly aligned.
39.
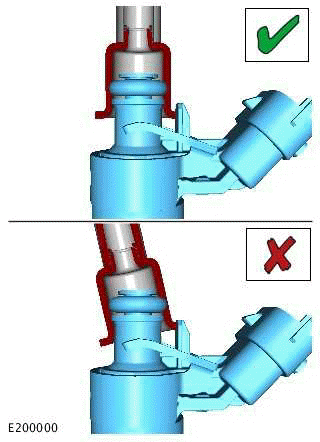
Make sure the fuel injectors are correctly aligned.
40.
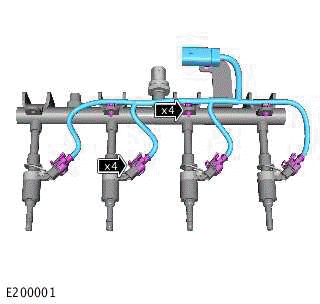
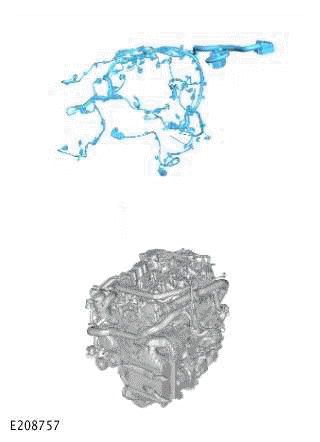
- Install the wiring harness.
- Connect the 4 electrical connectors.
- Install the 4 wiring harness clips.
41.
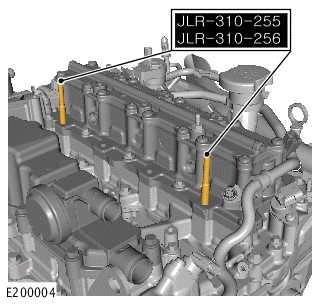
Install the appropriate special tools. If a new cylinder head has not been installed then the special tool JLR-310-255 with the threaded section must be used. If a new cylinder head has been installed then the special tool JLR-310-256 without the threaded section must be used.
Special Tool(s): JLR-310-255, JLR-310-256
42.
CAUTION: Tighten the fuel rail bolts one turn at a time until the correct torque figure is achieved.
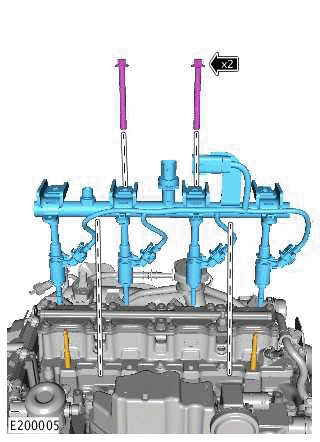
- Install the fuel rail and fuel injector assembly. Use the special tool guide pins to control the position.
- Install and tighten the 2 bolts.
Torque: 20Nm
43. Remove the special tools.
Special Tool(s): JLR-310-255, JLR-310-256
44.
CAUTION: Tighten the fuel rail bolts one turn at a time until the correct torque figure is achieved.
Install and tighten the 2 bolts.
Torque: 20Nm
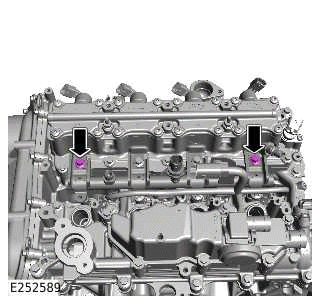
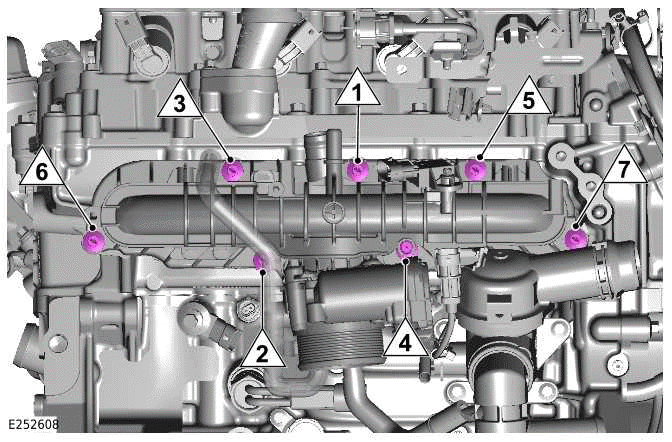
45.
Tighten the 4 bolts in the illustrated sequence.
Torque: 30Nm
46.
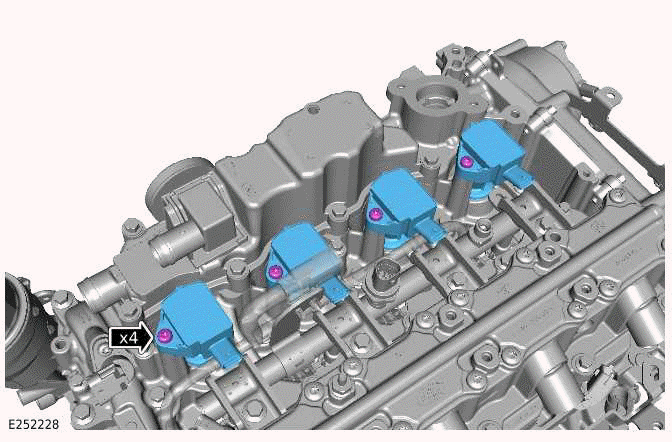
- Install the 4 ignition coils.
- Install and tighten the 4 bolts.
Torque: 8Nm
47.
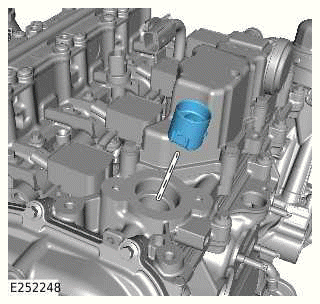
- Lubricate the High Pressure (HP) fuel pump tappet with clean engine oil.
- Install the HP fuel pump tappet.
48.
CAUTION: Install the fuel pump evenly onto the camshaft cover surface by one turn on each bolt alternating until the required torque is achieved.
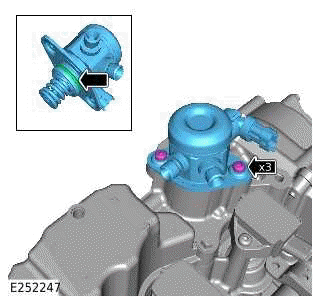
- Inspect the O-ring seal. Install a new O-ring seal if damaged or worn.
- Lubricate the O-ring seal with clean engine oil.
- Install the HP fuel pump.
- Install and tighten the 2 bolts.
Torque: 11.5Nm
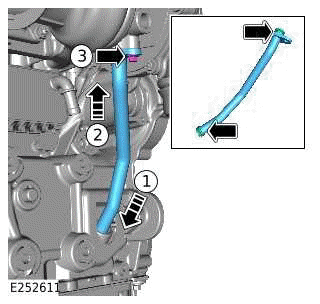
49.
- Install the HP fuel line.
- Tighten the 2 fuel line unions finger tight.
50.
- Tighten the 2 fuel line unions in the illustrated sequence.
Torque: 20Nm
- Wait for 30 seconds and recheck the final torque of the 2 fuel line
unions.
Torque: 20Nm
51.
- Install the HP fuel line.
- Tighten the fuel line union finger tight.
- Install and tighten the 2 bolts.
Torque
- Stage1: 11.5Nm
- Stage2: Loosen 90º
52.
- Tighten the fuel line union.
Torque: 20Nm
- Tighten the 2 bolts.
Torque: 11.5Nm
- Wait for 30 seconds and recheck the final torque of the fuel line union.
Torque: 20Nm
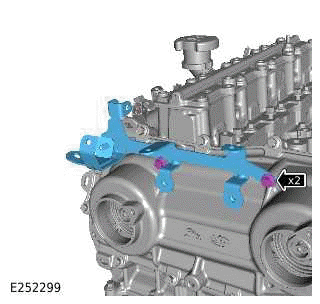
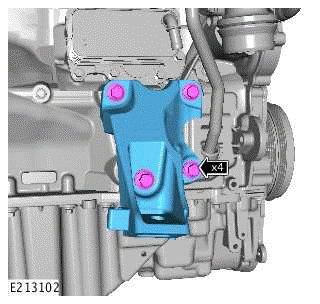
53.
- Install the bracket.
- Install and tighten the 4 bolts.
Torque
- M10: 47.5Nm
- M8: 25Nm
54.
- Inspect the gasket. Install a new gasket if damaged or worn.
- Install the thermostat housing.
- Install and tighten the 4 bolts.
Torque: 11.5Nm
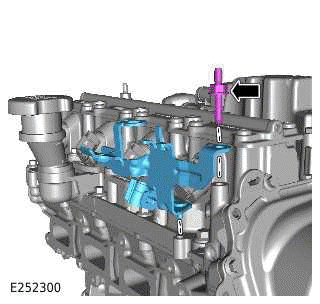
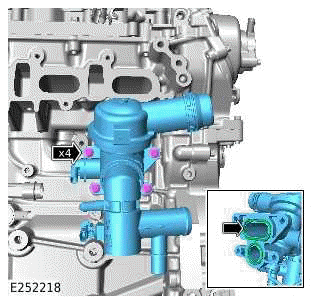
55.
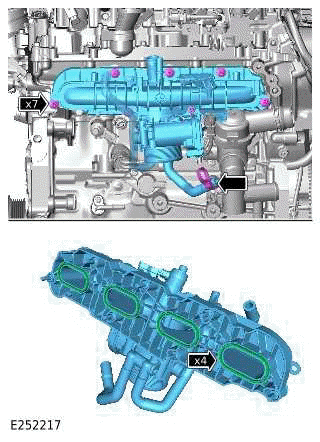
- Install the 4 new O-ring seals.
Renew Part: Intake manifold seals Quantity: 4.
- Install the intake manifold.
- Install, but do not fully tighten the 7 bolts.
- Connect the engine coolant hose and install the clamp.
56.
Tighten the 7 bolts in the illustrated sequence.
Torque: 11.5Nm
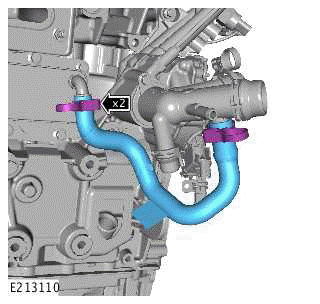
57.
- Inspect the O-ring seal. Install a new O-ring seal if damaged or worn.
- Install the engine coolant pipe.
- Install and tighten the 2 bolts.
Torque: 11.5Nm
58.
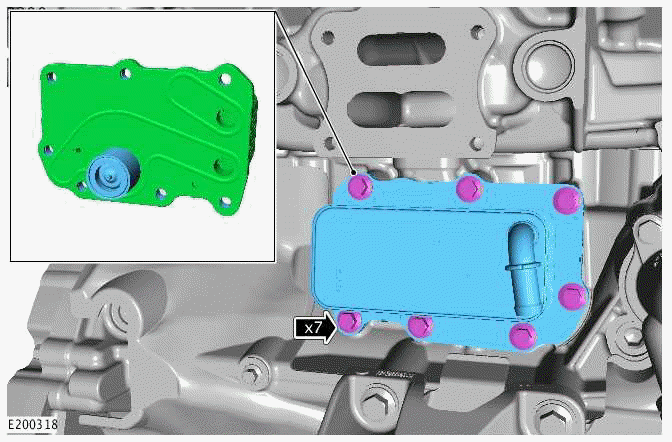
- Install a new gasket.
Renew Part: Oil cooler gasket Quantity: 1.
- Install the oil cooler.
- Install, but do not fully tighten the 7 bolts.
59.

Tighten the 7 bolts in the illustrated sequence.
Torque
- Stage1: 15Nm
- Stage2: 25Nm
60.
- Install the engine coolant hose.
- Connect the 2 engine coolant hose clamps.
61.

Install a new exhaust manifold gasket.
Renew Part: Exhaust manifold gasket Quantity: 1.
62.
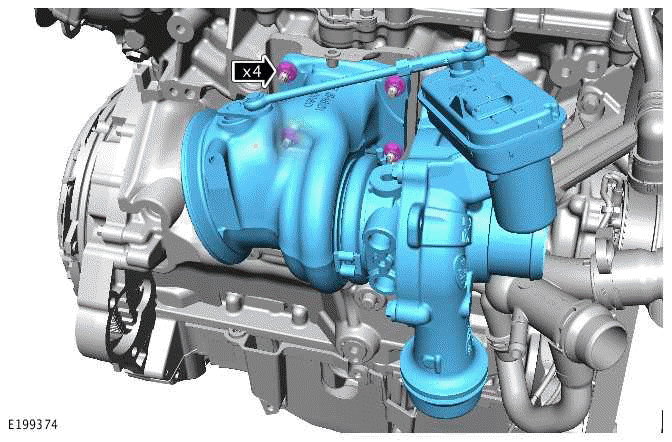
- Install the turbocharger.
- Install, but do not fully tighten the 4 new nuts.
Renew Part: Exhaust manifold to turbocharger nuts Quantity: 4.
63.
Tighten the 4 nuts in the illustrated sequence.
Torque
- Stage1: 18Nm
- Stage2: 25Nm
64.
- Install 2 new O-ring seals.
Renew Part: Oil return pipe O-ring seal Quantity: 2.
- Install the turbocharger oil return pipe.
- Install and tighten the bolt.
Torque: 10.5Nm
65.
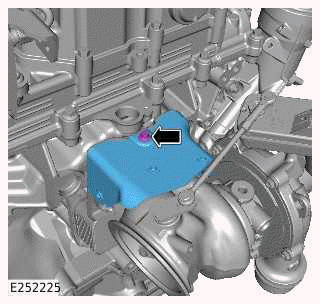
- Install the heatshield.
- Install and tighten the bolt.
Torque: 9Nm
66.
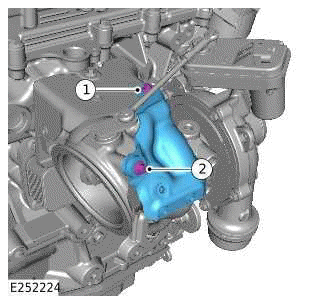
- Install the heatshield.
- Install and tighten the bolt (1).
Torque: 9Nm
- Install and tighten the new bolt (2).
Renew Part: Turbocharger heatshield bolt(s) Quantity: 1.
Torque: 9Nm
67.

- Install the heatshield.
- Install and tighten the 4 bolts.
Torque: 9Nm
68.
- Install the turbocharger oil feed pipe.
- Install 4 new sealing washers.
Renew Part: Turbocharger oil feed pipe banjo bolt washers Quantity: 4.
- Install and tighten the 2 new banjo bolts.
Renew Part: Turbocharger oil supply pipe banjo bolt Quantity: 2.
Torque: 18Nm
69.
- Install the bracket.
- Install and tighten the 4 bolts.
Torque: 60Nm
70.
- Install the engine coolant pump.
- Install and tighten the 2 bolts.
Torque: 6Nm
71.
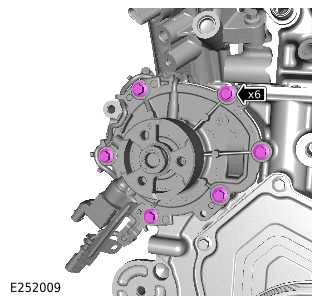
- Install the remaining 4 bolts.
- Tighten the 6 bolts.
Torque: 11.5Nm
72.
NOTE: If required, use a suitable tool to prevent the pulley from rotating.
- Install the engine coolant pump pulley.
- Install and tighten the 3 bolts.
Torque: 25Nm
73.
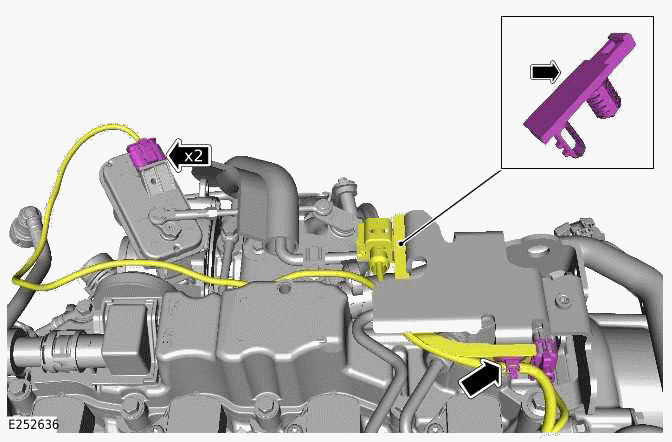
- Install the wiring harness.
- Install the 2 wiring harness clips.
- Install and tighten the 3 bolts.
Torque: 10Nm
74.
Install the wiring harness.
75.
- Connect the 2 electrical connectors.
- Install the 2 wiring harness clips.
76.
- Install and tighten the 2 nuts.
Torque: 10Nm
- Install the 3 wiring harness clips.
- Install and tighten the bolt.
Torque: 10Nm
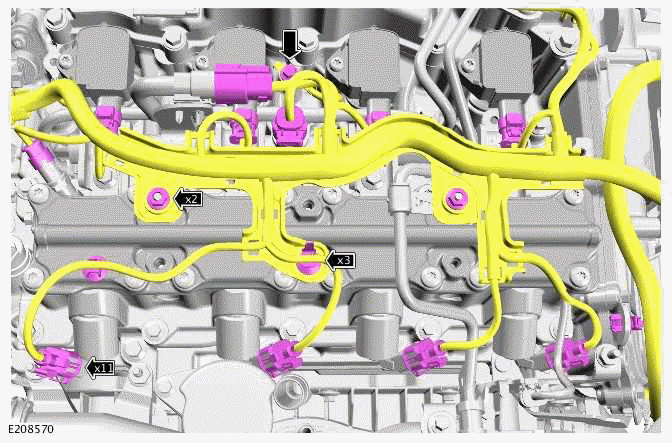
- Connect the 11 electrical connectors.
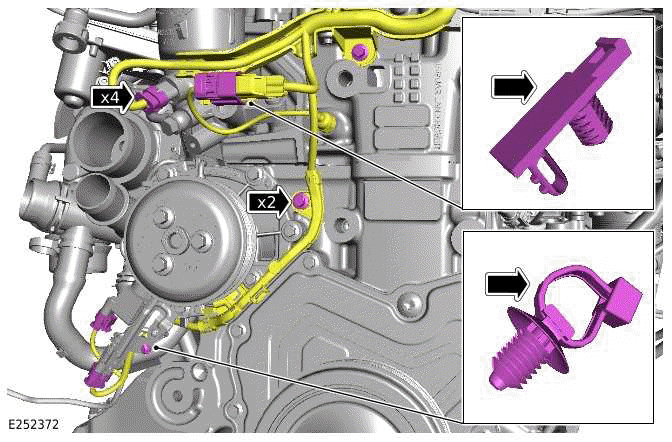
77.
- Install the 8 wiring harness clips.
- Connect the 4 electrical connectors.
78.
- Connect the 3 electrical connectors.
- Install the 4 wiring harness clips.
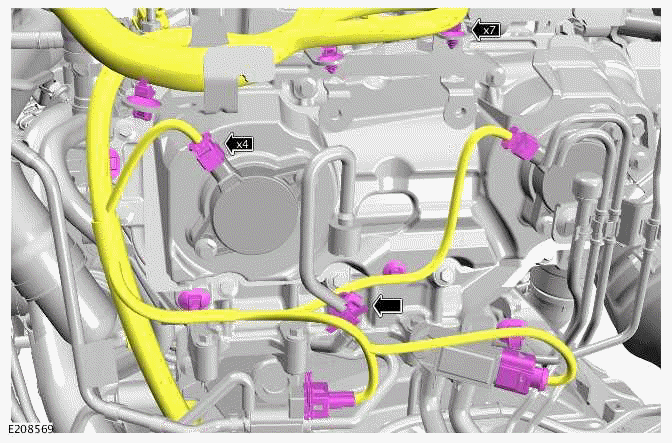
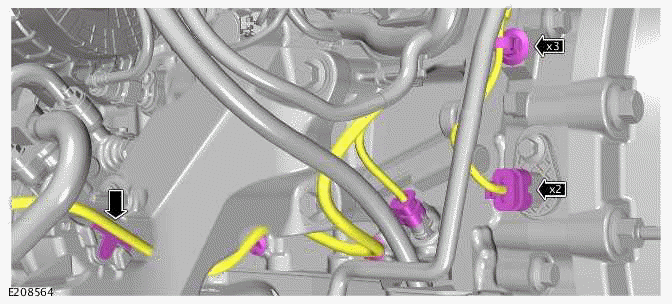
79.
- Connect the 2 electrical connectors.
- Install the wiring harness clip.
80.
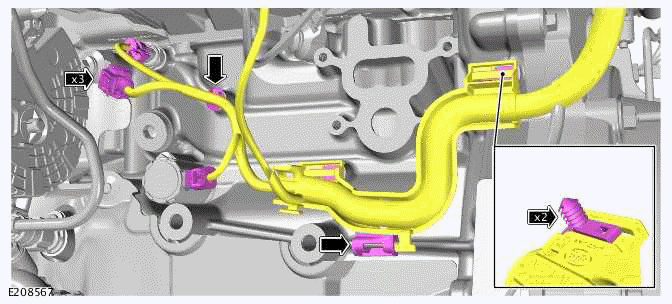
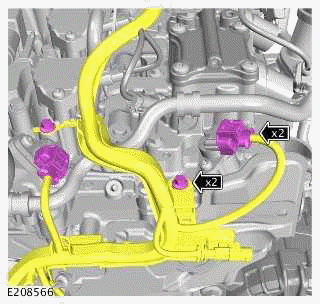
- Connect the 2 electrical connectors.
- Install the 4 wiring harness clips.
81.
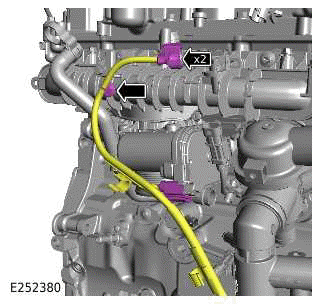
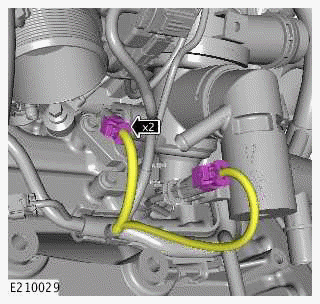
- Connect the 2 electrical connectors.
- Install and tighten the 2 bolts.
Torque: 10Nm
82.
- Connect the 4 electrical connectors.
- Install and tighten the 2 bolts.
- Install the 2 wiring harness clips.
83.
Connect the 2 electrical connectors.
84.
- Install the generator.
- Install and tighten the 2 bolts.
Torque: 47.5Nm
85.
- Install the wiring harness clip.
- Connect the electrical connector.
- Connect the startup battery positive cable.
- Install and tighten the nut.
Torque: 12Nm
- Reposition the cover.
86.
- Install the pipe.
- Tighten the clamp.
87.
- Install the 2 pulleys.
- Install and tighten the 2 bolts.
Torque
- M10: 47.5Nm
- M8: 25Nm
- Install the 2 covers.
88.
- Install a new O-ring seal.
Renew Part: Oil level gauge O-ring seal Quantity: 1.
- Lubricate the O-ring seal with clean engine oil.
- Install the oil level gauge assembly.
- Install and tighten the bolt.
Torque: 7Nm
- Install the 3 wiring harness clips.
89.
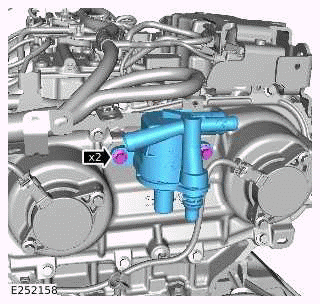
- Install the engine coolant degas separator.
- Install and tighten the 2 bolts.
Torque: 11.5Nm
90.
- Inspect the O-ring seal. Install a new O-ring seal if damaged or worn.
- Install the engine coolant hose.
- Connect the engine coolant hose and install the clamp.
91.
- Inspect the O-ring seal. Install a new O-ring seal if damaged or worn.
- Install the engine coolant hose.
- Install and tighten the bolt.
Torque: 11.5Nm
- Connect the engine coolant hose and install the clamp.
- Install the clip.
92.

- Inspect the O-ring seal. Install a new O-ring seal if damaged or worn.
- Install the engine coolant hose assembly.
- Install and tighten the 3 bolts.
Torque: 11.5Nm
- Connect the engine coolant hose and install the clamp.
93.
- Install the engine coolant hose.
- Connect the 2 engine coolant hoses and install the 2 clamps.
Install and tighten the 3 bolts.
- Torque: 7Nm
94.
- Install the purge valve assembly.
- Connect the breather pipe connector.
- Install the 2 clips.
- Connect the 2 electrical connectors.
95.
Install and tighten the 2 bolts.
Torque: 11.5Nm
96.
- Install the vacuum harness.
- Install the 5 vacuum harness clips.
- Connect the vacuum pipe connector.
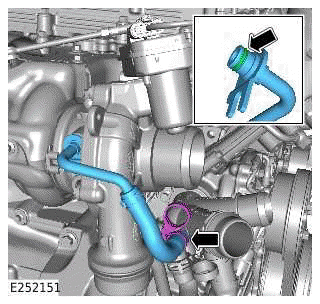
97.
- Install the engine coolant hose.
- Connect the engine coolant hose.
- Install and tighten the 2 bolts.
Torque: 11.5Nm
98.
- Install the breather pipe.
- Connect the 2 breather pipe connectors.
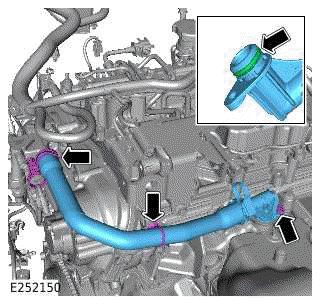
99.
- Install the engine coolant pipe.
- Install the clip.
- Connect the engine coolant pipe.
100.
- Install the engine coolant pipe.
- Connect the 2 engine coolant hoses and install the 2 clamps.
- Install and tighten the 2 bolts.
Torque: 25Nm
- Install the wiring harness clip.
101.
- Install the NVH material.
- Install the 3 clips.
102. Install the engine assembly.
103. Fill the engine with clean engine oil.
READ NEXT:
 Exhaust System
Exhaust System - Ingenium I4 2.0l Petrol/Ingenium I4 2.0l Petrol - PHEV
SPECIFICATIONS
NOTE:
Numbers with a green background are a single use component.
COMPONENT TORQUE LOCATION
COMPONENT TORQUE LO
Exhaust System - Description and Operation
DESCRIPTION AND OPERATION
COMPONENT LOCATION
COMPONENT LOCATION - 1 OF 1
NOTE:
Vehicle with 5 doors is shown. Vehicle with 3 doors is similar.
Ring flange to turbocharger
Flexible coupling
Resona
Exhaust System - Diagnosis and Testing
DIAGNOSIS AND TESTING
PRINCIPLES OF OPERATION
For a detailed description of the Exhaust System, refer to the relevant
Description and Operation section in the
workshop manual.
INSPECTION, VERIFICATIO
SEE MORE:
Instrument Panel Wiring Harness
REMOVAL AND INSTALLATION
REMOVAL
NOTES:
This procedure contains some variation in the illustrations depending
on the vehicle specification, but the
essential information is always correct.
This procedure contains illustrations showing certain components
removed to provide extra clarity.
1.
Secondary Bulkhead Right Panel
REMOVAL AND INSTALLATION
REMOVAL
NOTE:
This procedure contains some variation in the illustrations depending
on the vehicle specification, but the
essential information is always correct.
This procedure contains illustrations showing certain components
removed to provide extra clarity.
1.
