
Land Rover Defender: Road Test
DESCRIPTION AND OPERATION
WARNING: At commencement of a road test, check the brake operation while travelling at low speed before continuing with the test. If the brakes pull to one side, or appear to be otherwise inoperative, do not continue with the road test until the fault has been found and rectified.
NOTES:
- Road tests may require the Customer's approval and/or presence.
- Please follow local laws and regulations in regards to operating a vehicle on the public highway.
If a road test is not permitted, please carry out all possible static checks as a minimum.
PRE-TEST AND FUNCTIONAL CHECKS
NOTE: For additional information on systems that must be checked, refer to the relevant section in the Workshop Manual.
Pre-test and functional checks of systems which affect the safe and legal operations of the vehicle, such as brakes, lights and steering, must be carried out before the road test.
- Check operation of all lamps, horns and warning indicators.
- Check condition and operation of seats, seat belts and mirrors.
- Check condition and operation of windshield, wipers, blades and washer jets.
CAUTIONS:
- Brake fluid level should be between MIN and MAX based upon brake pad wear.
- Only top-up brake fluid level to MAX after new brake pads have been installed.
- If the brake fluid level is below MIN, visually check for any leaks.
Check brake fluid level.
- Check engine oil level.
- Check engine coolant level and PHEV battery coolant level (PHEV vehicles only).
- Check tires, for correct pressure, compatible types and tread patterns, and wear within limits.
- Check there is sufficient fuel in the tank to complete the test.
- Check all around the engine, transmission and under the vehicle for any fluid leak. Make a note of any apparent leaks and wipe off the surrounding areas to make it easier to identify the extent of the leak on completion of the test.
BRAKE TESTING
Avoid brake testing on busy roads where it can cause inconvenience or danger to other road users.
CAUTION: Brake testing, which includes heavy brake applications, should not be carried out with new brake pads/discs until the components have bedded-in. New brake friction material will not reach full efficiency until the bedding-in process is complete.
Test the brakes at several speeds within the normal operating range using both light and heavy pedal pressure. Note any tendency to snatch, pull or drag, and any undue delay in application or release.
Allow the vehicle to coast and note any tendency to pull to one side, or evidence that the brakes are binding.
AIR SUSPENSION TESTING
CAUTIONS:
- Make sure that the vehicle is clear of people and obstacles before adjusting the suspension.
- To maintain control of the vehicle at a standstill, during suspension height adjustment, make sure that the Electric Parking Brake (EPB) is applied. Also make sure that the transmission is engaged in Neutral (N) or Park (P).
NOTES:
- Suspension adjustment slows and stops, if there is not sufficient air reserves in the electronic air suspension system. In this event, start the engine to allow operation of the compressor. Run the engine until sufficient air reserves resume.
- Normal operation of the compressor generates heat. In the event of overheating, switch off the engine and allow time for the compressor to cool.
- The electronic air suspension system may raise or lower the vehicle automatically. For example, if a terrain response driving program requires it or if the vehicle is travelling at high speeds.
Functional checks of the air suspension system must be performed with all doors closed:
- Up button: Press and release to raise the suspension height. Off-road height indicator lamp: Illuminates when the suspension is set to off-road height.
- Down button: Press and release to lower the suspension height. Normal height indicator lamp: Illuminates when the suspension is set to normal height.
- Access height button: Press to set the suspension to access height. Access height indicator lamp: Illuminates when the suspension is set to access height.
The electronic air suspension system may raise or lower the vehicle automatically. For example, if a terrain response driving program requires it or if the vehicle is traveling at high speeds.
ROAD TEST
NOTE: For additional information on systems that must be checked, refer to the relevant section in the Workshop Manual.
During a road test, functional checks of the following systems/circuits must be carried out.
- Check correct operation of dashboard, instruments and switches.
- Check correct operation of climate control system.
- Check correct operation of park brake.
- Check correct operation of selector mechanism and clutch (manual transmission)
- Check correct operation of drive selector and steering wheel paddles (automatic transmission).
- Check the steering wheel is in the straight ahead position.
- Check steering operation is smooth, accurate, not excessively heavy or with excessive free play or vibration. Does not pull to one side and self centres smoothly after cornering.
- Check overall handling, straight-line stability and abnormal noise or vibration.
- Check the engine power output is satisfactory, acceleration is smooth and accelerator pedal operation is not stiff or heavy, and engine speed returns to idle correctly.
- Check cruise control engages and disengages correctly.
- Check brakes operate correctly.
- Select the LOW range gears and drive the vehicle 3 to 4 vehicle lengths, then re-select HIGH range gears (vehicles with twin-speed transfer box only).
- Check correct operation of air suspension system (if fitted).
- Check operation of the Stop/Start system (if fitted).
Smart Key Transmission Frequency
DESCRIPTION AND OPERATION
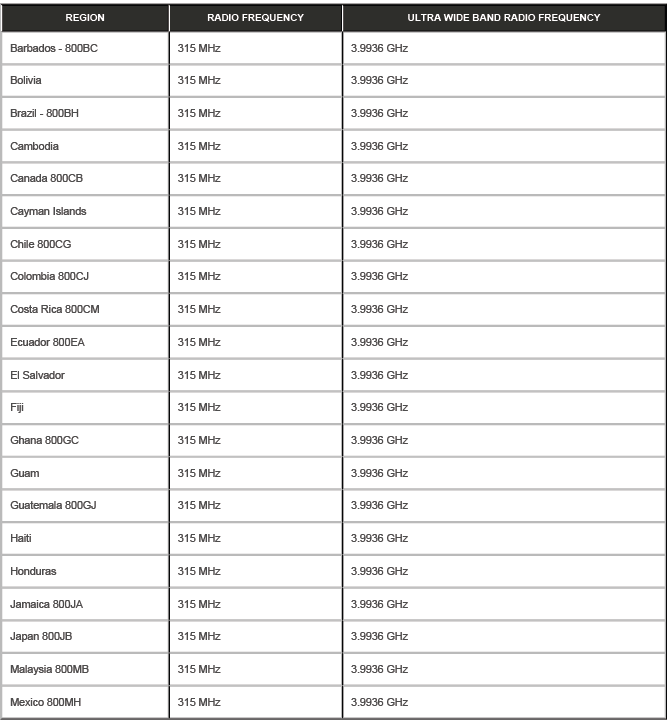
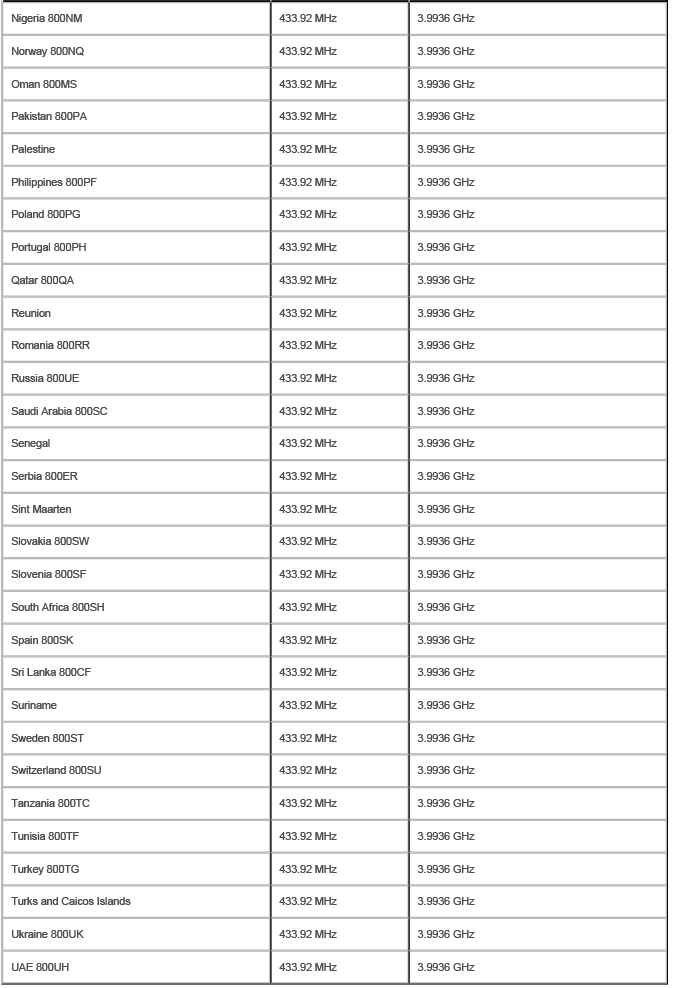
Smart Key Transmission Frequency - 315 MHz

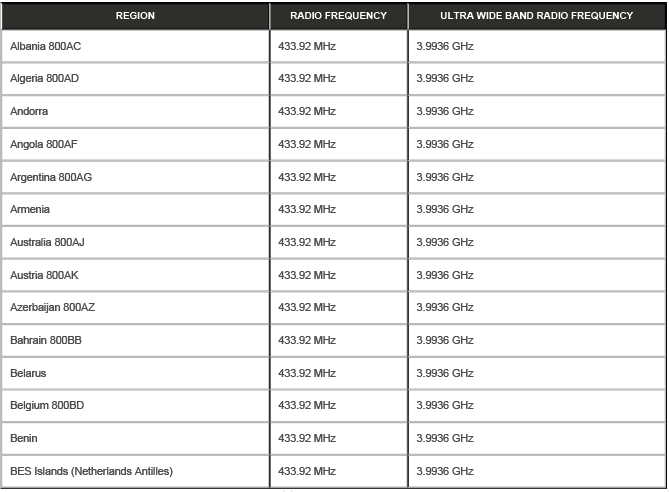
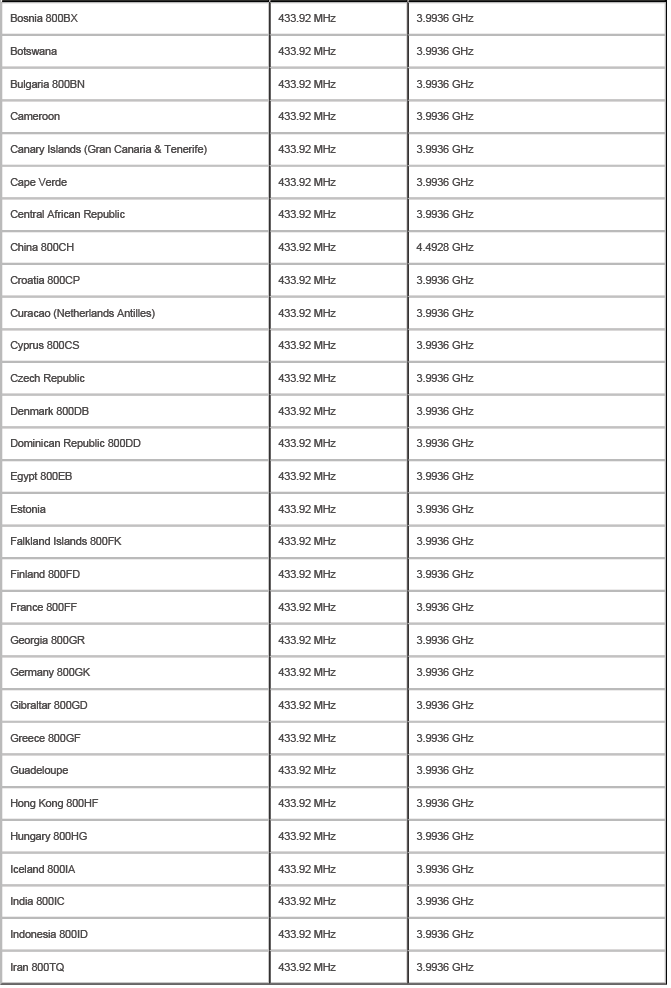
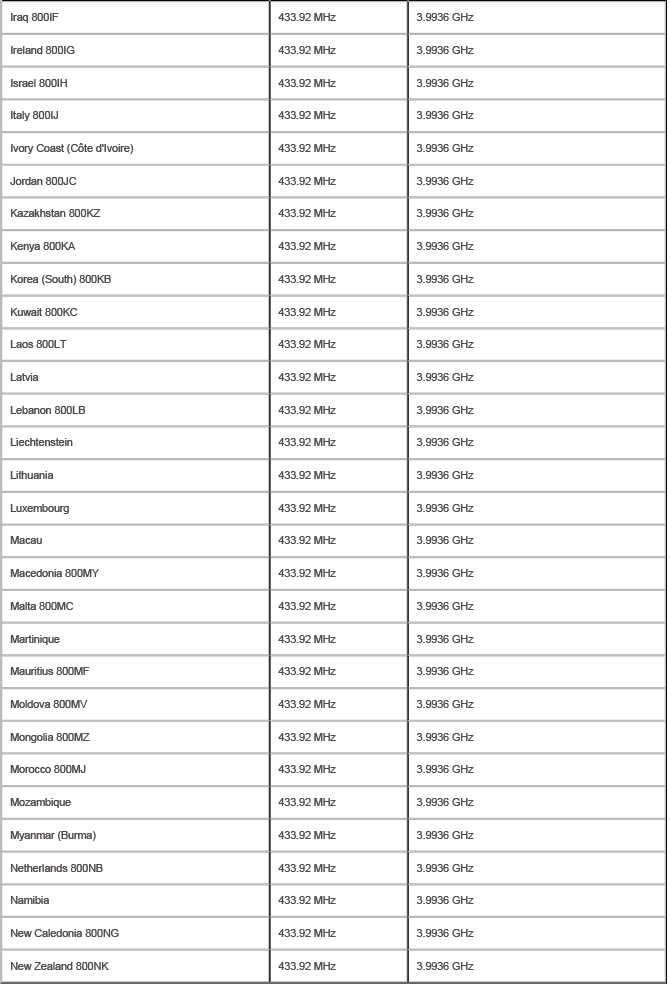
Smart Key Transmission Frequency - 433.92 MHz

READ NEXT:
 Vehicle In Workshop
When working on a vehicle in the workshop always make sure that:
Where practicable, the parking brake is applied and the wheels are
securely chocked to prevent the vehicle
moving forwards or back
General Installation Instructions
COMPONENT REMOVAL
Whenever possible, clean components and the surrounding area before removal.
Blank off openings exposed by component removal.
Following disconnection, seal fuel, oil or hydraulic
SEE MORE:
Towing safety
Make sure the following warnings and
cautions have been read and fully
understood before towing a trailer. Failure
to follow the guidance could result in
vehicle damage, serious injury, or death.
Do not exceed the Gross Vehicle Weight
(GVW), maximum rear axle weight, or
nose weight. Exceeding any o
Component Location, Overview
COMPONENT LOCATION
COMPONENT LOCATION 1 OF 2 - MODEL 110 VEHICLES
Rear left height sensor
Chassis Control Module (CHCM)
Interactive Control Interface Module 'A' (ICIMA)
Interactive Display Module 'A' (IDMA)
Front left air spring and damper
Front left height sensor
Front accelerometer (quant
