
Land Rover Defender: Controls overview
Land Rover Defender 2020-2026 Owner's Manual / Controls overview
DRIVER CONTROLS
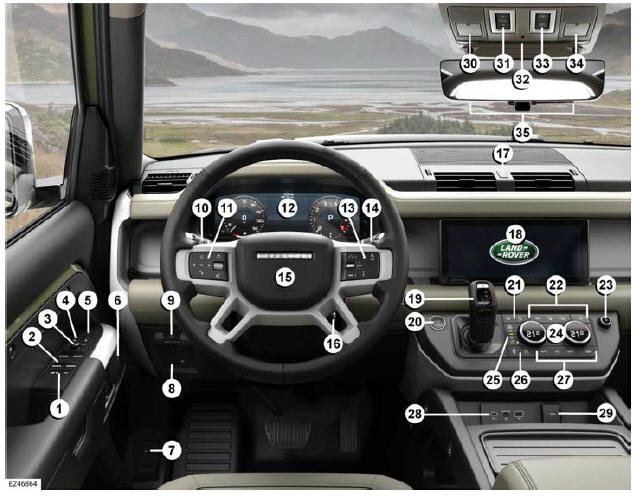
- Rear window isolator and child safety locks
- Window controls
- Mirror adjustment and power-folding mirrors
- Driver's seat position memory
- Clear exit monitor
- Doors lock and unlock
- Hood release lever
- Interior illumination control: Rotate to adjust.
- Electric Parking Brake (EPB)
- Exterior lights and trip computer controls
- Instrument panel menu, audio, phone, and voice controls
- Instrument panel
- Lane Keep Assist (LKA), cruise or adaptive cruise control, heated steering wheel, and speed limiter
- Wash/wipe control
- Horn.
- Steering wheel adjuster
- Hazard warning lights
- Touchscreen
- Gear selector
- Engine START/STOP
- All Terrain Progress Control (ATPC), Hill Descent Control (HDC), and auto stop/start
- Climate control
- Media power button and volume control
- Driving programs and climate control
- Electronic air suspension control
- Dynamic Stability Control (DSC) and low range transfer case
- Climate control
- Portable media connections
- Auxiliary power socket
- Optimized Land Rover assistance
- Sunroof
- Front interior lights
- Sunroof blind
- SOS emergency call
- ClearSight rear-view mirror and garage door opener
READ NEXT:
 Smart key operation
The smart key system uses Radio
Frequency (RF) transmissions that could
interfere with implanted medical
devices. To avoid any possibility of
interference between the system and
the device, make sur
Keyless entry
The smart key system uses Radio
Frequency (RF) transmissions that could
interfere with implanted medical
devices. Make sure that the device is
kept at a safe distance of at least 9 in
(22 cm) away fr
SEE MORE:
All terrain progress control (ATPC) safety
Make sure the following warnings have
been read and fully understood before
using All Terrain Progress Control (ATPC).
Failure to follow the guidance could result
in vehicle damage, serious injury, or death.
Use extreme care when maneuvering
the vehicle in challenging off-road
conditions. The driv
Transfer Case - Installation
INSTALLATION
SPECIAL TOOL(S)
303-1069
Adapter, Wrench
PART(S)
NOTES:
This procedure contains some variation in the illustrations
depending on the vehicle specification, but
the essential information is always correct.
This procedure contains illustrations showing certain components
© 2010-2026 Copyright www.lrdefender.org
