
Land Rover Defender: Rear towing eye

The screw-in type rear recovery eyes are designed for on-road recovery only. If the screw-in type towing eyes are used for any other purpose, it may result in vehicle damage and can cause serious injury or death.

Use extreme caution when moving or towing the vehicle. Death or serious injury may occur.
Note: The rear towing eyes may be used to tow another vehicle, if required.
Vehicles without exposed towing eyes

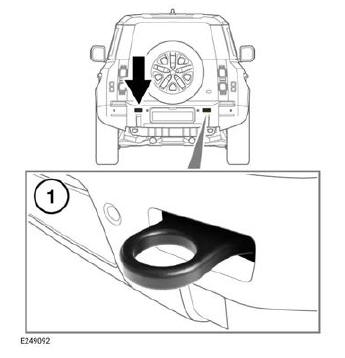
The vehicle's rear towing eye socket is located behind the rear bumper cover 1.
To remove the cover, lever the left-hand side of the cover outward from the bumper.
The vehicle's rear towing eye 2 is located underneath the loadspace floor. Screw the towing eye into the aperture located behind the rear bumper cover.
To refit the cover, push the right-hand side of the cover home first. Then push the left-hand side of the cover to be flush with the bumper.
Vehicles with exposed towing eyes

The rear exposed towing eyes are designed for both on-road and off-road recovery (up to 14330 lbs or 6500 kg).
If the exposed towing eyes are used for any other purpose, it may result in vehicle damage and can cause serious injury or death.

Avoid leaving towing equipment attached to the rear towing eyes when not in use.
Some towing equipment may damage the vehicle's paintwork.
Vehicles with exposed towing eyes have a pair of towing eyes protruding through the rear bumper cover 1.
OFF-ROAD RECOVERY

If the towing points are to be used for off-road recovery, it is essential that off-road driver training, covering recovery techniques is undertaken.
Further information on off-road driver training can be found at: www.landroverexperience.com.
TRANSPORTING THE VEHICLE

Use extreme caution when moving or towing the vehicle. Death or serious injury may occur.

The front and rear tie down points must be used only for securing the vehicle during transportation. If they are used for any other purpose, it may result in vehicle damage and serious injury.
The recommended method for recovery/ transporting the vehicle is by a trailer designed for that purpose.
Always use qualified persons to perform recovery and to make sure that the vehicle is secured correctly.

If the vehicle's electronics are operational, the air suspension must be set to access height, before securing the vehicle to a recovery vehicle or trailer. Failure to do so can result in damage to the vehicle.
READ NEXT:
 Towing the vehicle on four wheels
The recovery agent MUST activate the
transmission park release mechanism
before towing commences.
If Neutral (N) is selected and the engine
is then switched off, the transmission
automatically selec
After a collision
BEFORE STARTING OR DRIVING
If the vehicle is involved in a collision, it
should be checked by a retailer/
authorized repairer, or suitably qualified
personnel, before starting or driving. A
collision
Vehicle labels
LABEL LOCATIONS
Warning labels attached to the
vehicle bearing this symbol
mean: Do not touch or adjust
components until having read
the relevant instructions in the
handbook.
Labels showing this symb
SEE MORE:
Windshield Sunshade
WINDSHIELD SUNSHADE - PART NUMBER:
VPLES0571
REMOVAL AND INSTALLATION
VPLZS0500, VPLES0571
WARNING:
Accessories which are not correctly installed can be dangerous. Read the
instructions carefully prior to
installation. Comply with instructions at all times. If in doubt, contact your
nearest approv
Seat Backpack
SEAT BACKPACK - PART NUMBER: VPLES0573
REMOVAL AND INSTALLATION
WARNING:
Accessories which are not correctly installed can be dangerous. Read the
instructions carefully prior to
installation. Comply with instructions at all times. If in doubt, contact your
nearest approved retailer.
NOTE:
This pro
