
Land Rover Defender: Vehicle labels
LABEL LOCATIONS
 Warning labels attached to the
vehicle bearing this symbol
mean: Do not touch or adjust
components until having read
the relevant instructions in the
handbook.
Warning labels attached to the
vehicle bearing this symbol
mean: Do not touch or adjust
components until having read
the relevant instructions in the
handbook.
 Labels showing this symbol
indicate that the ignition system
utilises very high voltages. Do
not touch any ignition
components while the ignition
is switched on.
Labels showing this symbol
indicate that the ignition system
utilises very high voltages. Do
not touch any ignition
components while the ignition
is switched on.
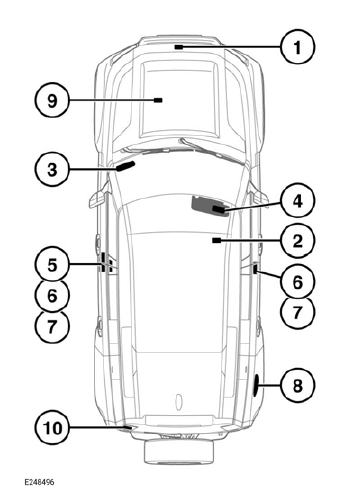
- Hood locking platform: Air Conditioning (A/C) label.
- Top of the battery: Battery warning symbols.
- The Vehicle Identification Number
(VIN) is etched onto a label, visible
through the lowest part of the right
side of the windscreen. The number is
also stamped into the right-side
suspension tower.
Note: The VIN number may be requested by the retailer/authorized repairer.
Note: The vehicle's built date is shown on the tire pressure label. The builtdate is the calendar month and year in which the body and powertrain assemblies were conjoined and the vehicle was driven from the production line.
- Passenger side sun visor: Air bag label, vehicle handling label.
- B pillar: VIN certification label, containing the certified vehicle weights.
- B pillar or inside base of the front door: Tire pressure label and placard.
- B pillar: Air bag warning label.
- Inside the fuel filler flap: Fuel label.
- Engine number: Inlet manifold.
- Rear taildoor warning information.
It is important to be familiar with these subjects, to make sure that the vehicle and its features are used safely.
READ NEXT:
 Using the passport to service
YOUR PASSPORT TO SERVICE
This section of the Owner's Handbook
contains information essential for the
understanding of your vehicle warranties,
and for the implementation of any
necessary warranty rect
Foreword
LAND ROVER ROADSIDE ASSISTANCE
We are committed to providing high levels
of owner satisfaction and to offering you
the highest standard of owner care. Jaguar
Land Rover (JLR) is pleased to welcome
you
SEE MORE:
Exhaust System - Removal and Installation
REMOVAL AND INSTALLATION
PART(S)
REMOVAL
WARNING:
Observe due care when working near a hot exhaust system.
CAUTION:
Make sure the exhaust system is supported at all times.
NOTE:
This procedure contains illustrations showing certain components
removed to provide extra clarity.
This procedure co
Activity key
The activity key is a touchscreen with wrist
strap designed to support situations where
the smart key might be obtrusive or
difficult to keep secure. The activity key is
waterproof to a depth of 131 ft (40 m) and
is shockproof. Care should be taken
during certain sporting activities, e.g.,
skiing, j
