Land Rover Defender: Adaptive speed limiter

Make sure the relevant safety warnings have been read and understood before driving the vehicle.
Note: The adaptive speed limiter does not operate if the traffic sign recognition system is not operating.

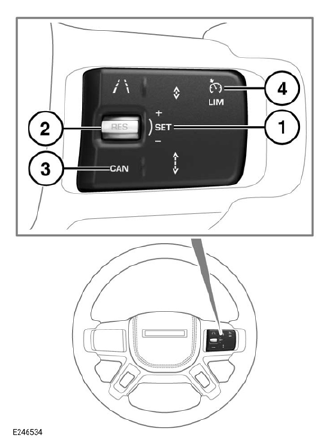
- Speed control rocker switch. Push the
rocker switch upwards to select SET+.
Push the rocker switch downwards to select SET-. - Push the speed control rocker switch inwards to select RES.
- CAN button.
- LIM button.
 Press the LIM
button (4) on the
steering wheel to toggle
between adaptive speed limiter
and cruise control. Depending
on vehicle status, the instrument
panel displays either the speed
limiter or the adaptive speed
limiter information lamp.
If the speed limiter information lamp is displayed, press and hold the CAN button (3). The adaptive speed limiter information lamp replaces the speed limiter information lamp to confirm that the adaptive speed limiter has been selected.
The adaptive speed limiter does not operate until activated. Push the set speed rocker switch (1) upwards (SET+) or inwards (RES) to activate the adaptive speed limiter. The Head-Up Display (HUD) and instrument panel display the detected speed limits as icons.
If the adaptive speed limiter detects a speed limit lower than the current vehicle speed, it automatically slows the vehicle to meet the speed limit.
If the system detects a speed limit higher than the current vehicle speed, it allows the driver to accelerate up to the speed limit.
Note: Adaptive speed limiter only activates if the vehicle's speed is less than 20 mph (30 km/h) over the set speed. If the vehicle's speed is 20 mph (30 km/h) above the set speed, the instrument panel displays a warning message and the system does not activate.
Press the CAN button to suspend adaptive speed limiter operation. Push the set speed rocker switch(1) inwards (RES) or upwards (SET+) to resume adaptive speed limiter operation.
The adaptive speed limiter's detected speed limit can be overridden if rapid acceleration is required. Fully press the accelerator pedal to accelerate past the adaptive speed limiter's set speed. When the vehicle's speed drops below the adaptive speed limiter's detected speed limit, any speed limitations are reapplied.
The system's detected speed limit can be adjusted, if required, to control the vehicle's speed at just above or below the detected speed limit. To adjust the detected speed limit:
1. Push the set speed rocker (1) upwards (SET+) to raise the maximum vehicle speed 1 mph (2 km/h) above the detected speed limit. The maximum increase available is 6 mph (10 km/h) above the detected speed limit. Push and hold the set speed rocker switch (1) (SET+) to raise the maximum vehicle speed in larger increments above the detected speed limit.
2. Push the set speed rocker switch (1) downwards (SET-) to reduce the maximum vehicle speed 1 mph (2 km/h) below the detected speed limit.
The maximum decrease available is 6 mph (10 km/h) below the detected speed limit. Push and hold the set speed rocker switch (1) downwards (SET-) to reduce the maximum vehicle speed in larger increments below the detected speed limit.
Note: Any adjustments to the system's detected speed limit are lost if the speed limiter is deactivated, or if the vehicle's ignition is switched off.
ADAPTIVE SPEED LIMITER LIMITATIONS
The adaptive speed limiter:
- Does not apply speed limits below 10 mph (16 km/h). For detected speed limits below 10 mph (16 km/h), the system sets a speed limit of 10 mph (16 km/h).
- Displays --- in the instrument panel if
the traffic sign recognition system
cannot determine a valid speed limit.
The last known valid speed limit is applied if this occurs.
- May allow vehicle speed to increase in certain conditions, e.g., when traveling downhill. If the vehicle's speed rises by more than 2 mph (3.5 km/h) above the detected speed limit, the instrument panel displays a warning message. If the vehicle's speed rises by more than 4 mph (7 km/h) above the detected speed limit for 4 seconds, a chime also sounds.
- Performance and accuracy are only as good as the information provided by the traffic sign recognition system.
- Performance and accuracy are only as good as the information provided by the navigation system. Always make sure the navigation system is operating correctly and is using the latest software.
- Does not operate if the traffic sign recognition system is unavailable. If the adaptive speed limiter is unavailable the system reverts to standard speed limiter operation using the last detected speed limit.
The instrument panel displays messages to inform the driver of any performance or system issues.

