
Land Rover Defender: Wiper operation

Do not operate the wipers on a dry windshield as the wipers may cause damage to its surface.

Remove any snow, ice, or frost from the windshield, around the wiper arms and blades, and the cowl area, before operating the wipers. Failure to do so can damage the wiper arms, blades and the windshield.

Make sure the wipers do not stick to the glass during freezing or hot conditions.
Use the winter park position during extreme temperatures. Attempting to use the wipers while they are stuck to the glass could cause damage to the wiper blades and mechanism.

To avoid damage to the wiper blade, do not lift the wiper by the wiper blade.
Always lift the wiper by the wiper arm.

Make sure the wipers are not in automatic rain sensing mode and are switched off before entering a car wash. If the wipers operate during the car washing process, damage may occur to the wiper mechanism.
Note: If the wipers leave smears on the glass after the vehicle has been washed, this may be due to wax or other residue.
Should this occur, clean the glass with the recommended windshield washer fluid.
Note: The windshield is no longer wiped effectively and the automatic rain sensing mode degrades if the wipers become worn. Always replace worn or damaged wiper blades as soon as possible. The wipers service position moves the wipers to allow wiper blade replacement.
Note: If the wipers become stuck or jammed, an electronic cut-out temporarily halts the operation of the wipers. If this happens, switch off the wipers and the vehicle's ignition, when safe to do so.
Clear any obstructions and free the wiper blades, before attempting to switch on the vehicle's ignition.
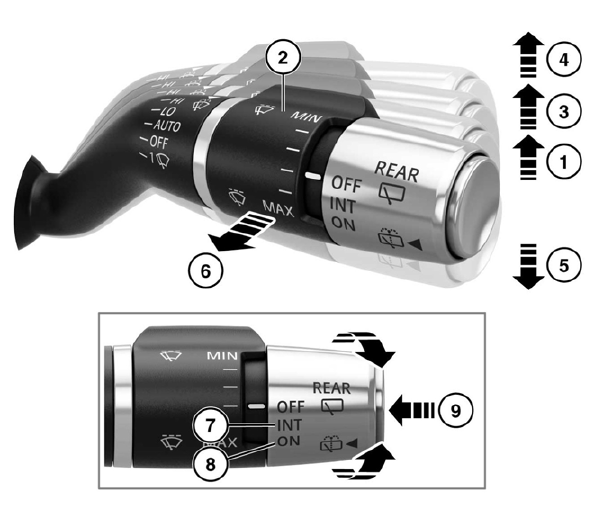
To operate the washers and wipers:
- Automatic rain sensing mode. The
front wipers respond and adapt
automatically to the ambient rain
conditions. The appropriate wiper
frequency is selected for the prevailing
conditions. The sensitivity of the
system can be adjusted by rotating the
collar (2).
When rain sensing mode is disabled: Intermittent wipe. The time delay between wipes can be adjusted by rotating the collar (2).
- Rotate the collar to adjust the
sensitivity of the automatic rain sensing
mode when position (1) is selected.
The higher the setting, the more responsive the system becomes. When automatic rain sensing mode is selected, or when sensitivity is increased, the system performs a single wipe.
Note: Wipe frequency increases with vehicle speed.
- LO: Low speed continuous wipe.
- HI: High speed continuous wipe.
- Single wipe of the windshield, or hold down for further continuous wipes.
- Windshield wash and wipe: Pull and
release to operate the front washers
and wipers. After a few seconds, a drip
wipe function clears any residual
washer fluid from the windshield. If
more washer fluid is required, pull and
hold the control's position.
Note: The front wipers do not operate while the hood is open.
- INT: Rear wiper, intermittent operation. Wiper frequency increases with vehicle speed.
- ON: Rear wiper, continuous operation.
- Rear window wash and wipe: Press and
release to operate the rear washer and
wiper. The wiper operates in a set
cycle to minimize drips when the
button is released. If more washer fluid
is required, push and hold the button.
Note: The rear wiper activates when Reverse (R) is selected and the front wipers are operating.
Note: The rear wiper does not operate while the taildoor is open.
READ NEXT:
 Rain sensor
Note: Static droplets may not be detected
when the vehicle is first started. A single
wipe should be used to clear the
windshield.
Note: If the wash/wipe control is in the
AUTO position, the wipers do
Winter park position
Make sure that the wiper arms are in the
winter park position before lifting the
wiper blades away from the windshield.
Failure to do so, may result in damage to
the bonnet.
When the vehicle is park
SEE MORE:
Engine Oil Vacuum Draining and Filling
GENERAL PROCEDURES
SPECIAL TOOL(S)
JLR-303-1644
Oil Extraction Kit
PART(S)
DRAINING
WARNINGS:
The spilling of hot oil is unavoidable during this procedure, care
must be taken to prevent scalding.
Be prepared to collect escaping oil.
CAUTION:
Before disconnecting any components, make sure the
SOS emergency call
There are two states of SOS emergency
call: Automatic and manual operation.
In a crash situation, where the air bags
have deployed, an automatic emergency
call is made to the emergency services. In
a non-crash situation, when emergency
assistance is required, the emergency call
button can be used ma
