
Land Rover Defender: Programming
Note: The instructions below apply to the majority of HomeLink compatible systems. However, there are some HomeLink applications, or HomeLink compatible systems, that require slightly different instructions. For more information and instructional videos, visit: www.HomeLink.com.
Note: Garage door openers manufactured after 1995 may be equipped with rolling code protection. In this case, a stepladder, or other sturdy, safe device may be required to reach the learn or smart button on the garage door opener.
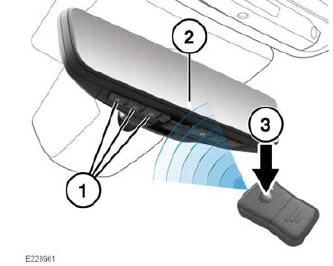
- HomeLink buttons.
- LED indicator.
- Remote control for the device, e.g., garage door opener.
Note: Dependent on the vehicle's specification, the location of the Homelink buttons may differ from those illustrated above.
If required, erase the previous programming from the HomeLink device.
To program the HomeLink device:
1. With the ignition switched on, press and release the required HomeLink button (1). The LED indicator (2) flashes orange.
2. Position the end of the remote control (3) 1 to 3 inches (2 to 8 cm) from the HomeLink button.
3. Press and hold the button on the remote control until the LED indicator changes from flashing orange to flashing or solid green.
Note: Some remote device systems require the operator to cycle the remote control button every 2 seconds during programming. Refer to the additional information in Gate operator and Canadian programming at the end of the PROGRAMMING instructions.
4. Firmly press and release the programmed HomeLink button up to three separate times to activate the device.
Note: The device should now be programmed. If not, carry out the following additional steps:
5. Locate the learn or smart button on the garage door opener's motor-head unit.
Note: The learn or smart button can usually be found directly on the motor-head unit. If in doubt, refer to the garage door opener's manual to identify the button.
6. Firmly press and release the learn or smart button. There are typically 30 seconds to initiate Step 7.
7. Return to the vehicle. Firmly press and release the programmed HomeLink button up to three separate times to activate the device. If the device activates, programming is complete.
Gate operator and Canadian programming
Canadian Radio Frequency (RF) laws require remote device systems to have a remote control signal that only operates for a short period of time. The signal times-out before programming is complete. The operator is required to cycle the remote control button every 2 seconds during programming. Some U.S. gate operators also have this type of signal.
If in Canada, or experiencing difficulties while programming the remote device, carry out the following: During programming of the remote device, replace programming step 3 with the following:
- Press and hold the HomeLink button.
Simultaneously, press and release the remote control button every 2 seconds, until the LED indicator rapidly flashes green or continuously illuminates green. Release the HomeLink and remote control buttons.
- Continue the programming process from step 4.
If the HomeLink LED indicator does not rapidly flash green or continuously illuminates green after performing these steps, contact HomeLink at: www.HomeLink.com.
HomeLink is a registered trademark of Gentex Corporation.
REPROGRAMMING A SINGLE GARAGE DOOR OPENER BUTTON
To program a remote device to a previously programmed HomeLink button:
1. Switch the ignition on.
2. Press and hold the required HomeLink button. After approximately 20 seconds, the LED indicator starts to flash orange.
3. Release the button.
4. Follow the programming instructions from step 3 onwards, as described in PROGRAMMING.
HomeLink is a registered trademark of Gentex Corporation.
TO ERASE ALL PROGRAMMING
To erase all programming from the HomeLink device:
1. Switch the vehicle's ignition on.
2. Press and hold the outer two HomeLink buttons until the LED indicator changes from continuously illuminated orange to flashing green.
Note: Do not press and hold the buttons for longer than 20 seconds.
3. Release the buttons. HomeLink is initialized and the previous settings of all three buttons are erased.
HomeLink is a registered trademark of Gentex Corporation.
READ NEXT:
 Radio frequency (RF) spectrum regulation statements
United States of America
This device complies with part 15 of the
FCC rules. Operation is subject to the
following two conditions:
This device may not cause harmful
interference, and
this device m
Electric windows
To prevent accidental operation, never
leave the smart key inside the vehicle if
children or animals are also left inside
the vehicle. Removal of the smart key
prevents unsupervised operation of the
SEE MORE:
Tire glossary
lbf/in² or psi: Pounds per square inch, an
imperial unit of measure for pressure.
kPa: Kilopascal, a metric unit of measure
for pressure.
Cold tire pressure: The air pressure in a
tire which has been standing in excess of
3 hours, or driven for less than 1 mile.
Maximum permissible inflation pre
Upper Timing Cover
REMOVAL AND INSTALLATION
PART(S)
REMOVAL
WARNING:
Be prepared to collect escaping coolant.
CAUTION:
Before disconnecting any components, make sure the area is clean and free from
foreign material. When
disconnected all openings must be sealed.
NOTES:
This procedure contains some variation in the
