
Land Rover Defender: Electric windows

To prevent accidental operation, never leave the smart key inside the vehicle if children or animals are also left inside the vehicle. Removal of the smart key prevents unsupervised operation of the windows, and the panoramic or canvas roof, which may result in serious injury or death.

If children are carried in the rear seats, the isolator button should be used to prevent operation of the windows and doors. If the windows or doors are operated by children, there is a risk of serious injury or death.

Any ice must be removed from the windows before operating. Operating icy windows can cause damage to the windows' operating system.
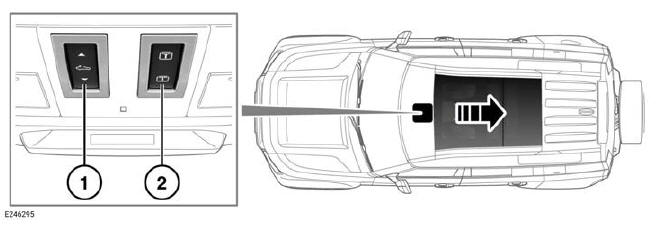
Note: 5-door vehicle is illustrated, 3-door vehicles are similar.
Note: Each switch has a two-stage operation. Lightly press or pull and hold to manually operate to the required position. Alternatively, press or pull fully and release for one-touch operation. Press the switch again to halt the one-touch operation at any time.
To operate the windows:
- Window switches:
- Briefly pull a switch fully up, and release to close a window.
- Briefly press a switch fully down, and release to fully open a window.
- Press or pull a switch again to stop movement of the window.
Note: The windows operate for 5 minutes after the engine is switched off, as long as none of the doors are opened.
Rear windows have a short drop feature for passenger comfort. The first press of a switch lowers the window a short distance, to give a flow of air. A second press lowers the window to its full extent. If a resonance or booming sound occurs when a rear window is open, lowering an adjacent front window by approximately 1 inch (25 mm) eliminates the condition.
- Rear window isolator and child safety locks.
Vehicles with sliding panoramic roof

To prevent accidental damage, make sure any roof rack load does not interfere with the opening of the panoramic roof.
- Panoramic roof:
Note: The front and rear of the switch has a two-stage operation. Lightly press and hold to manually operate to the required position. Alternatively, press fully and release for one-touch operation. Press the switch again to halt the one-touch operation at any time.- With the panoramic roof closed,
press the rear of the switch to
partially or fully raise the roof to
the tilt position. Press the rear of
the switch again to partially or fully
open the roof.
Note: If the roof blind is closed, the panoramic roof switch also opens the roof blind while operating the panoramic roof.
- With the panoramic roof open, press the front of the switch to partially or fully close the panoramic roof.
- With the panoramic roof closed,
press the rear of the switch to
partially or fully raise the roof to
the tilt position. Press the rear of
the switch again to partially or fully
open the roof.
- Roof blind:
The roof blind can be opened whenever required, but it can only be closed when the panoramic roof is closed. If the panoramic roof is partially closed, the roof blind only partially closes to the same position.Note: The front and rear of the switch has a two-stage operation. Lightly press and hold to manually operate to the required position. Alternatively, press fully and release for one-touch operation. Press the switch again to halt the one-touch operation at any time.
- Press the rear of the switch to partially or fully open.
- Press the front of the switch to partially or fully close.
Vehicles with sliding canvas roof

The sliding canvas roof does not have an anti-trap facility. The canvas roof must be clear of obstruction to allow safe operation. If the canvas roof motion is blocked by body parts, there is a risk of serious injury or death.

The sliding canvas roof is not compatible with lateral cross-bars or roof rack equipment. Using unapproved roof mounted equipment could result in damage to the sliding canvas roof.

To prevent accidental damage, make sure any roof accessories do not interfere with the opening of the sliding canvas roof.
The sliding canvas roof requires a minimum of 71 in (180 mm) clearance between any roof accessories and the top of the roof.

Operation of the sliding canvas roof is not recommended in temperatures below 14˚F (-10˚C). Damage may occur if the canvas roof is operated below 14˚F (-10˚C).
- Press and hold the front of the switch
to fully close the sliding canvas roof.
Note: One-touch operation does not fully close the sliding canvas roof.
Note: Varying resonance noises can occur in the cabin when the sliding canvas roof is open, due to pressure fluctuation. To reduce or eliminate these noises, the sliding canvas roof can be closed slightly.
READ NEXT:
 Anti-trap protection
Windows
Before closing a window, make sure that
no occupants have any body part in a
position where it could be trapped.
Even with an anti-trap system, death or
serious injury could occur.
Closing
Roof blind
To operate the roof blind:
Press the rear of the roof blind switch to
the second position and release. The blind
fully opens. A further press stops
movement of the blind.
Alternatively, press the re
Storage compartments
STORAGE COMPARTMENTS
Make sure any items stored in the
vehicle are secure and cannot move. If
the vehicle is involved in an accident, or
is subject to sudden braking or a change
of direction, loose
SEE MORE:
MHEV Battery
REMOVAL AND INSTALLATION
GENERAL EQUIPMENT
REMOVAL
CAUTION:
Before disconnecting any components, make sure the area is clean and free from
foreign material. When
disconnected all openings must be sealed.
NOTE:
This procedure contains some variation in the illustrations depending
on the vehicle
Tailgate Wiring Harness
REMOVAL AND INSTALLATION
REMOVAL
NOTES:
This procedure contains some variation in the illustrations depending
on the vehicle specification, but the
essential information is always correct.
This procedure contains illustrations showing certain components
removed to provide extra clarity.
1.
