
Land Rover Defender: Single locking

Before exiting the vehicle, always select Park (P), switch off the ignition, apply the Electric Parking Brake (EPB), and remove any smart keys. Missing these steps may lead to serious injury or death.

No modifications or additions should be made to the security system. Such changes could cause the system to malfunction.
Before attempting to lock the vehicle, always make sure of the following:
- The ignition is switched off.
- All of the doors, the windows, the bonnet, and the taildoor are closed correctly.
Briefly press the lock button on the smart key to lock the vehicle and arm the perimetric alarm. The hazard warning lights flash to confirm.
Single locking secures the vehicle and prevents the doors from being opened from the outside. The doors may still be unlocked and opened from inside the vehicle.
Note: The single locking setting should be used in circumstances when pets remain in the vehicle, or if a window must be left open.
Once armed, the alarm activates if:
- The hood, taildoor, or a door is opened.
- The engine START/STOP button is pressed without a valid smart key present.
- The vehicle's battery is disconnected.
- An attempt is made to disconnect the battery back-up sounder.
Note: Always secure the vehicle when left unattended.
Note: In some markets, the full alarm system, including the alarm sensors, is armed when the vehicle is single locked.
The alarm sensors can be enabled and disabled, for one alarm cycle only, via the Vehicle menu in the touchscreen.
KEYLESS LOCKING
Note: The smart key may not be detected if it is inside a metal container, or is shielded by a device with a back-lit LCD screen. For example, a smartphone, laptop, including when inside a laptop bag, or a games console. Keep the smart key clear of such devices when attempting keyless entry, keyless locking, or push button starting. Loose coins, in the same pocket as the smart key, may also affect its detection.
Note: The vehicle does not lock automatically.
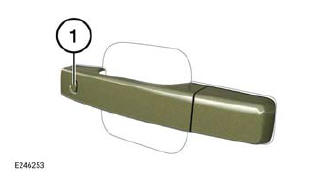
Using the door handle buttons to keyless lock:
1. Press the lock/unlock button (1) once to single lock the vehicle.
Note: Do not grip the door handle while pressing the button. Doing so prevents the vehicle from locking.
2. The hazard warning lights flash once to confirm the single locked status.
When using keyless locking, the vehicle does not lock if:
- Any door(s) is open.
- The hood is open.
- The taildoor is not fully closed.
- The vehicle's ignition is switched on.
If locking is unsuccessful the hazard warning lights do not flash, and the power-fold mirrors, if enabled, do not fold in. Make sure that the vehicle's ignition is switched off, and that all of the doors, the hood, and the taildoor are closed properly. Lock the vehicle again. If the mislock persists, consult a retailer/ authorized repairer.
LOCK CONFIRMATION
If uncertain about the vehicle's locked and armed status, press the lock button on the smart key.
The hazard warning lights flash once to indicate and confirm the current lock status. One short flash means that the vehicle is single locked and one long flash indicates that it is double locked.
MISLOCK
When locking the vehicle with the smart key, a mislock can occur if:
- One or more of the doors, the hood, or the taildoor are not fully closed.
- One or more of the doors have failed to lock.
- The vehicle's ignition is switched on.
If any of the above are present, the vehicle does not lock and an audible mislock error warning sounds. The hazard warning lights do not flash and the power-fold mirrors, if enabled, do not fold in. Check that all of the doors, the windows, the hood, and the taildoor are closed properly. Make sure the vehicle's ignition is switched off.
Lock the vehicle again. If the mislock persists, consult a retailer/authorized repairer.
Note: Operating the interior or exterior door handles while unlocking, locking, or changing the child lock status may cause the security system to ignore requests.
READ NEXT:
 Door locks and handles
Note: The rear door child safety locks
inhibit operation of the rear door lock and
unlock buttons and the interior door
handles.
Unlock button: Press to unlock all of
the doors and the taildoor.
L
Emergency locking
Note: Do not leave the emergency key
blade in the vehicle at any point during
the emergency locking procedure.
In the event of a fault with the alarm
and/or locking system, manually secure
the vehicle
SEE MORE:
Roof blind
To operate the roof blind:
Press the rear of the roof blind switch to
the second position and release. The blind
fully opens. A further press stops
movement of the blind.
Alternatively, press the rear of the roof
blind switch to the first position and hold
until the blind reaches the desired
posit
Front Stabilizer Bar Link
REMOVAL AND INSTALLATION
PART(S)
REMOVAL
NOTES:
This procedure contains some variation in the illustrations depending
on the vehicle specification, but the
essential information is always correct.
This procedure contains illustrations showing certain components
removed to provide extra clar
