
Land Rover Defender: On-road camera views

Make sure the relevant safety warnings and cautions have been read and understood before operating the camera features.
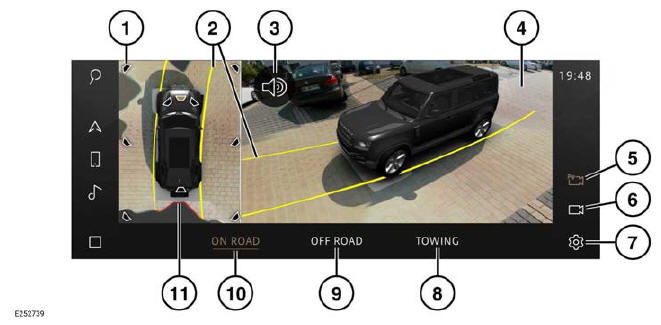
- Camera view icon: Touch to select an alternative camera view.
- Vehicle steering trajectory lines:
Displays the projected path, based on
the current steering wheel position.
Note: The trajectories representation varies between images. For vehicles in a multi-camera display, e.g., perspective camera view, the image represents the trajectory of the vehicle body. For vehicles in a single camera image e.g., front or rear camera view, the image represents the steering wheel trajectory.
- Volume icon: Touch to mute warning tones for the current parking aid maneuver.
- Main camera display.
- Camera icon: The icon displays when the automatic collision alerts are on.
- Camera icon: The icon displays when the automatic collision alerts are off.
- Settings icon: Touch to select the settings menu.
- TOWING: Touch to display the towing camera views.
- OFF ROAD: Touch to display off-road camera views.
- ON ROAD: Touch to display on-road camera views.
- Parking aid object detection threats.
The on-road camera system activates automatically when:
- Reverse (R) is selected.
- The vehicle starts to roll backwards.
- An automatic collision threat is detected by the parking aid system.
Note: The default setting for automatic collision alerts is on when the vehicle is maneuvering.
Note: If automatic collision alerts are disabled via the settings menu, the automatic camera views will no longer be displayed if a collision threat is detected.
When the camera system is active, the camera views may automatically switch, under the following circumstances:
- A rear camera view displays when Reverse (R) is selected.
- A rear camera view displays if the vehicle rolls backwards.
- A forward camera view displays when Drive (D) is selected.
To activate the on-road camera system manually:
1. From the home menu screen, touch the camera icon¹,².
2. Select ON ROAD.
Note: When manually activating the camera system, the default camera view display is dependant on the selected gear.
Note: The previously selected camera view is displayed, if the camera system has been re-enabled.
Depending on the user's requirement, alternative camera views can be manually selected. To select an alternative camera view, touch the camera view icons from the 360º vehicle plan view:
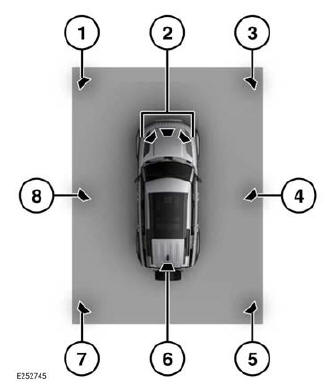
- Front left camera view icon: Touch to display a front left perspective camera view.
- Front toggle camera view icon: Touch to display a front camera view. Touch again to display a front junction camera view.
- Front right camera view icon: Touch to display a front right perspective camera view.
- Right camera view icon: Touch to display a right curb perspective camera view.
- Rear right camera view icon: Touch to display a rear right perspective camera view.
- Rear toggle camera view icon: Touch to display a rear camera view. Touch again to display a rear junction camera view.
- Rear left camera view icon: Touch to display a rear left perspective camera view.
- Left curb camera view icon: Touch to display a left curb perspective camera view icon.
The selected camera view icon becomes illuminated on the 360º vehicle plan view and image displays on the main display.
Alternatively, swipe the main camera screen left or right to display an alternative camera view, or touch the left and right arrows displayed.
 Camera icon with automatic
collision alerts.¹
Camera icon with automatic
collision alerts.¹
 Camera icon without automatic
collision alerts.²
Camera icon without automatic
collision alerts.²
READ NEXT:
 Off-road camera views
Make sure the relevant safety warnings
and cautions have been read and
understood before operating the
camera system.
To activate the off-road camera system:
1. From the home menu screen, touch
the c
4X4i overview
Do not operate the touchscreen while
the vehicle is moving. Doing so may
cause driver distraction, leading to a
loss of vehicle control. A loss of vehicle
control could cause vehicle damage,
serious
SEE MORE:
Fuel Fired Booster Heater
DESCRIPTION AND OPERATION
COMPONENT LOCATION
COMPONENT LOCATION - 1 OF 1
NOTE:
Vehicle with 5 doors is shown, vehicle with 3 doors is similar.
Touch Screen (FCDIM)
Fuel Fired Booster Heater (FFBH) system
Heating, ventilation, and air conditioning (HVAC) control module
FFBH fuel pump
FFBH rece
Second Row Seat Backrest Heater Element
REMOVAL AND INSTALLATION
REMOVAL
NOTE:
This procedure contains illustrations showing certain components
removed to provide extra clarity.
This procedure contains some variation in the illustrations depending
on the vehicle specification, but the
essential information is always correct.
This
