
Land Rover Defender: Interior lights
INTERIOR LIGHTS
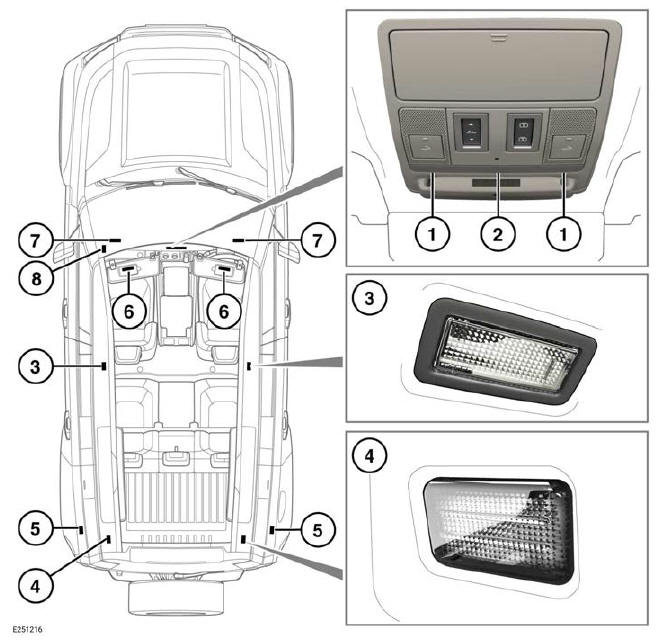
Note: 5 door car illustrated, 3 door vehicles are similar.
Interior lighting locations and operation:
- Front reading lights: Move a finger close to, or touch, the relevant lens to switch on or off.
- Front interior courtesy light: To switch on or off, touch the center of the lens briefly. To switch automatic illumination on or off, touch the lens until the light flashes. In auto mode, the lights illuminate when a door is opened.
- Second row reading lights: Press the lens to operate.
- Upper loadspace lights: Illuminate when the taildoor is opened.
- Lower loadspace lights: Illuminate when the taildoor is opened.
- Vanity mirror lights: Lift the cover to switch on.
- Front seat footwell lights: Automatically illuminate when the doors are opened.
- Glovebox light: Illuminates when the glovebox is opened.
INTERIOR LIGHTS INTENSITY
Use the interior illumination control to adjust the intensity of the instrument illumination. The exterior lights must be switched on while changes are being made.
AMBIENT INTERIOR LIGHTING
Note: Vehicles without configurable interior mood lighting illuminate the standard white light for the interior lights.
To adjust the configurable interior mood lighting for color and intensity, select the VEHICLE menu in the touchscreen. The exterior lights must be switched on while changes are being made.
STEALTH MODE
Stealth mode lowers the level of interior illumination to aid with night time driving.
Stealth mode can be enabled through the touchscreen's Screensaver menu.
Once enabled, stealth mode is activated by switching the touchscreen off, using the on and off button. If night time conditions exist when the touchscreen is switched off, interior switch illumination and instrument panel back-lighting automatically reduces to the minimum light levels. Stealth mode is deactivated if night time conditions no longer exist, or if the touchscreen is switched back on.
READ NEXT:
 Wiper operation
Do not operate the wipers on a dry
windshield as the wipers may cause
damage to its surface.
Remove any snow, ice, or frost from the
windshield, around the wiper arms and
blades, and the cowl area,
Rain sensor
Note: Static droplets may not be detected
when the vehicle is first started. A single
wipe should be used to clear the
windshield.
Note: If the wash/wipe control is in the
AUTO position, the wipers do
SEE MORE:
Front Left Halfshaft
REMOVAL AND INSTALLATION
SPECIAL TOOL(S)
204-506/1
Remover/Installer, Halfshaft
204-506/2
Remover/Installer, Halfshaft Spacer
204-506/3
Remover/Installer, Halfshaft Screw Thread
204-506/5
Retainers, Halfshaft tools
JLR-204-793A
Ball Joint Splitter
JLR-204-803
Splitter, Upper Arm
GENERAL EQUIPM
Roof Opening Panel Frame
REMOVAL AND INSTALLATION
SPECIAL TOOL(S)
JLR-501-176
Fiber-lined Glass Removal Tool Kit
REMOVAL
CAUTIONS:
Place the glass on felt covered supports. Do not stand on edge as
this can cause chips which
subsequently develop into cracks.
Protect the surrounding paintwork to avoid damage.
NOTES:
